December 3, 2025
Real-world Terraform Project Structure
I. Introduction.
Separating directories for different environments (Dev, Staging, Production) is a mandatory standard in real-world projects to ensure security and manageability.
The best approach is to use a modular model. We will refactor the previous EC2 creation code into a shared module (template), which the Dev and Prod environments will then call using different parameters.
II. Terraform Project Structure.
We will create a Terraform project with the following requirements:
-
Separate configurations for dev and prod environments.
-
Define shared variables for code reusability.
-
Store the State File in AWS S3.
Below is the new directory structure and the implementation steps:
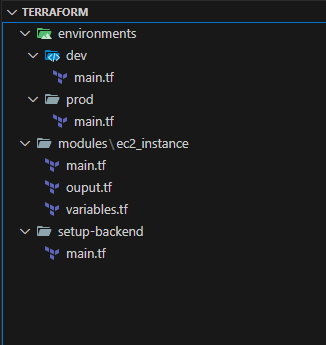
The function of each folder is as follows:
setup-backend: Configuration for the Terraform backend.
modules: Stores reusable code modules.
environments: Contains environment-specific configurations.
File: setup-backend\main.tf
The function of this code is to bootstrap the foundational infrastructure required for a Terraform Remote Backend. This allows the State file to be stored securely on the Cloud instead of a local machine, which is essential for team collaboration.
# Configure the AWS Provider and set the region where resources will be created.
provider "aws" {
  region = "us-east-1"
}

# Create an S3 bucket to store the 'terraform.tfstate' file.
resource "aws_s3_bucket" "terraform_state" {
  bucket = "terraform-state-project-9999"
  lifecycle {
    prevent_destroy = true
  }
}

# Enable versioning on the S3 bucket.
# This is crucial for state recovery. It allows you to revert to an older
# state file if the current one gets corrupted or accidentally overwritten.
resource "aws_s3_bucket_versioning" "enabled" {
  bucket = aws_s3_bucket.terraform_state.id
  versioning_configuration {
    status = "Enabled"
  }
}

# Create a DynamoDB table to handle state locking.
# This prevents race conditions (e.g., two developers running 'apply' simultaneously).
resource "aws_dynamodb_table" "terraform_locks" {
  name         = "terraform-locks"
  billing_mode = "PAY_PER_REQUEST"
  hash_key     = "LockID"

  attribute {
    name = "LockID"
    type = "S"
  }
}

# Output the name of the S3 bucket for easy reference later.
output "bucket_name" {
  value = aws_s3_bucket.terraform_state.bucket
}

# Output the name of the DynamoDB table for easy reference later.
output "dynamodb_table_name" {
  value = aws_dynamodb_table.terraform_locks.name
}
File: modules\ec2_instance\main.tf
This code snippet creates a basic Web Server infrastructure on AWS. It consists of two main components: a "Virtual Firewall" (Security Group) and a "Virtual Server" (EC2 Instance) protected by that firewall.
resource "aws_security_group" "sg" {
  name        = "${var.env_name}-sg"
  description = "Security Group for ${var.env_name}"

  ingress {
   ...
  }

  egress {
   ...
  }
}

resource "aws_instance" "app_server" {
  ami             = var.ami_id
  instance_type   = var.instance_type
  security_groups = [aws_security_group.sg.name]

  tags = {
    Name        = "${var.env_name}-Web-Server"
    Environment = var.env_name
  }
}
File: environments\dev\main.tf
This code represents a complete Terraform configuration (Root Module) for the Development environment. It orchestrates various infrastructure components: from state file storage (Backend) to resource instantiation (Module), and finally displaying the results.
# TERRAFORM CONFIGURATION
terraform {
  # Define the providers required by this configuration.
  required_providers {
    aws = {
      source  = "hashicorp/aws"
      version = "~> 5.0"
    }
  }
  # Configure Terraform to store the state file in an S3 bucket instead of locally.
  backend "s3" {
    bucket         = "terraform-state-project-9999"
    key            = "dev/terraform.tfstate"
    region         = "us-east-1"
    dynamodb_table = "terraform-locks"
    encrypt        = true
  }
}

# Configure the AWS Provider to deploy resources into the US East 1 region.
provider "aws" {
  region = "us-east-1"
}

# Instantiate the 'web_server' module using code defined in a local directory.
# This promotes code reusability and cleaner project structure.
module "web_server" {
  # The relative path to the module source code.
  source = "../../modules/ec2_instance"
  # Pass input variables to the module to customize its behavior.
  env_name      = "dev"
  instance_type = "t3.micro"
  ami_id        = "ami-0fa3fe0fa7920f68e"
}

# Retrieve the public IP address from the module's outputs and display it.
output "server_ip" {
  value = module.web_server.public_ip
}
File: environments\prod\main.tf
This code represents a complete Terraform configuration (Root Module) for the Production environment. It orchestrates various infrastructure components: from state file storage (Backend) to resource instantiation (Module), and finally displaying the results.
# TERRAFORM CONFIGURATION
terraform {
  # Define the providers required by this configuration.
  required_providers {
    aws = {
      source  = "hashicorp/aws"
      version = "~> 5.0"
    }
  }
  # Configure Terraform to store the state file in an S3 bucket instead of locally.
  backend "s3" {
    bucket         = "terraform-state-project-9999"
    key            = "prod/terraform.tfstate"
    region         = "us-east-1"
    dynamodb_table = "terraform-locks"
    encrypt        = true
  }
}
# Configure the AWS Provider to deploy resources into the US East 1 region.
provider "aws" {
  region = "us-east-1"
}

# Instantiate the 'web_server' module using code defined in a local directory.
# This promotes code reusability and cleaner project structure.
module "web_server" {
  # The relative path to the module source code.
  source = "../../modules/ec2_instance"
  # Pass input variables to the module to customize its behavior.
  env_name      = "prod"
  instance_type = "t3.micro"
  ami_id        = "ami-0fa3fe0fa7920f68e"
}
# Retrieve the public IP address from the module's outputs and display it.
output "server_ip" {
  value = module.web_server.public_ip
}
Full source code: https://github.com/ivc-phampbt/terraform-project
III. Run the project to provision resources on the AWS Cloud.
- Proceed to provision the Terraform backend resources.
taipham@Tais setup-backend % pwd
/Users/taipham/Desktop/projects/terraform/setup-backend
taipham@Tais setup-backend % terraform init
taipham@Tais setup-backend % terraform apply
- Initializing the Development Environment (Proceed similarly for Production)
taipham@Tais dev % pwd
/Users/taipham/Desktop/projects/terraform/environments/dev
taipham@Tais dev % terraform init
taipham@Tais dev % terraform apply
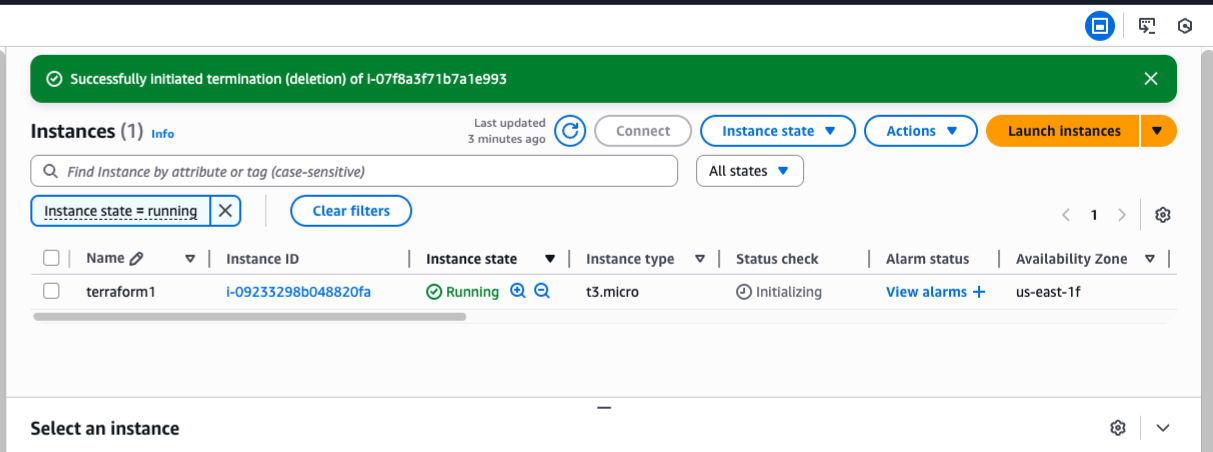
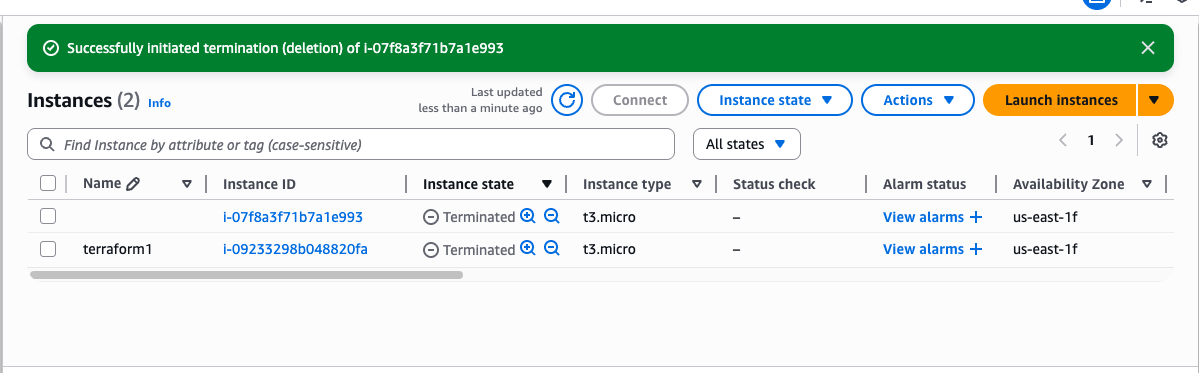
- Result on AWS: Two EC2 instances were created for the production and development environments
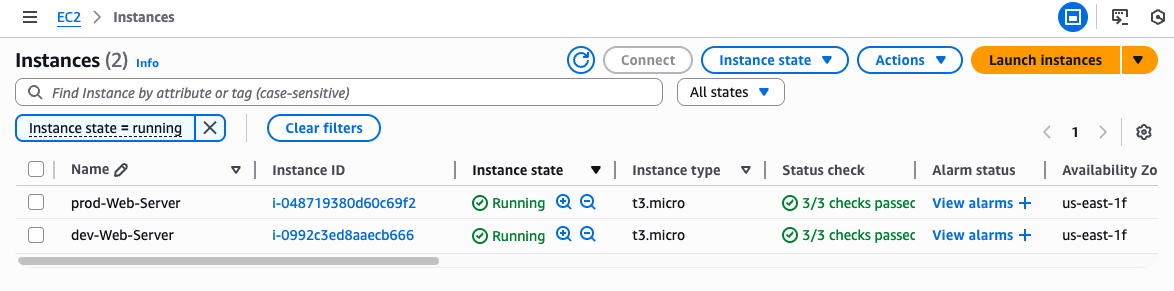
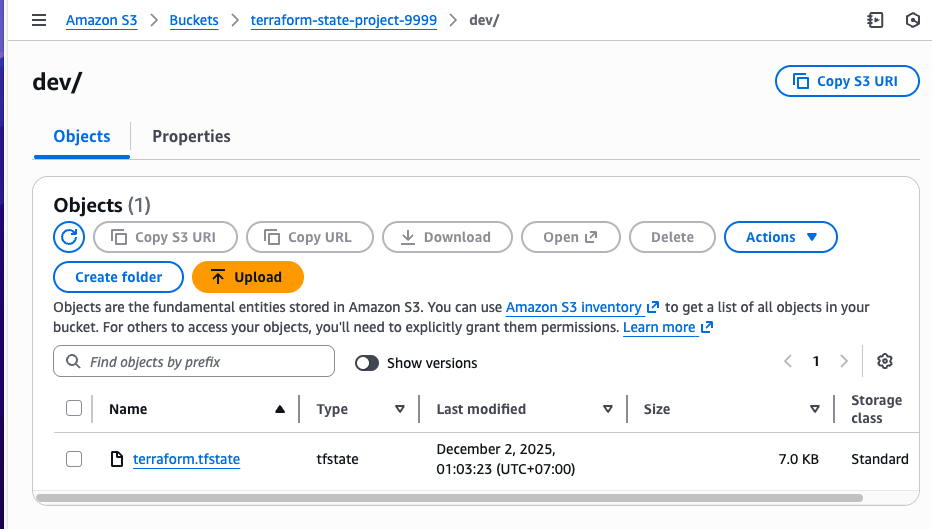
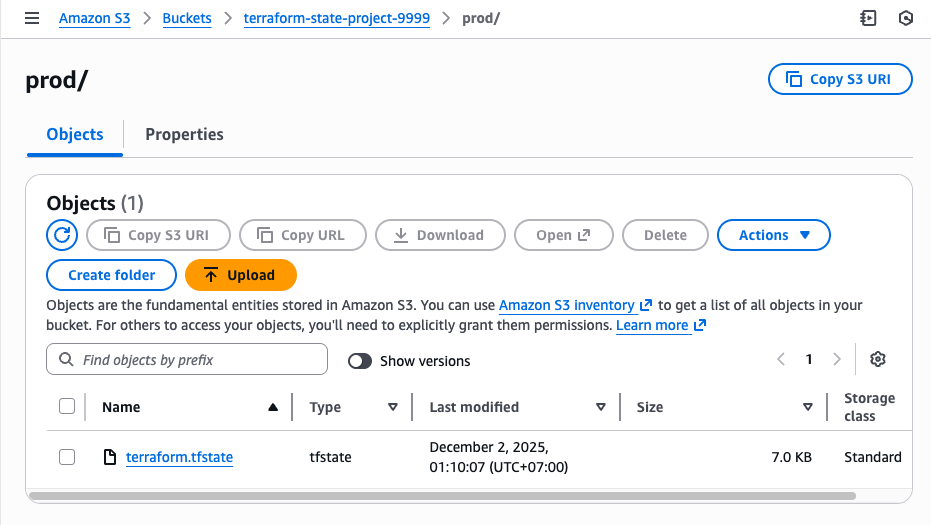
- Check the S3 bucket for the stored state file.
Development:
Production:
Conclusion
The project successfully transitioned to a professional IaC architecture by implementing the Module pattern and deploying a secure Remote Backend on AWS.
Key Achievements:
-
High Reusability: Infrastructure logic was encapsulated into Terraform Modules, ensuring consistency between Dev and Prod environments.
-
Safety & Collaboration: Implemented a Remote Backend using S3 (for state storage) and DynamoDB (for state locking), ensuring secure team collaboration.
-
Separation: The project structure clearly isolates Dev/Prod environments, confirming that each state file is independently managed and verified.
Whether you need scalable software solutions, expert IT outsourcing, or a long-term development partner, ISB Vietnam is here to deliver. Let’s build something great together—reach out to us today. Or click here to explore more ISB Vietnam's case studies.
[References]
https://developer.hashicorp.com/terraform
https://www.sudeepa.com/?p=382 [Image link]