June 27, 2026
Build a Simple AI Object Detection with Qt
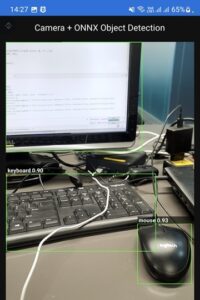
If you want a practical “Qt + AI” demo that actually feels like a real app, object detection on Android is a great starting point: open the phone camera, run a small neural network (ONNX), and draw bounding boxes on top of the preview.
This tutorial shows a minimal but solid pipeline for Qt 6.8+ on Android using:
- Qt Quick + Qt Multimedia for camera capture
- C++ worker thread for inference (so UI stays smooth)
- OpenCV DNN to run an ONNX model (YOLO-style)
- A QML UI to display the annotated frames
You’ll end up with a working app that prints detection lines (label, confidence, box) and shows boxes on the video.
What you’ll build
Data flow
- Android Camera → QMediaCaptureSession + QVideoSink → QVideoFrame → QImage
- QImage → OpenCV (cv::Mat) → net.forward() → detections
- Draw boxes → annotated QImage
- QML shows image://annotated/frame?... (updates every frame)
Why this approach is good on Android
- Qt Multimedia handles camera access reliably (and supports modern devices)
- Inference runs in a separate thread
- No heavy “engine” architecture—easy to integrate into your real project later
Prerequisites (Android-focused)
Required
- Qt 6.8 or newer with Android kits installed (Qt Creator recommended)
- Android SDK + NDK configured in Qt Creator with Android Qt 6.8.3 Clang arm64_v8a kit
- OpenCV 4.x built/available for Android (with DNN enabled) (download here: https://github.com/opencv/opencv/releases/download/4.12.0/opencv-4.12.0-android-sdk.zip)
- An ONNX object detection model (YOLO-style). Recommended for mobile: yolo11n for 320x320 image size (https://huggingface.co/giangndm/yolo11-onnx/resolve/main/yolo11n_320.onnx?download=true).
Project structure
QtAIDetectAndroid/
CMakeLists.txt
main.cpp
android/AndroidManifest.xml
qml/Main.qml
FrameGrabber.h/.cpp
DetectorWorker.h/.cpp
AnnotatedImageProvider.h/.cpp
third_party/ OpenCV-android-sdk #Extract downloaded OpenCV for Android here
assests/model.onnx assests/labels.txt #(contains model + labels)
Step 1 — Android permissions (Manifest + runtime)
1) Add camera permission to android/AndroidManifest.xml
In Qt Creator: Projects → Build → Build Steps → Build Android APK → “Android package source directory” point it to your android/ folder.
Minimal manifest additions:
<manifest ...>
<uses-permission android:name="android.permission.CAMERA" />
<uses-feature
android:name="android.hardware.camera.any"
android:required="false" />
...
</manifest>
2) Request runtime permission in Qt (important)
Android requires runtime permission on modern versions. Qt provides a clean API.
In main.cpp, before starting the camera, request QCameraPermission. (Code is included later in the tutorial.)
Step 2— CMake for Qt 6.8 + QML + OpenCV
CMakeLists.txt (core idea):
Click here for detail...
cmake_minimum_required(VERSION 3.21)set(APP_TARGET "QtAIDetectAndroid")
set(QML_URI "QtAIDetectAndroid")
project(${APP_TARGET} LANGUAGES CXX)
set(CMAKE_CXX_STANDARD 17)
set(CMAKE_CXX_STANDARD_REQUIRED ON)
find_package(Qt6 6.8 REQUIRED COMPONENTS Quick Multimedia)
qt_standard_project_setup()
# ---- OpenCV Android SDK ----
if(ANDROID)
set(OPENCV_ANDROID_SDK "${CMAKE_CURRENT_LIST_DIR}/third_party/Opencv-android-sdk")
set(OpenCV_DIR "${OPENCV_ANDROID_SDK}/sdk/native/jni")
endif()
find_package(OpenCV REQUIRED)
# ---- App ----
qt_add_executable(${APP_TARGET}
MANUAL_FINALIZATION
main.cpp
)
qt_add_qml_module(${APP_TARGET}
URI ${QML_URI}
VERSION 1.0
QML_FILES
qml/Main.qml
RESOURCES
NO_RESOURCE_TARGET_PATH
SOURCES
FrameGrabber.h FrameGrabber.cpp
DetectorWorker.h DetectorWorker.cpp
AnnotatedImageProvider.h AnnotatedImageProvider.cpp
android/AndroidManifest.xml
)
# Embed model + labels into Qt resources at ":/assets/..."
qt_add_resources(${APP_TARGET} app_assets
PREFIX "/assets"
BASE "assets"
FILES
assets/model.onnx
assets/labels.txt
)
target_link_libraries(${APP_TARGET}
PRIVATE Qt6::Quick Qt6::Multimedia
PRIVATE ${OpenCV_LIBS}
)
target_include_directories(${APP_TARGET}
PRIVATE ${OpenCV_INCLUDE_DIRS}
)
if(ANDROID)
set_property(TARGET ${APP_TARGET} PROPERTY
QT_ANDROID_PACKAGE_SOURCE_DIR "${CMAKE_CURRENT_LIST_DIR}/android"
)
set(_opencv_so "${OPENCV_ANDROID_SDK}/sdk/native/libs/${ANDROID_ABI}/libopencv_java4.so")
if(NOT EXISTS "${_opencv_so}")
set(_opencv_so "${OPENCV_ANDROID_SDK}/sdk/native/libs/${ANDROID_ABI}/libopencv_java3.so")
endif()
if(NOT EXISTS "${_opencv_so}")
message(FATAL_ERROR "OpenCV .so not found for ABI='${ANDROID_ABI}'")
endif()
set_property(TARGET ${APP_TARGET} APPEND PROPERTY
QT_ANDROID_EXTRA_LIBS "${_opencv_so}"
)
target_link_libraries(${APP_TARGET} PRIVATE log)
endif()
if(ANDROID)
set_target_properties(${APP_TARGET} PROPERTIES
QT_ANDROID_PACKAGE_SOURCE_DIR "${CMAKE_CURRENT_SOURCE_DIR}/android"
QT_ANDROID_PACKAGE_NAME "org.qtproject.QtAIDetectAndroid"
QT_ANDROID_APP_NAME ${APP_TARGET}
QT_ANDROID_TARGET_SDK_VERSION 31
QT_ANDROID_MIN_SDK_VERSION 31
QT_ANDROID_VERSION_NAME "1.0")
qt_finalize_executable(${APP_TARGET})
endif()
install(TARGETS ${APP_TARGET}
BUNDLE DESTINATION .
LIBRARY DESTINATION ${CMAKE_INSTALL_LIBDIR}
RUNTIME DESTINATION ${CMAKE_INSTALL_BINDIR}
)
qt_generate_deploy_qml_app_script(
TARGET ${APP_TARGET}
OUTPUT_SCRIPT deploy_script
MACOS_BUNDLE_POST_BUILD
NO_UNSUPPORTED_PLATFORM_ERROR
DEPLOY_USER_QML_MODULES_ON_UNSUPPORTED_PLATFORM
)
install(SCRIPT ${deploy_script})
OpenCV on Android: find_package(OpenCV REQUIRED) works if your OpenCV Android build is correctly provided to CMake (commonly via OpenCV_DIR). In Qt Creator you can set CMake cache variables (e.g., -DOpenCV_DIR=...).
Step 3 — Frame grabbing with QVideoSink
FrameGrabber.h
Click here for detail...
#pragma once
#include <QObject>
#include <QVideoSink>
#include <QImage>
class FrameGrabber : public QObject {
Q_OBJECT
Q_PROPERTY(int frameCounter READ frameCounter NOTIFY frameCounterChanged)
public:
explicit FrameGrabber(QObject *parent = nullptr);
QVideoSink* videoSink() { return &m_sink; }
int frameCounter() const { return m_frameCounter; }
signals:
void frameReady(const QImage &img);
void frameCounterChanged();
public slots:
void onAnnotatedFrameReady(const QImage &img);
private slots:
void onVideoFrameChanged(const QVideoFrame &frame);
private:
QVideoSink m_sink;
int m_frameCounter = 0;
// Simple throttle (optional): process only every Nth frame
int m_skip = 1; // set to 2 or 3 on slower phones
int m_count = 0;
};
FrameGrabber.cpp
Click here for detail...
#include "FrameGrabber.h"
#include <QVideoFrame>
FrameGrabber::FrameGrabber(QObject *parent) : QObject(parent) {
connect(&m_sink, &QVideoSink::videoFrameChanged,
this, &FrameGrabber::onVideoFrameChanged);
}
void FrameGrabber::onVideoFrameChanged(const QVideoFrame &frame) {
if (!frame.isValid())
return;
if (++m_count % m_skip != 0)
return;
QImage img = frame.toImage();
if (img.isNull())
return;
emit frameReady(img);
}
void FrameGrabber::onAnnotatedFrameReady(const QImage &) {
++m_frameCounter;
emit frameCounterChanged();
}
Step 4 — Object detection worker (OpenCV DNN + ONNX)
This worker:
- converts QImage → cv::Mat
- runs model
- applies threshold + NMS
- draws boxes and emits annotated image
DetectorWorker.h
Click here for detail...
#pragma once
#include <QObject>
#include <QImage>
#include <QMutex>
#include <QStringList>
#include <QVector>
#include <QRectF>
#include <opencv2/dnn.hpp>
class DetectorWorker : public QObject
{
Q_OBJECT
public:
explicit DetectorWorker(QObject *parent = nullptr);
public slots:
void loadModel(const QString &onnxPath);
// Optional configuration
void loadLabels(const QString &labelsPath); // supports ":/..." and "qrc:/..."
void setInputSize(int w, int h); // e.g. 320,320
void setUseLetterbox(bool enabled); // recommended for YOLO exports
void setThresholds(float confThres, float nmsThres); // tune
// Call for every camera frame. Internally runs one inference at a time
// and keeps only the latest pending frame (latest-frame-wins).
void processFrame(const QImage &img);
signals:
void annotatedFrameReady(const QImage &img);
void detectionsTextReady(const QStringList &lines);
private slots:
void doWork(); // runs in worker thread
private:
struct Det {
QRectF box;
int classId;
float score;
};
struct LetterboxInfo {
float r = 1.0f; // scale
int dw = 0; // padding left
int dh = 0; // padding top
};
static cv::Mat qimageToBgrMat(const QImage &img);
cv::Mat letterbox(const cv::Mat &srcBgr, LetterboxInfo &info) const;
QVector<Det> runYoloFromOutput(const cv::Mat &outRaw, int imgW, int imgH, const LetterboxInfo &lb);
QImage drawDetections(const QImage &src, const QVector<Det> &dets);
private:
cv::dnn::Net m_net;
bool m_ready = false;
// Model / postprocess settings
int m_inW = 320;
int m_inH = 320;
bool m_useLetterbox = true;
float m_confThres = 0.20f; // lower default for 320
float m_nmsThres = 0.45f;
QStringList m_labels;
// Backpressure state
bool m_busy = false;
QImage m_current;
QImage m_pending;
QMutex m_mutex;
};
DetectorWorker.cpp
Click here for detail...
#include "DetectorWorker.h"
#include <QDebug>
#include <QFile>
#include <QPainter>
#include <QMetaObject>
#include <opencv2/imgproc.hpp>
#include <opencv2/core.hpp>
static QString normalizeQrc(const QString &path)
{
// QML often uses qrc:/..., QFile uses :/...
if (path.startsWith("qrc:/"))
return ":" + path.mid(3); // "qrc:/x" -> ":/x"
return path;
}
static inline float sigmoidf(float x)
{
if (x >= 0.0f) {
const float z = std::exp(-x);
return 1.0f / (1.0f + z);
} else {
const float z = std::exp(x);
return z / (1.0f + z);
}
}
static inline float scoreToProb(float s)
{
// If the model outputs logits (<0 or >1), convert via sigmoid.
if (s < 0.0f || s > 1.0f)
return sigmoidf(s);
return s;
}
cv::Mat DetectorWorker::qimageToBgrMat(const QImage &img)
{
QImage tmp = img.convertToFormat(QImage::Format_RGBA8888);
cv::Mat rgba(tmp.height(), tmp.width(), CV_8UC4,
const_cast<uchar*>(tmp.bits()),
tmp.bytesPerLine());
cv::Mat bgr;
cv::cvtColor(rgba, bgr, cv::COLOR_RGBA2BGR); // allocates bgr
return bgr;
}
DetectorWorker::DetectorWorker(QObject *parent) : QObject(parent) {}
void DetectorWorker::setInputSize(int w, int h)
{
if (w > 0) m_inW = w;
if (h > 0) m_inH = h;
}
void DetectorWorker::setUseLetterbox(bool enabled)
{
m_useLetterbox = enabled;
}
void DetectorWorker::setThresholds(float confThres, float nmsThres)
{
m_confThres = confThres;
m_nmsThres = nmsThres;
}
void DetectorWorker::loadLabels(const QString &labelsPath)
{
const QString p = normalizeQrc(labelsPath);
QFile f(p);
if (!f.open(QIODevice::ReadOnly | QIODevice::Text)) {
qWarning() << "Failed to open labels file:" << labelsPath << f.errorString();
return;
}
QStringList labels;
while (!f.atEnd()) {
const QString line = QString::fromUtf8(f.readLine()).trimmed();
if (!line.isEmpty())
labels << line;
}
f.close();
m_labels = labels;
qDebug() << "Loaded labels:" << m_labels.size() << "from" << labelsPath;
}
void DetectorWorker::loadModel(const QString &onnxPath)
{
m_ready = false;
try {
m_net = cv::dnn::readNetFromONNX(onnxPath.toStdString());
m_net.setPreferableBackend(cv::dnn::DNN_BACKEND_OPENCV);
m_net.setPreferableTarget(cv::dnn::DNN_TARGET_CPU);
m_ready = true;
qDebug() << "Model loaded:" << onnxPath;
} catch (const cv::Exception &e) {
qWarning() << "Model load failed:" << e.what();
m_ready = false;
}
}
cv::Mat DetectorWorker::letterbox(const cv::Mat &srcBgr, LetterboxInfo &info) const
{
const int srcW = srcBgr.cols;
const int srcH = srcBgr.rows;
const float r = std::min((float)m_inW / (float)srcW, (float)m_inH / (float)srcH);
const int newW = (int)std::round(srcW * r);
const int newH = (int)std::round(srcH * r);
const int dw = (m_inW - newW) / 2;
const int dh = (m_inH - newH) / 2;
info.r = r;
info.dw = dw;
info.dh = dh;
cv::Mat resized;
cv::resize(srcBgr, resized, cv::Size(newW, newH), 0, 0, cv::INTER_LINEAR);
cv::Mat out(m_inH, m_inW, CV_8UC3, cv::Scalar(114, 114, 114));
resized.copyTo(out(cv::Rect(dw, dh, newW, newH)));
return out;
}
void DetectorWorker::processFrame(const QImage &img)
{
if (!m_ready || img.isNull())
return;
bool shouldStart = false;
{
QMutexLocker lock(&m_mutex);
if (!m_busy) {
m_busy = true;
m_current = img; // implicit-share
shouldStart = true;
} else {
// Overwrite pending with newest
m_pending = img;
}
}
if (shouldStart) {
// Run in worker thread event loop; yields between frames
QMetaObject::invokeMethod(this, &DetectorWorker::doWork, Qt::QueuedConnection);
}
}
void DetectorWorker::doWork()
{
QImage img;
{
QMutexLocker lock(&m_mutex);
img = m_current;
}
if (!m_ready || img.isNull()) {
QMutexLocker lock(&m_mutex);
m_busy = false;
return;
}
// Convert & preprocess
const cv::Mat bgrSrc = qimageToBgrMat(img);
LetterboxInfo lb;
cv::Mat bgrInput;
if (m_useLetterbox) {
bgrInput = letterbox(bgrSrc, lb);
} else {
lb = LetterboxInfo{};
cv::resize(bgrSrc, bgrInput, cv::Size(m_inW, m_inH));
}
// Blob: swapRB=true => BGR->RGB
cv::Mat blob = cv::dnn::blobFromImage(
bgrInput, 1.0/255.0, cv::Size(m_inW, m_inH),
cv::Scalar(), true, false
);
m_net.setInput(blob);
std::vector<cv::Mat> outs;
try {
m_net.forward(outs, m_net.getUnconnectedOutLayersNames());
} catch (...) {
outs.clear();
outs.push_back(m_net.forward());
}
QVector<Det> dets;
if (!outs.empty())
dets = runYoloFromOutput(outs[0], img.width(), img.height(), lb);
// Emit text
QStringList lines;
lines.reserve(dets.size());
for (const auto &d : dets) {
const QString label =
(d.classId >= 0 && d.classId < m_labels.size()) ? m_labels[d.classId] : QString("class_%1").arg(d.classId);
lines << QString("%1 score=%2 box=[%3,%4,%5,%6]")
.arg(label)
.arg(d.score, 0, 'f', 2)
.arg(d.box.x(), 0, 'f', 0)
.arg(d.box.y(), 0, 'f', 0)
.arg(d.box.width(), 0, 'f', 0)
.arg(d.box.height(), 0, 'f', 0);
}
emit detectionsTextReady(lines);
emit annotatedFrameReady(drawDetections(img, dets));
// Schedule next if pending exists
bool hasNext = false;
{
QMutexLocker lock(&m_mutex);
if (!m_pending.isNull()) {
m_current = m_pending;
m_pending = QImage();
hasNext = true;
} else {
m_busy = false;
}
}
if (hasNext) {
QMetaObject::invokeMethod(this, &DetectorWorker::doWork, Qt::QueuedConnection);
}
}
QVector<DetectorWorker::Det> DetectorWorker::runYoloFromOutput(const cv::Mat &outRaw, int imgW, int imgH, const LetterboxInfo &lb)
{
// Ensure float32 for safe reading
cv::Mat out;
if (outRaw.depth() != CV_32F)
outRaw.convertTo(out, CV_32F);
else
out = outRaw;
// Debug shape (prints a few times)
static int dbg = 0;
if (dbg < 5) {
dbg++;
QString shape = "dims=" + QString::number(out.dims);
for (int i = 0; i < out.dims; ++i)
shape += " " + QString::number(out.size[i]);
qDebug() << "ONNX output:" << shape << "type=" << out.type();
cv::Mat flat = out.reshape(1, 1);
double mn=0, mx=0;
cv::minMaxLoc(flat, &mn, &mx);
qDebug() << "output min/max:" << mn << mx;
}
QVector<Det> candidates;
auto clamp01orPixels = [&](float &x, float &y, float &w, float &h, int refW, int refH) {
if (x <= 1.5f && y <= 1.5f && w <= 1.5f && h <= 1.5f) {
x *= (float)refW;
y *= (float)refH;
w *= (float)refW;
h *= (float)refH;
}
};
auto mapXYXYFromInputToImage = [&](float &x1, float &y1, float &x2, float &y2) {
if (m_useLetterbox) {
x1 = (x1 - (float)lb.dw) / lb.r;
y1 = (y1 - (float)lb.dh) / lb.r;
x2 = (x2 - (float)lb.dw) / lb.r;
y2 = (y2 - (float)lb.dh) / lb.r;
} else {
x1 = x1 * imgW / (float)m_inW;
x2 = x2 * imgW / (float)m_inW;
y1 = y1 * imgH / (float)m_inH;
y2 = y2 * imgH / (float)m_inH;
}
x1 = std::max(0.0f, std::min(x1, (float)imgW - 1.0f));
y1 = std::max(0.0f, std::min(y1, (float)imgH - 1.0f));
x2 = std::max(0.0f, std::min(x2, (float)imgW - 1.0f));
y2 = std::max(0.0f, std::min(y2, (float)imgH - 1.0f));
};
auto addCandidateXYWH = [&](float cx, float cy, float w, float h, float score, int cls) {
if (score < m_confThres)
return;
clamp01orPixels(cx, cy, w, h, m_inW, m_inH);
float x1 = cx - w * 0.5f;
float y1 = cy - h * 0.5f;
float x2 = cx + w * 0.5f;
float y2 = cy + h * 0.5f;
mapXYXYFromInputToImage(x1, y1, x2, y2);
const float ww = std::max(0.0f, x2 - x1);
const float hh = std::max(0.0f, y2 - y1);
if (ww <= 1.0f || hh <= 1.0f)
return;
candidates.push_back({ QRectF(x1, y1, ww, hh), cls, score });
};
// Your model prints: dims=3 1 84 2100 -> treat as [1, C, N] with C=84 (4 + 80)
if (out.dims == 3 && out.size[0] == 1 && out.size[1] >= 6 && out.size[2] > 100) {
const int C = out.size[1];
const int N = out.size[2];
const float *p = (const float*)out.data;
const int labelCount = m_labels.size();
const int clsStart = 4;
const int clsEnd = (labelCount > 0) ? std::min(C, clsStart + labelCount) : C;
// Print best-score range once to help tuning threshold
static bool printedMax = false;
float globalMax = 0.f;
int globalIdx = -1;
for (int i = 0; i < N; ++i) {
float cx = p[0*N + i];
float cy = p[1*N + i];
float w = p[2*N + i];
float h = p[3*N + i];
int bestCls = -1;
float bestScore = 0.f;
for (int c = clsStart; c < clsEnd; ++c) {
float s = scoreToProb(p[c*N + i]);
if (s > bestScore) { bestScore = s; bestCls = c - clsStart; }
}
if (!printedMax && bestScore > globalMax) {
globalMax = bestScore;
globalIdx = bestCls;
}
addCandidateXYWH(cx, cy, w, h, bestScore, bestCls);
}
if (!printedMax) {
printedMax = true;
qDebug() << "Max class score seen (first frame):" << globalMax
<< "classIndex=" << globalIdx
<< "(try confThres ~0.15-0.30)";
}
}
// Fallback: [1, N, 5+classes]
else if (out.dims == 3 && out.size[0] == 1 && out.size[2] >= 6) {
const int N = out.size[1];
const int C = out.size[2];
const float *p = (const float*)out.data;
const int labelCount = m_labels.size();
const int clsStart = 5;
const int clsEnd = (labelCount > 0) ? std::min(C, clsStart + labelCount) : C;
for (int i = 0; i < N; ++i) {
float cx = p[i*C + 0], cy = p[i*C + 1], w = p[i*C + 2], h = p[i*C + 3];
float obj = scoreToProb(p[i*C + 4]);
int bestCls = -1;
float bestClsScore = 0.f;
for (int c = clsStart; c < clsEnd; ++c) {
float s = scoreToProb(p[i*C + c]);
if (s > bestClsScore) { bestClsScore = s; bestCls = c - clsStart; }
}
addCandidateXYWH(cx, cy, w, h, obj * bestClsScore, bestCls);
}
}
else {
qWarning() << "Unsupported output shape. dims=" << out.dims;
return {};
}
// NMS
std::vector<cv::Rect> boxes;
std::vector<float> scores;
boxes.reserve((size_t)candidates.size());
scores.reserve((size_t)candidates.size());
for (const auto &d : candidates) {
boxes.emplace_back((int)d.box.x(), (int)d.box.y(),
(int)d.box.width(), (int)d.box.height());
scores.push_back(d.score);
}
std::vector<int> keep;
cv::dnn::NMSBoxes(boxes, scores, m_confThres, m_nmsThres, keep);
QVector<Det> finalDets;
finalDets.reserve((int)keep.size());
for (int idx : keep)
finalDets.push_back(candidates[idx]);
return finalDets;
}
QImage DetectorWorker::drawDetections(const QImage &src, const QVector<Det> &dets)
{
QImage outImg = src.convertToFormat(QImage::Format_RGBA8888);
QPainter p(&outImg);
p.setRenderHint(QPainter::Antialiasing, true);
QPen pen(Qt::green);
pen.setWidth(3);
p.setPen(pen);
QFont f = p.font();
f.setPointSize(32);
f.setBold(true);
p.setFont(f);
for (const auto &d : dets) {
const QString label =
(d.classId >= 0 && d.classId < m_labels.size()) ? m_labels[d.classId] : QString("class_%1").arg(d.classId);
p.drawRect(d.box);
const QString text = QString("%1 %2").arg(label).arg(d.score, 0, 'f', 2);
QRectF tr(d.box.x(), d.box.y() - 42, 320, 42);
p.fillRect(tr, QColor(0, 0, 0, 160));
p.setPen(Qt::white);
p.drawText(tr.adjusted(6, 0, 0, 0), text);
p.setPen(pen);
}
return outImg;
}
Step 5 — QML image provider (to show annotated frames)
Same concept as before (thread-safe setImage() + requestImage()), so as short:
- setImage(QImage) stores the latest annotated image (mutex protected)
- QML pulls image://annotated/frame?ts=<counter> to refresh
AnnotatedImageProvider.h
Click here for detail...
#pragma once
#include <QQuickImageProvider>
#include <QImage>
#include <QMutex>
class AnnotatedImageProvider : public QQuickImageProvider
{
public:
AnnotatedImageProvider();
// Called from your detector/worker when a new annotated frame is ready
void setImage(const QImage &img);
QImage requestImage(const QString &id, QSize *size, const QSize &requestedSize) override;
private:
QImage m_img;
QMutex m_mutex;
};
AnnotatedImageProvider.cpp
Click here for detail...
#include "AnnotatedImageProvider.h"
#include <QPainter>
AnnotatedImageProvider::AnnotatedImageProvider()
: QQuickImageProvider(QQuickImageProvider::Image)
{
}
void AnnotatedImageProvider::setImage(const QImage &img)
{
QMutexLocker lock(&m_mutex);
m_img = img;
}
QImage AnnotatedImageProvider::requestImage(const QString &id, QSize *size, const QSize &requestedSize)
{
// IMPORTANT: id may include query string, e.g. "frame?ts=123"
QString baseId = id;
const int q = baseId.indexOf('?');
if (q >= 0)
baseId.truncate(q);
QImage out;
{
QMutexLocker lock(&m_mutex);
out = m_img;
}
// If no image yet, return a placeholder instead of failing
if (out.isNull()) {
const int w = requestedSize.width() > 0 ? requestedSize.width() : 640;
const int h = requestedSize.height() > 0 ? requestedSize.height() : 480;
out = QImage(w, h, QImage::Format_RGBA8888);
out.fill(QColor(20, 20, 20));
QPainter p(&out);
p.setPen(Qt::white);
p.drawText(out.rect(), Qt::AlignCenter, "Waiting for frames...");
}
if (size)
*size = out.size();
// If you ever want to support multiple ids, check baseId here:
// if (baseId != "frame") { ... }
return out;
}
Step 6 — main.cpp (Android runtime permission + camera setup)
This is the Android-specific part that matters: request permission, then start camera.
Click here for detail...
#include <QGuiApplication>
#include <QQmlApplicationEngine>
#include <QQmlContext>
#include <QCoreApplication>
#include <QDebug>
#include <QFile>
#include <QDir>
#include <QStandardPaths>
#include <QThread>
#include <QPermission>
#include <QCamera>
#include <QCameraDevice>
#include <QMediaCaptureSession>
#include <QMediaDevices>
#include "FrameGrabber.h"
#include "DetectorWorker.h"
#include "AnnotatedImageProvider.h"
extern int qInitResources_app_assets();
extern int qCleanupResources_app_assets();
static QString extractResourceToFile(const QString &qrcPath, const QString &targetName)
{
QString dir = QStandardPaths::writableLocation(QStandardPaths::CacheLocation);
if (dir.isEmpty())
dir = QStandardPaths::writableLocation(QStandardPaths::AppDataLocation);
if (dir.isEmpty()) {
qCritical() << "No writable location for extracted assets.";
return {};
}
QDir().mkpath(dir);
const QString outPath = QDir(dir).filePath(targetName);
QFile in(qrcPath);
if (!in.exists()) {
qCritical() << "Resource does not exist:" << qrcPath;
return {};
}
if (!in.open(QIODevice::ReadOnly)) {
qCritical() << "Failed to open resource:" << qrcPath << in.errorString();
return {};
}
QFile out(outPath);
if (!out.open(QIODevice::WriteOnly | QIODevice::Truncate)) {
qCritical() << "Failed to open output:" << outPath << out.errorString();
return {};
}
const QByteArray data = in.readAll();
out.write(data);
out.close();
in.close();
qDebug() << "Extracted" << qrcPath << "->" << outPath << "bytes=" << data.size();
return outPath;
}
int main(int argc, char *argv[])
{
QGuiApplication app(argc, argv);
qInitResources_app_assets();
QQmlApplicationEngine engine;
auto *provider = new AnnotatedImageProvider();
engine.addImageProvider("annotated", provider);
FrameGrabber grabber;
engine.rootContext()->setContextProperty("frameGrabber", &grabber);
// Worker thread
QThread workerThread;
auto *worker = new DetectorWorker();
worker->moveToThread(&workerThread);
QObject::connect(&app, &QCoreApplication::aboutToQuit, [&](){
if (workerThread.isRunning()) {
QMetaObject::invokeMethod(worker, &QObject::deleteLater, Qt::QueuedConnection);
workerThread.quit();
workerThread.wait();
} else {
delete worker;
}
qCleanupResources_app_assets();
});
// Pipeline
QObject::connect(&grabber, &FrameGrabber::frameReady,
worker, &DetectorWorker::processFrame,
Qt::QueuedConnection);
QObject::connect(worker, &DetectorWorker::annotatedFrameReady,
&app, [provider](const QImage &img) {
provider->setImage(img);
},
Qt::QueuedConnection);
QObject::connect(worker, &DetectorWorker::annotatedFrameReady,
&grabber, &FrameGrabber::onAnnotatedFrameReady,
Qt::QueuedConnection);
// Print detections to logcat
QObject::connect(worker, &DetectorWorker::detectionsTextReady,
&app, [](const QStringList &lines){
if (lines.isEmpty())
return;
qDebug().noquote() << "Detections:\n - " + lines.join("\n - ");
},
Qt::QueuedConnection);
// Camera
QMediaCaptureSession session;
const QCameraDevice camDev = QMediaDevices::defaultVideoInput();
if (camDev.isNull())
qWarning() << "No default video input device found.";
QCamera camera(camDev);
session.setCamera(&camera);
session.setVideoSink(grabber.videoSink());
const QUrl url(QStringLiteral("qrc:/qml/Main.qml"));
QObject::connect(&engine, &QQmlApplicationEngine::objectCreated,
&app, [&](QObject *obj, const QUrl &objUrl){
if (!obj && objUrl == url) {
qCritical() << "QML root object creation failed. Exiting.";
QCoreApplication::exit(-1);
return;
}
if (!obj)
return;
const QString modelPath = extractResourceToFile(":/assets/model.onnx", "model.onnx");
if (modelPath.isEmpty()) {
qCritical() << "Model extraction failed. Exiting.";
QCoreApplication::exit(-1);
return;
}
if (!workerThread.isRunning())
workerThread.start();
QMetaObject::invokeMethod(worker, [worker](){
worker->setInputSize(320, 320);
worker->setUseLetterbox(true);
worker->setThresholds(0.20f, 0.45f); // lower for 320
worker->loadLabels(":/assets/labels.txt");
}, Qt::QueuedConnection);
QMetaObject::invokeMethod(worker, [worker, modelPath](){
worker->loadModel(modelPath);
}, Qt::QueuedConnection);
auto startCamera = [&](){
qDebug() << "Starting camera...";
camera.start();
};
QCameraPermission camPerm;
const auto status = app.checkPermission(camPerm);
if (status == Qt::PermissionStatus::Granted) {
startCamera();
} else {
app.requestPermission(camPerm, [&](const QPermission &perm){
if (perm.status() == Qt::PermissionStatus::Granted)
startCamera();
else
qWarning() << "Camera permission denied.";
});
}
},
Qt::QueuedConnection);
engine.load(url);
return app.exec();
}
Step 7 — QML UI (Android-friendly)
qml/Main.qml:
Click here for detail...
import QtQuickimport QtQuick.Controls
import QtQuick.Layouts
import QtMultimedia
ApplicationWindow {
id: mainWnd
visible: true
width: 960
height: 540
title: "Qt Android AI Object Detection"
Rectangle {
anchors.fill: parent
color: "#111"
ColumnLayout {
id: rootLayout
anchors.fill: parent
anchors.margins: 12
spacing: 10
Text {
text: "Camera + ONNX Object Detection"
color: "white"
font.pixelSize: 18
Layout.alignment: Qt.AlignHCenter
}
Item {
Layout.fillWidth: true
Layout.fillHeight: true
clip: true
Image {
anchors.fill: parent
cache: false
asynchronous: true
fillMode: Image.PreserveAspectFit
source: "image://annotated/frame?ts=" + frameGrabber.frameCounter
}
}
Text {
text: "Detections are printed to logcat (Qt debug output)."
color: "#bbb"
font.pixelSize: 12
Layout.alignment: Qt.AlignHCenter
}
}
}
}
Expected output (Android)
Visual
- Camera feed with green bounding boxes
- Label + confidence above each detection
Console (logcat / Qt Creator Application Output)
Example lines:
- person score=0.82 box=[210,124,180,360]
- car score=0.74 box=[520,260,280,170]
Practical Android tips (important)
Performance knobs (the first things to try)
- Frame skipping: get the latest frame to process object detection when previous frame has been finished
- Use a smaller model: yolov8n > yolov8s for mobile
- Lower input size if your model supports it (e.g., 320×320)
Accuracy gotcha: letterbox vs plain resize
Many YOLO pipelines use letterbox resizing (padding). This tutorial uses plain resize in blobFromImage. If your boxes look shifted or scaled wrong, implement letterboxing and reverse mapping.
Debugging on Android
- Watch logcat (Qt Creator shows it)
- Print model load path and m_ready status
- Temporarily lower m_confThres to 0.20
Conclusion:
In this guide, we built a practical, end-to-end real-time object detection demo on Android using Qt—from camera capture to ONNX inference and rendering the final annotated frame. By combining Qt Multimedia (camera + frame delivery), OpenCV DNN (ONNX inference), and a lightweight YOLO model at 320×320, we achieved a setup that’s both portable and fast enough for mobile devices.
A few details made the difference between a “demo that runs” and a pipeline that feels smooth:
- Static-shape ONNX models are essential for OpenCV DNN on Android (dynamic/zero shapes often fail).
- Letterbox preprocessing + correct reverse mapping keeps bounding boxes aligned with the original camera image.
- Running inference in a dedicated QThread and applying backpressure (latest-frame-wins) prevents frame backlog, reduces stutter, and avoids crashes from excessive allocations.
- Loading
labels.txtand emitting detection strings gives you clean, readable output for logs or UI overlays.
Qt is also building API to easily inference AI Model (Qt AI Inference API) in your QML app
References:
- OpenCV for Android: https://github.com/opencv/opencv/releases/download/4.12.0/opencv-4.12.0-android-sdk.zip
- ONNX Model for Object detection: https://huggingface.co/giangndm/yolo11-onnx/resolve/main/yolo11n_320.onnx?download=true
Ready to get started?
Contact IVC for a free consultation and discover how we can help your business grow online.
Contact IVC for a Free Consultation