...

What We Think

Blog

Keep up with the latest in technological advancements and business strategies, with thought leadership articles contributed by our staff.
TECH

June 27, 2026

Build a Simple AI Object Detection with Qt

If you want a practical “Qt + AI” demo that actually feels like a real app, object detection on Android is a great starting point: open the phone camera, run a small neural network (ONNX), and draw bounding boxes on top of the preview.

This tutorial shows a minimal but solid pipeline for Qt 6.8+ on Android using:

  • Qt Quick + Qt Multimedia for camera capture
  • C++ worker thread for inference (so UI stays smooth)
  • OpenCV DNN to run an ONNX model (YOLO-style)
  • A QML UI to display the annotated frames

You’ll end up with a working app that prints detection lines (label, confidence, box) and shows boxes on the video.

What you’ll build

Data flow

  • Android Camera → QMediaCaptureSession + QVideoSink → QVideoFrame → QImage
  • QImage → OpenCV (cv::Mat) → net.forward() → detections
  • Draw boxes → annotated QImage
  • QML shows image://annotated/frame?... (updates every frame)

Why this approach is good on Android

  • Qt Multimedia handles camera access reliably (and supports modern devices)
  • Inference runs in a separate thread
  • No heavy “engine” architecture—easy to integrate into your real project later

Prerequisites (Android-focused)

Required

  • Qt 6.8 or newer with Android kits installed (Qt Creator recommended)
  • Android SDK + NDK configured in Qt Creator with Android Qt 6.8.3 Clang arm64_v8a kit
  • OpenCV 4.x built/available for Android (with DNN enabled) (download here: https://github.com/opencv/opencv/releases/download/4.12.0/opencv-4.12.0-android-sdk.zip)
  • An ONNX object detection model (YOLO-style). Recommended for mobile: yolo11n for 320x320 image size (https://huggingface.co/giangndm/yolo11-onnx/resolve/main/yolo11n_320.onnx?download=true).

Project structure

QtAIDetectAndroid/
  CMakeLists.txt
  main.cpp
  android/AndroidManifest.xml
  qml/Main.qml

  FrameGrabber.h/.cpp
  DetectorWorker.h/.cpp
  AnnotatedImageProvider.h/.cpp

  third_party/ OpenCV-android-sdk #Extract downloaded OpenCV for Android here

  assests/model.onnx assests/labels.txt   #(contains model + labels)

Step 1 — Android permissions (Manifest + runtime)

1) Add camera permission to android/AndroidManifest.xml

In Qt Creator: Projects → Build → Build Steps → Build Android APK → “Android package source directory” point it to your android/ folder.

Minimal manifest additions:

<manifest ...>
    <uses-permission android:name="android.permission.CAMERA" />
    <uses-feature
        android:name="android.hardware.camera.any"
        android:required="false" />
    ...
</manifest>

2) Request runtime permission in Qt (important)

Android requires runtime permission on modern versions. Qt provides a clean API.
In main.cpp, before starting the camera, request QCameraPermission. (Code is included later in the tutorial.)

Step 2— CMake for Qt 6.8 + QML + OpenCV

CMakeLists.txt (core idea):

Click here for detail... cmake_minimum_required(VERSION 3.21)
set(APP_TARGET "QtAIDetectAndroid")
set(QML_URI    "QtAIDetectAndroid")

project(${APP_TARGET} LANGUAGES CXX)

set(CMAKE_CXX_STANDARD 17)
set(CMAKE_CXX_STANDARD_REQUIRED ON)

find_package(Qt6 6.8 REQUIRED COMPONENTS Quick Multimedia)

qt_standard_project_setup()

# ---- OpenCV Android SDK ----
if(ANDROID)
  set(OPENCV_ANDROID_SDK "${CMAKE_CURRENT_LIST_DIR}/third_party/Opencv-android-sdk")
  set(OpenCV_DIR "${OPENCV_ANDROID_SDK}/sdk/native/jni")
endif()

find_package(OpenCV REQUIRED)

# ---- App ----
qt_add_executable(${APP_TARGET}
  MANUAL_FINALIZATION
  main.cpp
)

qt_add_qml_module(${APP_TARGET}
  URI ${QML_URI}
  VERSION 1.0
  QML_FILES
      qml/Main.qml

  RESOURCES
  NO_RESOURCE_TARGET_PATH
  SOURCES
    FrameGrabber.h FrameGrabber.cpp
    DetectorWorker.h DetectorWorker.cpp
    AnnotatedImageProvider.h AnnotatedImageProvider.cpp
    android/AndroidManifest.xml
)

# Embed model + labels into Qt resources at ":/assets/..."
qt_add_resources(${APP_TARGET} app_assets
  PREFIX "/assets"
  BASE "assets"
  FILES
    assets/model.onnx
    assets/labels.txt
)

target_link_libraries(${APP_TARGET}
  PRIVATE Qt6::Quick Qt6::Multimedia
  PRIVATE ${OpenCV_LIBS}
)

target_include_directories(${APP_TARGET}
  PRIVATE ${OpenCV_INCLUDE_DIRS}
)

if(ANDROID)
  set_property(TARGET ${APP_TARGET} PROPERTY
    QT_ANDROID_PACKAGE_SOURCE_DIR "${CMAKE_CURRENT_LIST_DIR}/android"
  )

  set(_opencv_so "${OPENCV_ANDROID_SDK}/sdk/native/libs/${ANDROID_ABI}/libopencv_java4.so")
  if(NOT EXISTS "${_opencv_so}")
    set(_opencv_so "${OPENCV_ANDROID_SDK}/sdk/native/libs/${ANDROID_ABI}/libopencv_java3.so")
  endif()

  if(NOT EXISTS "${_opencv_so}")
    message(FATAL_ERROR "OpenCV .so not found for ABI='${ANDROID_ABI}'")
  endif()

  set_property(TARGET ${APP_TARGET} APPEND PROPERTY
    QT_ANDROID_EXTRA_LIBS "${_opencv_so}"
  )

  target_link_libraries(${APP_TARGET} PRIVATE log)
endif()

if(ANDROID)
    set_target_properties(${APP_TARGET} PROPERTIES
            QT_ANDROID_PACKAGE_SOURCE_DIR "${CMAKE_CURRENT_SOURCE_DIR}/android"
            QT_ANDROID_PACKAGE_NAME "org.qtproject.QtAIDetectAndroid"
            QT_ANDROID_APP_NAME ${APP_TARGET}
            QT_ANDROID_TARGET_SDK_VERSION 31
            QT_ANDROID_MIN_SDK_VERSION 31
            QT_ANDROID_VERSION_NAME "1.0")

    qt_finalize_executable(${APP_TARGET})
endif()

install(TARGETS ${APP_TARGET}
    BUNDLE DESTINATION .
    LIBRARY DESTINATION ${CMAKE_INSTALL_LIBDIR}
    RUNTIME DESTINATION ${CMAKE_INSTALL_BINDIR}
)

qt_generate_deploy_qml_app_script(
    TARGET ${APP_TARGET}
    OUTPUT_SCRIPT deploy_script
    MACOS_BUNDLE_POST_BUILD
    NO_UNSUPPORTED_PLATFORM_ERROR
    DEPLOY_USER_QML_MODULES_ON_UNSUPPORTED_PLATFORM
)

install(SCRIPT ${deploy_script})


 OpenCV on Android: find_package(OpenCV REQUIRED) works if your OpenCV Android build is correctly provided to CMake (commonly via OpenCV_DIR). In Qt Creator you can set CMake cache variables (e.g., -DOpenCV_DIR=...).

Step 3 — Frame grabbing with QVideoSink

FrameGrabber.h

Click here for detail...

#pragma once
#include <QObject>
#include <QVideoSink>
#include <QImage>

class FrameGrabber : public QObject {
    Q_OBJECT
    Q_PROPERTY(int frameCounter READ frameCounter NOTIFY frameCounterChanged)

public:
    explicit FrameGrabber(QObject *parent = nullptr);
    QVideoSink* videoSink() { return &m_sink; }
    int frameCounter() const { return m_frameCounter; }

signals:
    void frameReady(const QImage &img);
    void frameCounterChanged();

public slots:
    void onAnnotatedFrameReady(const QImage &img);

private slots:
    void onVideoFrameChanged(const QVideoFrame &frame);

private:
    QVideoSink m_sink;
    int m_frameCounter = 0;

    // Simple throttle (optional): process only every Nth frame
    int m_skip = 1;     // set to 2 or 3 on slower phones
    int m_count = 0;
};


FrameGrabber.cpp

Click here for detail...

#include "FrameGrabber.h"
#include <QVideoFrame>

FrameGrabber::FrameGrabber(QObject *parent) : QObject(parent) {
    connect(&m_sink, &QVideoSink::videoFrameChanged,
            this, &FrameGrabber::onVideoFrameChanged);
}

void FrameGrabber::onVideoFrameChanged(const QVideoFrame &frame) {
    if (!frame.isValid())
        return;

    if (++m_count % m_skip != 0)
        return;

    QImage img = frame.toImage();

    if (img.isNull())
        return;

    emit frameReady(img);
}

void FrameGrabber::onAnnotatedFrameReady(const QImage &) {
    ++m_frameCounter;
    emit frameCounterChanged();
}

Step 4 — Object detection worker (OpenCV DNN + ONNX)

This worker:

  • converts QImage → cv::Mat
  • runs model
  • applies threshold + NMS
  • draws boxes and emits annotated image


DetectorWorker.h

Click here for detail...

#pragma once
#include <QObject>
#include <QImage>
#include <QMutex>
#include <QStringList>
#include <QVector>
#include <QRectF>
#include <opencv2/dnn.hpp>

class DetectorWorker : public QObject
{
    Q_OBJECT
public:
    explicit DetectorWorker(QObject *parent = nullptr);

public slots:
    void loadModel(const QString &onnxPath);

    // Optional configuration
    void loadLabels(const QString &labelsPath);          // supports ":/..." and "qrc:/..."
    void setInputSize(int w, int h);                     // e.g. 320,320
    void setUseLetterbox(bool enabled);                  // recommended for YOLO exports
    void setThresholds(float confThres, float nmsThres); // tune

    // Call for every camera frame. Internally runs one inference at a time
    // and keeps only the latest pending frame (latest-frame-wins).
    void processFrame(const QImage &img);

signals:
    void annotatedFrameReady(const QImage &img);
    void detectionsTextReady(const QStringList &lines);

private slots:
    void doWork(); // runs in worker thread

private:
    struct Det {
        QRectF box;
        int classId;
        float score;
    };

    struct LetterboxInfo {
        float r = 1.0f;  // scale
        int dw = 0;      // padding left
        int dh = 0;      // padding top
    };

    static cv::Mat qimageToBgrMat(const QImage &img);
    cv::Mat letterbox(const cv::Mat &srcBgr, LetterboxInfo &info) const;

    QVector<Det> runYoloFromOutput(const cv::Mat &outRaw, int imgW, int imgH, const LetterboxInfo &lb);
    QImage drawDetections(const QImage &src, const QVector<Det> &dets);

private:
    cv::dnn::Net m_net;
    bool m_ready = false;

    // Model / postprocess settings
    int m_inW = 320;
    int m_inH = 320;
    bool m_useLetterbox = true;

    float m_confThres = 0.20f; // lower default for 320
    float m_nmsThres  = 0.45f;

    QStringList m_labels;

    // Backpressure state
    bool  m_busy = false;
    QImage m_current;
    QImage m_pending;
    QMutex m_mutex;
};


DetectorWorker.cpp

Click here for detail...

#include "DetectorWorker.h"
#include <QDebug>
#include <QFile>
#include <QPainter>
#include <QMetaObject>
#include <opencv2/imgproc.hpp>
#include <opencv2/core.hpp>

static QString normalizeQrc(const QString &path)
{
    // QML often uses qrc:/..., QFile uses :/...
    if (path.startsWith("qrc:/"))
        return ":" + path.mid(3); // "qrc:/x" -> ":/x"
    return path;
}

static inline float sigmoidf(float x)
{
    if (x >= 0.0f) {
        const float z = std::exp(-x);
        return 1.0f / (1.0f + z);
    } else {
        const float z = std::exp(x);
        return z / (1.0f + z);
    }
}

static inline float scoreToProb(float s)
{
    // If the model outputs logits (<0 or >1), convert via sigmoid.
    if (s < 0.0f || s > 1.0f)
        return sigmoidf(s);
    return s;
}

cv::Mat DetectorWorker::qimageToBgrMat(const QImage &img)
{
    QImage tmp = img.convertToFormat(QImage::Format_RGBA8888);

    cv::Mat rgba(tmp.height(), tmp.width(), CV_8UC4,
                 const_cast<uchar*>(tmp.bits()),
                 tmp.bytesPerLine());

    cv::Mat bgr;
    cv::cvtColor(rgba, bgr, cv::COLOR_RGBA2BGR); // allocates bgr

    return bgr;
}

DetectorWorker::DetectorWorker(QObject *parent) : QObject(parent) {}

void DetectorWorker::setInputSize(int w, int h)
{
    if (w > 0) m_inW = w;
    if (h > 0) m_inH = h;
}

void DetectorWorker::setUseLetterbox(bool enabled)
{
    m_useLetterbox = enabled;
}

void DetectorWorker::setThresholds(float confThres, float nmsThres)
{
    m_confThres = confThres;
    m_nmsThres = nmsThres;
}

void DetectorWorker::loadLabels(const QString &labelsPath)
{
    const QString p = normalizeQrc(labelsPath);
    QFile f(p);

    if (!f.open(QIODevice::ReadOnly | QIODevice::Text)) {
        qWarning() << "Failed to open labels file:" << labelsPath << f.errorString();

        return;
    }

    QStringList labels;

    while (!f.atEnd()) {
        const QString line = QString::fromUtf8(f.readLine()).trimmed();
        if (!line.isEmpty())
            labels << line;
    }

    f.close();

    m_labels = labels;
    qDebug() << "Loaded labels:" << m_labels.size() << "from" << labelsPath;
}

void DetectorWorker::loadModel(const QString &onnxPath)
{
    m_ready = false;
    try {
        m_net = cv::dnn::readNetFromONNX(onnxPath.toStdString());
        m_net.setPreferableBackend(cv::dnn::DNN_BACKEND_OPENCV);
        m_net.setPreferableTarget(cv::dnn::DNN_TARGET_CPU);
        m_ready = true;

        qDebug() << "Model loaded:" << onnxPath;
    } catch (const cv::Exception &e) {
        qWarning() << "Model load failed:" << e.what();
        m_ready = false;
    }
}

cv::Mat DetectorWorker::letterbox(const cv::Mat &srcBgr, LetterboxInfo &info) const
{
    const int srcW = srcBgr.cols;
    const int srcH = srcBgr.rows;
    const float r = std::min((float)m_inW / (float)srcW, (float)m_inH / (float)srcH);
    const int newW = (int)std::round(srcW * r);
    const int newH = (int)std::round(srcH * r);
    const int dw = (m_inW - newW) / 2;
    const int dh = (m_inH - newH) / 2;
    info.r = r;
    info.dw = dw;
    info.dh = dh;
    cv::Mat resized;

    cv::resize(srcBgr, resized, cv::Size(newW, newH), 0, 0, cv::INTER_LINEAR);
    cv::Mat out(m_inH, m_inW, CV_8UC3, cv::Scalar(114, 114, 114));
    resized.copyTo(out(cv::Rect(dw, dh, newW, newH)));

    return out;
}

void DetectorWorker::processFrame(const QImage &img)
{
    if (!m_ready || img.isNull())
        return;

    bool shouldStart = false;
    {
        QMutexLocker lock(&m_mutex);
        if (!m_busy) {
            m_busy = true;
            m_current = img; // implicit-share
            shouldStart = true;
        } else {
            // Overwrite pending with newest
            m_pending = img;
        }
    }

    if (shouldStart) {
        // Run in worker thread event loop; yields between frames
        QMetaObject::invokeMethod(this, &DetectorWorker::doWork, Qt::QueuedConnection);
    }
}

void DetectorWorker::doWork()
{
    QImage img;
    {
        QMutexLocker lock(&m_mutex);
        img = m_current;
    }

    if (!m_ready || img.isNull()) {
        QMutexLocker lock(&m_mutex);
        m_busy = false;

        return;
    }

    // Convert & preprocess
    const cv::Mat bgrSrc = qimageToBgrMat(img);

    LetterboxInfo lb;
    cv::Mat bgrInput;
    if (m_useLetterbox) {
        bgrInput = letterbox(bgrSrc, lb);
    } else {
        lb = LetterboxInfo{};
        cv::resize(bgrSrc, bgrInput, cv::Size(m_inW, m_inH));
    }

    // Blob: swapRB=true => BGR->RGB
    cv::Mat blob = cv::dnn::blobFromImage(
        bgrInput, 1.0/255.0, cv::Size(m_inW, m_inH),
        cv::Scalar(), true, false
        );

    m_net.setInput(blob);
    std::vector<cv::Mat> outs;


try {
        m_net.forward(outs, m_net.getUnconnectedOutLayersNames());
    } catch (...) {
        outs.clear();
        outs.push_back(m_net.forward());
    }

    QVector<Det> dets;
    if (!outs.empty())
        dets = runYoloFromOutput(outs[0], img.width(), img.height(), lb);

    // Emit text
    QStringList lines;
    lines.reserve(dets.size());
    for (const auto &d : dets) {
        const QString label =
            (d.classId >= 0 && d.classId < m_labels.size()) ? m_labels[d.classId] : QString("class_%1").arg(d.classId);

        lines << QString("%1 score=%2 box=[%3,%4,%5,%6]")
                     .arg(label)
                     .arg(d.score, 0, 'f', 2)
                     .arg(d.box.x(), 0, 'f', 0)
                     .arg(d.box.y(), 0, 'f', 0)
                     .arg(d.box.width(), 0, 'f', 0)
                     .arg(d.box.height(), 0, 'f', 0);
    }

    emit detectionsTextReady(lines);
    emit annotatedFrameReady(drawDetections(img, dets));

    // Schedule next if pending exists
    bool hasNext = false;
    {
        QMutexLocker lock(&m_mutex);
        if (!m_pending.isNull()) {
            m_current = m_pending;
            m_pending = QImage();
            hasNext = true;
        } else {
            m_busy = false;
        }
    }

    if (hasNext) {
        QMetaObject::invokeMethod(this, &DetectorWorker::doWork, Qt::QueuedConnection);
    }
}

QVector<DetectorWorker::Det> DetectorWorker::runYoloFromOutput(const cv::Mat &outRaw, int imgW, int imgH, const LetterboxInfo &lb)
{
    // Ensure float32 for safe reading
    cv::Mat out;
    if (outRaw.depth() != CV_32F)
        outRaw.convertTo(out, CV_32F);
    else
        out = outRaw;

    // Debug shape (prints a few times)
    static int dbg = 0;
    if (dbg < 5) {
        dbg++;
        QString shape = "dims=" + QString::number(out.dims);

        for (int i = 0; i < out.dims; ++i)
            shape += " " + QString::number(out.size[i]);
        qDebug() << "ONNX output:" << shape << "type=" << out.type();

        cv::Mat flat = out.reshape(1, 1);
        double mn=0, mx=0;
        cv::minMaxLoc(flat, &mn, &mx);
        qDebug() << "output min/max:" << mn << mx;
    }

    QVector<Det> candidates;
    auto clamp01orPixels = [&](float &x, float &y, float &w, float &h, int refW, int refH) {
        if (x <= 1.5f && y <= 1.5f && w <= 1.5f && h <= 1.5f) {
            x *= (float)refW;
            y *= (float)refH;
            w *= (float)refW;
            h *= (float)refH;
        }
    };

    auto mapXYXYFromInputToImage = [&](float &x1, float &y1, float &x2, float &y2) {
        if (m_useLetterbox) {
            x1 = (x1 - (float)lb.dw) / lb.r;
            y1 = (y1 - (float)lb.dh) / lb.r;
            x2 = (x2 - (float)lb.dw) / lb.r;
            y2 = (y2 - (float)lb.dh) / lb.r;
        } else {
            x1 = x1 * imgW / (float)m_inW;
            x2 = x2 * imgW / (float)m_inW;
            y1 = y1 * imgH / (float)m_inH;
            y2 = y2 * imgH / (float)m_inH;
        }

        x1 = std::max(0.0f, std::min(x1, (float)imgW - 1.0f));
        y1 = std::max(0.0f, std::min(y1, (float)imgH - 1.0f));
        x2 = std::max(0.0f, std::min(x2, (float)imgW - 1.0f));
        y2 = std::max(0.0f, std::min(y2, (float)imgH - 1.0f));
    };

    auto addCandidateXYWH = [&](float cx, float cy, float w, float h, float score, int cls) {
        if (score < m_confThres)
            return;

        clamp01orPixels(cx, cy, w, h, m_inW, m_inH);

        float x1 = cx - w * 0.5f;
        float y1 = cy - h * 0.5f;
        float x2 = cx + w * 0.5f;
        float y2 = cy + h * 0.5f;

        mapXYXYFromInputToImage(x1, y1, x2, y2);

        const float ww = std::max(0.0f, x2 - x1);
        const float hh = std::max(0.0f, y2 - y1);

        if (ww <= 1.0f || hh <= 1.0f)
            return;

        candidates.push_back({ QRectF(x1, y1, ww, hh), cls, score });
    };

    // Your model prints: dims=3 1 84 2100  -> treat as [1, C, N] with C=84 (4 + 80)
    if (out.dims == 3 && out.size[0] == 1 && out.size[1] >= 6 && out.size[2] > 100) {
        const int C = out.size[1];
        const int N = out.size[2];
        const float *p = (const float*)out.data;
        const int labelCount = m_labels.size();
        const int clsStart = 4;
        const int clsEnd = (labelCount > 0) ? std::min(C, clsStart + labelCount) : C;

        // Print best-score range once to help tuning threshold
        static bool printedMax = false;
        float globalMax = 0.f;
        int globalIdx = -1;

        for (int i = 0; i < N; ++i) {
            float cx = p[0*N + i];
            float cy = p[1*N + i];
            float w  = p[2*N + i];
            float h  = p[3*N + i];
            int bestCls = -1;
            float bestScore = 0.f;         

       for (int c = clsStart; c < clsEnd; ++c) {
                float s = scoreToProb(p[c*N + i]);
                if (s > bestScore) { bestScore = s; bestCls = c - clsStart; }
            }

            if (!printedMax && bestScore > globalMax) {
                globalMax = bestScore;
                globalIdx = bestCls;
            }

            addCandidateXYWH(cx, cy, w, h, bestScore, bestCls);
        }

        if (!printedMax) {
            printedMax = true;
            qDebug() << "Max class score seen (first frame):" << globalMax
                     << "classIndex=" << globalIdx
                     << "(try confThres ~0.15-0.30)";
        }
    }

    // Fallback: [1, N, 5+classes]
    else if (out.dims == 3 && out.size[0] == 1 && out.size[2] >= 6) {
        const int N = out.size[1];
        const int C = out.size[2];
        const float *p = (const float*)out.data;
        const int labelCount = m_labels.size();
        const int clsStart = 5;
        const int clsEnd = (labelCount > 0) ? std::min(C, clsStart + labelCount) : C;

        for (int i = 0; i < N; ++i) {
            float cx = p[i*C + 0], cy = p[i*C + 1], w = p[i*C + 2], h = p[i*C + 3];
            float obj = scoreToProb(p[i*C + 4]);
            int bestCls = -1;
            float bestClsScore = 0.f;

            for (int c = clsStart; c < clsEnd; ++c) {
                float s = scoreToProb(p[i*C + c]);
                if (s > bestClsScore) { bestClsScore = s; bestCls = c - clsStart; }
            }

            addCandidateXYWH(cx, cy, w, h, obj * bestClsScore, bestCls);
        }
    }
    else {
        qWarning() << "Unsupported output shape. dims=" << out.dims;
        return {};
    }

    // NMS
    std::vector<cv::Rect> boxes;
    std::vector<float> scores;
    boxes.reserve((size_t)candidates.size());
    scores.reserve((size_t)candidates.size());

    for (const auto &d : candidates) {
        boxes.emplace_back((int)d.box.x(), (int)d.box.y(),
                           (int)d.box.width(), (int)d.box.height());
        scores.push_back(d.score);
    }

    std::vector<int> keep;
    cv::dnn::NMSBoxes(boxes, scores, m_confThres, m_nmsThres, keep);
    QVector<Det> finalDets;
    finalDets.reserve((int)keep.size());

    for (int idx : keep)
        finalDets.push_back(candidates[idx]);

    return finalDets;
}

QImage DetectorWorker::drawDetections(const QImage &src, const QVector<Det> &dets)
{
    QImage outImg = src.convertToFormat(QImage::Format_RGBA8888);

    QPainter p(&outImg);
    p.setRenderHint(QPainter::Antialiasing, true);

    QPen pen(Qt::green);
    pen.setWidth(3);
    p.setPen(pen);

    QFont f = p.font();
    f.setPointSize(32);
    f.setBold(true);
    p.setFont(f);

    for (const auto &d : dets) {
        const QString label =
            (d.classId >= 0 && d.classId < m_labels.size()) ? m_labels[d.classId] : QString("class_%1").arg(d.classId);

        p.drawRect(d.box);
        const QString text = QString("%1 %2").arg(label).arg(d.score, 0, 'f', 2);
        QRectF tr(d.box.x(), d.box.y() - 42, 320, 42);
        p.fillRect(tr, QColor(0, 0, 0, 160));
        p.setPen(Qt::white);
        p.drawText(tr.adjusted(6, 0, 0, 0), text);
        p.setPen(pen);
    }

    return outImg;
}


Step 5 — QML image provider (to show annotated frames)

Same concept as before (thread-safe setImage() + requestImage()), so as short:

  • setImage(QImage) stores the latest annotated image (mutex protected)
  • QML pulls image://annotated/frame?ts=<counter> to refresh

AnnotatedImageProvider.h

Click here for detail...

#pragma once
#include <QQuickImageProvider>
#include <QImage>
#include <QMutex>

class AnnotatedImageProvider : public QQuickImageProvider
{
public:
    AnnotatedImageProvider();

    // Called from your detector/worker when a new annotated frame is ready
    void setImage(const QImage &img);

    QImage requestImage(const QString &id, QSize *size, const QSize &requestedSize) override;

private:
    QImage m_img;
    QMutex m_mutex;
};


AnnotatedImageProvider.cpp

Click here for detail...

#include "AnnotatedImageProvider.h"
#include <QPainter>

AnnotatedImageProvider::AnnotatedImageProvider()
    : QQuickImageProvider(QQuickImageProvider::Image)
{
}

void AnnotatedImageProvider::setImage(const QImage &img)
{
    QMutexLocker lock(&m_mutex);
    m_img = img;
}

QImage AnnotatedImageProvider::requestImage(const QString &id, QSize *size, const QSize &requestedSize)
{
    // IMPORTANT: id may include query string, e.g. "frame?ts=123"
    QString baseId = id;
    const int q = baseId.indexOf('?');

    if (q >= 0)
        baseId.truncate(q);

    QImage out;
    {
        QMutexLocker lock(&m_mutex);
        out = m_img;
    }

    // If no image yet, return a placeholder instead of failing
    if (out.isNull()) {
        const int w = requestedSize.width()  > 0 ? requestedSize.width()  : 640;
        const int h = requestedSize.height() > 0 ? requestedSize.height() : 480;
        out = QImage(w, h, QImage::Format_RGBA8888);
        out.fill(QColor(20, 20, 20));

        QPainter p(&out);
        p.setPen(Qt::white);
        p.drawText(out.rect(), Qt::AlignCenter, "Waiting for frames...");
    }

    if (size)
        *size = out.size();

    // If you ever want to support multiple ids, check baseId here:
    // if (baseId != "frame") { ... }

    return out;
}


Step 6 — main.cpp (Android runtime permission + camera setup)

This is the Android-specific part that matters: request permission, then start camera.

Click here for detail...

#include <QGuiApplication>
#include <QQmlApplicationEngine>
#include <QQmlContext>
#include <QCoreApplication>
#include <QDebug>
#include <QFile>
#include <QDir>
#include <QStandardPaths>
#include <QThread>
#include <QPermission>
#include <QCamera>
#include <QCameraDevice>
#include <QMediaCaptureSession>
#include <QMediaDevices>
#include "FrameGrabber.h"
#include "DetectorWorker.h"
#include "AnnotatedImageProvider.h"

extern int qInitResources_app_assets();
extern int qCleanupResources_app_assets();

static QString extractResourceToFile(const QString &qrcPath, const QString &targetName)
{
    QString dir = QStandardPaths::writableLocation(QStandardPaths::CacheLocation);
    if (dir.isEmpty())
        dir = QStandardPaths::writableLocation(QStandardPaths::AppDataLocation);

    if (dir.isEmpty()) {
        qCritical() << "No writable location for extracted assets.";

        return {};
    }

    QDir().mkpath(dir);
    const QString outPath = QDir(dir).filePath(targetName);

    QFile in(qrcPath);
    if (!in.exists()) {
        qCritical() << "Resource does not exist:" << qrcPath;

        return {};
    }

    if (!in.open(QIODevice::ReadOnly)) {
        qCritical() << "Failed to open resource:" << qrcPath << in.errorString();

        return {};
    }

    QFile out(outPath);
    if (!out.open(QIODevice::WriteOnly | QIODevice::Truncate)) {
        qCritical() << "Failed to open output:" << outPath << out.errorString();

        return {};
    }

    const QByteArray data = in.readAll();
    out.write(data);
    out.close();
    in.close();

    qDebug() << "Extracted" << qrcPath << "->" << outPath << "bytes=" << data.size();

    return outPath;
}

int main(int argc, char *argv[])
{
    QGuiApplication app(argc, argv);
    qInitResources_app_assets();
    QQmlApplicationEngine engine;

    auto *provider = new AnnotatedImageProvider();
    engine.addImageProvider("annotated", provider);

    FrameGrabber grabber;
    engine.rootContext()->setContextProperty("frameGrabber", &grabber);

    // Worker thread
    QThread workerThread;
    auto *worker = new DetectorWorker();
    worker->moveToThread(&workerThread);

    QObject::connect(&app, &QCoreApplication::aboutToQuit, [&](){
        if (workerThread.isRunning()) {
            QMetaObject::invokeMethod(worker, &QObject::deleteLater, Qt::QueuedConnection);
            workerThread.quit();
            workerThread.wait();
        } else {
            delete worker;
        }

        qCleanupResources_app_assets();
    });

    // Pipeline
    QObject::connect(&grabber, &FrameGrabber::frameReady,
                     worker, &DetectorWorker::processFrame,
                     Qt::QueuedConnection);

    QObject::connect(worker, &DetectorWorker::annotatedFrameReady,
                     &app, [provider](const QImage &img) {
                         provider->setImage(img);
                     },
                     Qt::QueuedConnection);

    QObject::connect(worker, &DetectorWorker::annotatedFrameReady,
                     &grabber, &FrameGrabber::onAnnotatedFrameReady,
                     Qt::QueuedConnection);

    // Print detections to logcat
    QObject::connect(worker, &DetectorWorker::detectionsTextReady,
                     &app, [](const QStringList &lines){
                         if (lines.isEmpty())
                             return;

                         qDebug().noquote() << "Detections:\n - " + lines.join("\n - ");
                     },
                     Qt::QueuedConnection);

    // Camera
    QMediaCaptureSession session;
    const QCameraDevice camDev = QMediaDevices::defaultVideoInput();

    if (camDev.isNull())
        qWarning() << "No default video input device found.";

    QCamera camera(camDev);
    session.setCamera(&camera);
    session.setVideoSink(grabber.videoSink());

    const QUrl url(QStringLiteral("qrc:/qml/Main.qml"));

    QObject::connect(&engine, &QQmlApplicationEngine::objectCreated,
                     &app, [&](QObject *obj, const QUrl &objUrl){
                         if (!obj && objUrl == url) {
                             qCritical() << "QML root object creation failed. Exiting.";
                             QCoreApplication::exit(-1);

                             return;
                         }

                         if (!obj)
                             return;

                         const QString modelPath = extractResourceToFile(":/assets/model.onnx", "model.onnx");

                         if (modelPath.isEmpty()) {
                             qCritical() << "Model extraction failed. Exiting.";
                             QCoreApplication::exit(-1);

                             return;
                         }

                         if (!workerThread.isRunning())         
                             workerThread.start();

                            QMetaObject::invokeMethod(worker, [worker](){
                             worker->setInputSize(320, 320);
                             worker->setUseLetterbox(true);
                             worker->setThresholds(0.20f, 0.45f); // lower for 320
                             worker->loadLabels(":/assets/labels.txt");
                         }, Qt::QueuedConnection);

                         QMetaObject::invokeMethod(worker, [worker, modelPath](){
                             worker->loadModel(modelPath);
                         }, Qt::QueuedConnection);

                         auto startCamera = [&](){
                             qDebug() << "Starting camera...";
                             camera.start();
                         };

                         QCameraPermission camPerm;
                         const auto status = app.checkPermission(camPerm);

                         if (status == Qt::PermissionStatus::Granted) {
                             startCamera();
                         } else {
                             app.requestPermission(camPerm, [&](const QPermission &perm){
                                 if (perm.status() == Qt::PermissionStatus::Granted)
                                     startCamera();
                                 else
                                     qWarning() << "Camera permission denied.";
                             });
                         }
                     },
                     Qt::QueuedConnection);

    engine.load(url);
    return app.exec();
}


Step 7 — QML UI (Android-friendly)

qml/Main.qml:

Click here for detail... import QtQuick
import QtQuick.Controls
import QtQuick.Layouts
import QtMultimedia

ApplicationWindow {
    id: mainWnd
    visible: true
    width: 960
    height: 540
    title: "Qt Android AI Object Detection"

    Rectangle {
        anchors.fill: parent
        color: "#111"

        ColumnLayout {
            id: rootLayout
            anchors.fill: parent
            anchors.margins: 12
            spacing: 10

            Text {
                text: "Camera + ONNX Object Detection"
                color: "white"
                font.pixelSize: 18
                Layout.alignment: Qt.AlignHCenter
            }

            Item {
                Layout.fillWidth: true
                Layout.fillHeight: true
                clip: true

                Image {
                    anchors.fill: parent
                    cache: false
                    asynchronous: true
                    fillMode: Image.PreserveAspectFit
                    source: "image://annotated/frame?ts=" + frameGrabber.frameCounter
                }
            }

            Text {
                text: "Detections are printed to logcat (Qt debug output)."
                color: "#bbb"
                font.pixelSize: 12
                Layout.alignment: Qt.AlignHCenter
            }
        }
    }
}


Expected output (Android)

Visual

  • Camera feed with green bounding boxes
  • Label + confidence above each detection

Console (logcat / Qt Creator Application Output)

Example lines:

  • person score=0.82 box=[210,124,180,360]
  • car score=0.74 box=[520,260,280,170]

Practical Android tips (important)

Performance knobs (the first things to try)

  • Frame skipping: get the latest frame to process object detection when previous frame has been finished
  • Use a smaller model: yolov8n > yolov8s for mobile
  • Lower input size if your model supports it (e.g., 320×320)

Accuracy gotcha: letterbox vs plain resize

Many YOLO pipelines use letterbox resizing (padding). This tutorial uses plain resize in blobFromImage. If your boxes look shifted or scaled wrong, implement letterboxing and reverse mapping.

Debugging on Android

  • Watch logcat (Qt Creator shows it)
  • Print model load path and m_ready status
  • Temporarily lower m_confThres to 0.20

Conclusion:

In this guide, we built a practical, end-to-end real-time object detection demo on Android using Qt—from camera capture to ONNX inference and rendering the final annotated frame. By combining Qt Multimedia (camera + frame delivery), OpenCV DNN (ONNX inference), and a lightweight YOLO model at 320×320, we achieved a setup that’s both portable and fast enough for mobile devices.

A few details made the difference between a “demo that runs” and a pipeline that feels smooth:

  • Static-shape ONNX models are essential for OpenCV DNN on Android (dynamic/zero shapes often fail).
  • Letterbox preprocessing + correct reverse mapping keeps bounding boxes aligned with the original camera image.
  • Running inference in a dedicated QThread and applying backpressure (latest-frame-wins) prevents frame backlog, reduces stutter, and avoids crashes from excessive allocations.
  • Loading labels.txt and emitting detection strings gives you clean, readable output for logs or UI overlays.

Qt is also building API to easily inference AI Model (Qt AI Inference API) in your QML app

References:

  • OpenCV for Android: https://github.com/opencv/opencv/releases/download/4.12.0/opencv-4.12.0-android-sdk.zip
  • ONNX Model for Object detection: https://huggingface.co/giangndm/yolo11-onnx/resolve/main/yolo11n_320.onnx?download=true

Ready to get started?

Contact IVC for a free consultation and discover how we can help your business grow online.

Contact IVC for a Free Consultation


View More
TECH

June 25, 2026

PostgreSQL Indexes: Performance Tuning

PostgreSQL is one of the most popular relational database management systems (RDBMS), known for its reliability, extensibility, and powerful feature set. While query performance is rarely a concern during the early stages of development, it often becomes a challenge as datasets grow from thousands to millions of rows.

As data volume increases, database queries can become a major bottleneck, leading to slower API response times and degraded application performance. One of the most effective ways to address this issue is through indexing.

Indexes are specialized data structures that allow PostgreSQL to locate data more efficiently, significantly reducing query execution time and minimizing expensive full table scans. When used correctly, indexes can dramatically improve the performance of large-scale applications.

In this article, we'll explore what PostgreSQL indexes are, how they work, and how different index types can be used to optimize database performance.

View More
TECH

June 24, 2026

The IT Professional's Guide to Understanding AI Terminology (Part 2)  

In Part 1, we explored the "Big Picture"—the Russian Doll hierarchy of AI, how tokens work, and why AI sometimes tells "confident lies." We saw the trap of Overfitting, where an AI memorizes a "red bird" instead of learning what a bird actually is.

But to be a true IT pro in 2026, you need to know more than just the structure. You need to understand the specialized "jobs" AI can do and the different ways we "teach" it. Let’s dive into Part 2 with the essential terms from our list, explained simply but with the detail you need for a technical meeting.

View More
TECH

June 12, 2026

SPRING DATA JPA: STREAMLINING DATA ACCESS

In modern web application development, interacting with a database is a core requirement. Spring Boot integrates seamlessly with Spring Data JPA, providing a robust way to manage data persistence with significantly less code. This section explains Spring Data JPA, how it works, practical examples, and its benefits.

I. What is Spring Data JPA?

Spring Data JPA is a powerful framework that helps you:

  • Simplify Database Operations: Perform CRUD (Create, Read, Update, Delete) operations without writing complex SQL.
  • Eliminate Boilerplate: Reduce the need for DAO (Data Access Object) implementation classes.
  • Automatic Query Generation: Create database queries simply by defining method names in an interface.
  • Support Pagination and Sorting: Manage large datasets efficiently with built-in tools.

By adding the spring-boot-starter-data-jpa dependency, Spring Boot configures a production-ready data layer automatically.

II. How Does Spring Data JPA Work?

Spring Data JPA acts as an abstraction layer on top of JPA (Java Persistence API) and Hibernate:

  • The Repository Pattern: It uses interfaces to provide a standard way to access data.
  • Proxy Mechanism: At runtime, Spring Boot automatically creates an implementation for your repository interfaces.
  • Method Name Parsing: When you define a method like findByEmail(String email), the framework parses the name and generates the appropriate JPQL (Java Persistence Query Language) or SQL query.
  • Transaction Management: It handles database transactions automatically, ensuring data integrity.

III. How to Use Spring Data JPA

1. Add Dependency

Maven:

<dependency>

  <groupId>org.springframework.boot</groupId>

  <artifactId>spring-boot-starter-data-jpa</artifactId>

</dependency>

<dependency>

  <groupId>com.h2database</groupId><artifactId>h2</artifactId>

  <scope>runtime</scope>

</dependency>


Gradle:

implementation 'org.springframework.boot:spring-boot-starter-data-jpa'

runtimeOnly 'com.h2database:h2'


2. Define an Entity

An Entity represents a table in your database:

@Entity

public class Product {

     @Id

     @GeneratedValue(strategy = GenerationType.IDENTITY)

     private Long id;

     private String name;

     private Double price;

                // Getters and Setters

}


3. Create a Repository Interface

By extending JpaRepository, you gain access to all standard CRUD operations.

@Repository

public interface ProductRepository extends JpaRepository<Product, Long> {

    // Automatically generates: SELECT * FROM product WHERE name = ?

    List<Product> findByName(String name);


    // Custom query using @Query

    @Query("SELECT p FROM Product p WHERE p.price > :minPrice")

    List<Product> findExpensiveProducts(@Param("minPrice") Double minPrice);

}


IV. Example of Spring Data JPA in Action

Managing products in a Service layer:

@Service

public class ProductService {

    @Autowired

    private ProductRepository productRepository;


    public Product saveProduct(Product product) {

        return productRepository.save(product); // Saves or Updates

              }


              public List<Product> getProductsByName(String name) {

                  return productRepository.findByName(name);

              }

}


When calling productRepository.findAll(PageRequest.of(0, 10)), Spring Data JPA handles the SQL "LIMIT" and "OFFSET" logic behind the scenes.

V. Benefits of Spring Data JPA

  • Development Speed: Write only interfaces; let the framework handle the implementation.
  • Reduced Errors: Automatic query generation prevents common syntax errors in SQL.
  • Easy Pagination: Built-in support for Pageable and Sort makes UI integration simple.
  • Vendor Independence: Easily switch between different databases (H2, MySQL, PostgreSQL) with minimal configuration changes.
  • Seamless Integration: Works perfectly with Spring Security for data-level protection and Spring Boot Auto-Configuration.

VI. Conclusion

Spring Data JPA allows you to manage your application's data layer with elegance and efficiency. It removes the burden of repetitive data access code, allowing developers to focus on building features rather than debugging SQL strings.

Whether you need scalable software solutions, expert IT outsourcing, or a long-term development partner, ISB Vietnam is here to deliver. Let’s build something great together—reach out to us today. Or click here to explore more ISB Vietnam's case studies.

[References]

https://spring.io/projects/spring-data-jpa

https://docs.spring.io/spring-data/jpa/docs/current/reference/html/

https://www.baeldung.com/the-persistence-layer-with-spring-data-jpa

https://spring.io/guides/gs/accessing-data-jpa/

View More
TECH

June 12, 2026

Upload CSV to AWS S3 with React/Next.js

Upload CSV to AWS S3 with React: Setup and Code

First, many data apps use sync jobs. Therefore, letting users send CSV files straight to S3 is smart. In addition, this setup splits the UI from background tasks. As a result, direct uploads boost both speed and trust.

Moreover, this guide shows how direct transfers work. Furthermore, we look at common setups and safe rules. Also, you will learn about CORS and React code.

View More
TECH

June 12, 2026

From AZ-900 to Real Understanding: Understanding Microsoft Azure Benefits

After completing the AZ‑900 certification, I realized that Microsoft Azure is far more than a cloud platform—it’s a well‑designed ecosystem built to support modern applications at scale. In this article, I’ll introduce Azure using the same structured framework I studied for AZ‑900, but with a stronger focus on practical, real‑world understanding from a developer’s perspective.

I. Understanding Cloud Concepts Before Using the Cloud

Before deploying anything, it is essential to understand what cloud computing actually provides.

Microsoft Azure is a cloud computing platform developed by Microsoft that offers on-demand computing resources over the internet. Instead of managing physical servers, developers provision infrastructure and services dynamically.

Service Models

Azure services are generally categorized into three cloud models:

  • IaaS (Infrastructure as a Service)
    Infrastructure as a service gives you maximum control over your cloud environment because you manage almost everything except the physical hardware. The provider handles the datacenter equipment, internet connectivity, and on‑site security, while you take charge of installing and maintaining operating systems, configuring networks, setting up storage and databases, and managing applications. In practice, it’s like renting servers and networking gear in someone else’s datacenter, with full freedom to decide how those resources are used.
    Example: Running a Linux server on Azure Virtual Machines.
  • PaaS (Platform as a Service)
    Platform as a service can be described as a cloud model that sits between IaaS and SaaS, giving you a managed environment for building and running applications without dealing with the underlying system layers. The provider takes care of the physical servers, security, networking, and also the software stack that supports development—such as operating systems, middleware, runtime environments, and analytics tools. Because these layers are handled for you, you don’t need to manage licenses, updates, or patches for the OS or databases.
    Example: Deploying a web application on Azure App Service.
  • SaaS (Software as a Service)
    Software as a service refers to using a fully built, ready‑to‑use application that runs in the cloud. Instead of installing or managing the software yourself, you simply access it—common examples include email services, accounting tools, messaging platforms, and collaboration apps. Because everything is already developed and maintained by the provider, you’re essentially subscribing to a complete product.

Even though SaaS offers the least customization, it’s also the simplest and fastest model to adopt. It requires minimal technical skill because all updates, maintenance, and infrastructure responsibilities are handled for you.
Example: Microsoft 365.

II. Networking and Storage

Azure Networking

Azure’s networking services provide the core connectivity that allows your cloud resources to communicate securely and efficiently. At the foundation are services like Virtual Networks (VNets), Private Link, Azure DNS, Bastion, Route Server, NAT Gateway, and Traffic Manager, which together create a customizable and secure network environment for your applications. These tools let you isolate workloads, manage routing, control inbound and outbound traffic, and connect on‑premises networks to Azure.

Beyond basic connectivity, Azure also offers load balancing and content delivery capabilities—such as Load Balancer, Application Gateway, and Azure Front Door—to distribute traffic, improve performance, and ensure high availability. These services help optimize how applications respond to user requests, whether they’re internal workloads or global web applications.

Security is built into the networking layer through features like network security groups, firewalls, and private endpoints, allowing you to tightly control which resources can communicate and how that communication happens.

Azure Storage

Azure Storage is Microsoft’s cloud‑based platform for storing and managing data at massive scale. It’s designed to be highly available, durable, secure, and globally accessible, making it suitable for everything from simple file storage to large‑scale analytics workloads. Azure Storage supports multiple data types and offers tools that developers and IT teams can use from anywhere via HTTP/HTTPS and REST APIs.

Core Characteristics:

  • Massive scalability — Designed to grow with your data needs, from gigabytes to petabytes.
  • High durability and availability — Multiple copies of your data are stored to protect against failures.
  • Strong security — Encryption, network isolation, and identity-based access controls are built in.
  • Global accessibility — Data can be accessed from anywhere over secure HTTP/HTTPS endpoints.
  • Developer-friendly — Supports REST APIs and client libraries for .NET, Java, Python, JavaScript, C++, and Go.

Azure maintains extra copies of your data to ensure availability and durability, even when failures occur. These failures can include hardware issues, power or network outages, or natural disasters. Choosing a redundancy option is a balance between cost, performance, and resilience.

Redundancy within the primary region

These options keep your data inside a single Azure region.

- Locally Redundant Storage (LRS) — Your data is copied three times within a single datacenter. It’s the most cost‑effective option but doesn’t protect against a full datacenter outage.

- Zone‑Redundant Storage (ZRS) — Your data is stored across three separate availability zones within the same region. This protects against datacenter‑level failures while staying within one region.

Redundancy across regions

These options replicate your data to a geographically distant secondary region.

- Geo‑Redundant Storage (GRS) — Your data is stored three times in the primary region (like LRS) and then copied to a secondary region for disaster recovery.

- Read‑Access Geo‑Redundant Storage (RA‑GRS) — Same as GRS, but you can read from the secondary region. This improves availability during regional outages.

III. Security and Identity

Azure security and identity in the cloud revolve around protecting access to resources through strong authentication, authorization, and continuous threat-aware controls. At the center of this model is Microsoft Entra ID, which provides identity management, single sign‑on, multifactor authentication, and role‑based access control to ensure that only the right people and applications can reach the right resources.

Security Concepts in Azure

Azure security concepts center on protecting identities, data, applications, and infrastructure through a multilayered, defense‑in‑depth approach. This model combines built‑in platform protections, shared responsibility between Microsoft and customers, and advanced security services that detect and respond to threats. Azure emphasizes securing every layer—from physical datacenters to identities, networks, and workloads—because cloud environments face constantly evolving cyber risks.

Defense in depth

Azure applies multiple layers of protection across physical, network, identity, application, and data layers. If one layer is compromised, others continue to protect the environment. This includes secure datacenters, network segmentation, identity controls, encryption, and monitoring.

The Zero Trust model

Zero Trust treats every network—internal or external—as untrusted, so no user or device is assumed safe by default. It follows the idea of “never trust, always verify,” meaning every access request must be authenticated, authorized, and continuously validated before anything is granted.

Data protection

One way to mitigate against common cybersecurity threats is to encrypt sensitive or valuable data. Encryption is the process of making data unreadable and unusable to unauthorized viewers. To use or read encrypted data, it must be decrypted, which requires the use of a secret key.

Shared responsibility model

Microsoft secures the physical infrastructure, hosts, and foundational services, while customers secure their identities, data, applications, and configurations. Understanding this division is essential for building a secure cloud environment.

Core Identity Concepts in Azure

Identity management

Identity management ensures that every user, device, or application accessing Azure resources is properly authenticated and authorized. Microsoft Entra ID acts as the cloud identity provider, extending on‑premises Active Directory to the cloud and enabling unified access across thousands of SaaS and on‑premises applications.

Single sign‑on (SSO)

SSO allows users to sign in once and access multiple applications without repeatedly entering credentials. This reduces password fatigue and improves security by minimizing exposed credentials. Entra ID supports SSO for a wide range of cloud and on‑premises apps.

Multifactor authentication (MFA)

MFA adds a second verification step—such as an authenticator app, biometric sign‑in, or security key—to strengthen protection against unauthorized access. It provides a critical extra layer of defense while keeping the sign‑in experience smooth.

Role‑based access control (RBAC)

RBAC assigns permissions based on roles rather than individual accounts, ensuring users only have the access they need. This supports the principle of least privilege and helps reduce accidental or malicious misuse of resources.

Additional security capabilities

Azure identity and security services also support modern frameworks such as Zero Trust and conditional access, which evaluate user identity, device health, location, and risk signals before granting access. These approaches help organizations defend against evolving threats.

IV. Pricing Model and Operational Flexibility

Azure Pricing Model

Pay‑as‑you‑go

You are billed based on actual consumption with no upfront commitment. This is ideal for workloads that change frequently because you can scale resources up or down instantly.

Reserved capacity

You commit to using a service (such as virtual machines or databases) for one or three years in exchange for a lower price. This is best for predictable, always‑on workloads.

Spot pricing

You use unused Azure capacity at a steep discount, with the understanding that Azure can reclaim the resources at any time. This works well for batch jobs, testing, or workloads that can tolerate interruptions.

What affects cost

  • Service type (compute, storage, networking)
  • Region where the service runs
  • Performance tier
  • Data transfer
  • Duration of usage

These factors allow organizations to tailor spending to their technical and financial goals.

Operational Flexibility in Azure

Elastic scalability

Azure resources can automatically scale based on demand. This prevents overprovisioning and reduces wasted cost.

Global deployment

Azure’s worldwide datacenter network lets you run applications close to users, improving performance and offering redundancy options.

Multiple service tiers

Most Azure services offer different performance levels, allowing you to choose between cost‑optimized or high‑performance configurations.

Cost management tools

Azure provides budgeting, monitoring, and optimization tools to help track spending and identify savings opportunities.

V. What AZ-900 Changed in My Perspective

Studying for AZ-900 was not just about passing an exam. It helped me structure cloud knowledge into:

  1. Concepts
  2. Services
  3. Security
  4. Cost management

More importantly, it shifted my mindset from “managing servers” to “designing scalable systems.”

VI. Conclusion

Microsoft Azure is not just a collection of cloud services. It is a comprehensive ecosystem designed to support modern software architectures — from startups to global enterprises.

For developers transitioning from traditional infrastructure or embedded systems to cloud-native environments, Azure provides a structured path forward.

Earning AZ-900 was only the beginning. The real value comes from applying these concepts in real-world architectures.

Ready to get started?

Contact IVC for a free consultation and discover how we can help your business grow online.

Contact IVC for a Free Consultation
References:

https://learn.microsoft.com/en-us/training/modules/describe-cloud-service-types/2-describe-infrastructure-service

https://learn.microsoft.com/en-us/training/modules/describe-cloud-service-types/3-describe-platform-service

https://learn.microsoft.com/en-us/training/modules/describe-cloud-service-types/4-describe-software-service

https://learn.microsoft.com/en-us/training/modules/describe-azure-compute-networking-services/8-virtual-network

https://learn.microsoft.com/en-us/training/modules/describe-security-concepts-methodologies/3-describe-defense-depth

https://learn.microsoft.com/en-us/training/modules/describe-security-concepts-methodologies/4-describe-zero-trust-model

https://learn.microsoft.com/en-us/training/modules/describe-security-concepts-methodologies/5-describe-encryption-hashing

https://learn.microsoft.com/en-us/training/modules/describe-security-concepts-methodologies/2-describe-shared-responsibility-model

https://learn.microsoft.com/en-us/training/modules/describe-identity-principles-concepts/3-define-identity-primary-security-perimeter

https://azure.microsoft.com/en-us/pricing/https://www.swiftorial.com/tutorials/cloud_computing/azurecloud/introduction_to_azurecloud/azure_pricing_models/

View More
OUTSOURCING

June 4, 2026

What Is Adaptive Software Development (ASD)? A Practical Guide for Modern Engineering Teams

Deadlines shift. Requirements change. Markets move faster than roadmaps.

For engineering teams working in complex, unpredictable environments, traditional plan-driven development often creates more friction than it solves. That's where Adaptive Software Development (ASD) comes in.

Introduced by Jim Highsmith and Sam Bayer in the mid-1990s, ASD was built on a simple premise: embrace change, don't fight it. Instead of locking in requirements upfront, ASD teams operate in short cycles of speculation, collaboration, and learning. They continuously adapt based on real feedback.

In this guide, we break down what ASD is, how it works, how it compares to Agile and Waterfall, and how modern engineering teams, including distributed and offshore teams, are applying it in practice.

What Is Adaptive Software Development (ASD)?

what is adaptive software development

Adaptive Software Development (ASD) is an iterative software development methodology in which teams work in repeating cycles of Speculate, Collaborate, and Learn to build complex systems while continuously responding to change. It was introduced by Jim Highsmith and Sam Bayer and helped shape the principles later formalized in the Agile Manifesto.

Unlike methodologies that attempt to eliminate uncertainty, ASD treats uncertainty as a given, and designs the process around it.

The ASD Market: Why This Methodology Is Growing

what is adaptive software development

Adaptive Software Development is gaining momentum as both engineering practices and the market itself demand more flexibility.

According to Gartner, the custom software development services market is growing at a compound annual growth rate of 8.9% and is expected to exceed $283 billion by 2028. This trend suggests that demand for software continues to expand, along with the complexity of building it.

As the market grows, so does the pressure on engineering teams. Products evolve mid-cycle, customer expectations shift, and new technologies continuously reshape development. In this context, rigid, plan-driven models can struggle to keep up, which is where ASD becomes increasingly relevant.

Insights from Forrester's The State Of Agile Development, 2025 also point in a similar direction. 95% of professionals say Agile remains critical to their operations, and 58% of business and technology leaders are prioritizing it in 2025. In addition, 61% of organizations have been using Agile for more than five years. This suggests that iterative and adaptive ways of working are now widely established.

At the same time, there appears to be a shift in focus. As Agile matures, teams are placing more emphasis on adaptability itself rather than strictly following predefined frameworks. ASD builds on this foundation by treating change and uncertainty as core conditions to design for.

What's driving adoption?

Three key factors are accelerating ASD adoption:

  • The rise of distributed teams. As organizations become more global, coordination can no longer rely on rigid processes or constant real-time communication. Flexible frameworks help teams stay aligned while working asynchronously.
  • The acceleration of product cycles. Teams are expected to release, test, and iterate much faster than before. Requirements often change during development, and methodologies that assume stability can struggle in this environment. ASD is designed to absorb and respond to that kind of change.
  • The growth of offshore development. Working across regions introduces challenges in communication and alignment, and overly prescriptive processes tend to break down. ASD provides a balance by offering enough structure to maintain alignment while remaining flexible enough for distributed collaboration.

The 3 Phases of ASD

what is adaptive software development

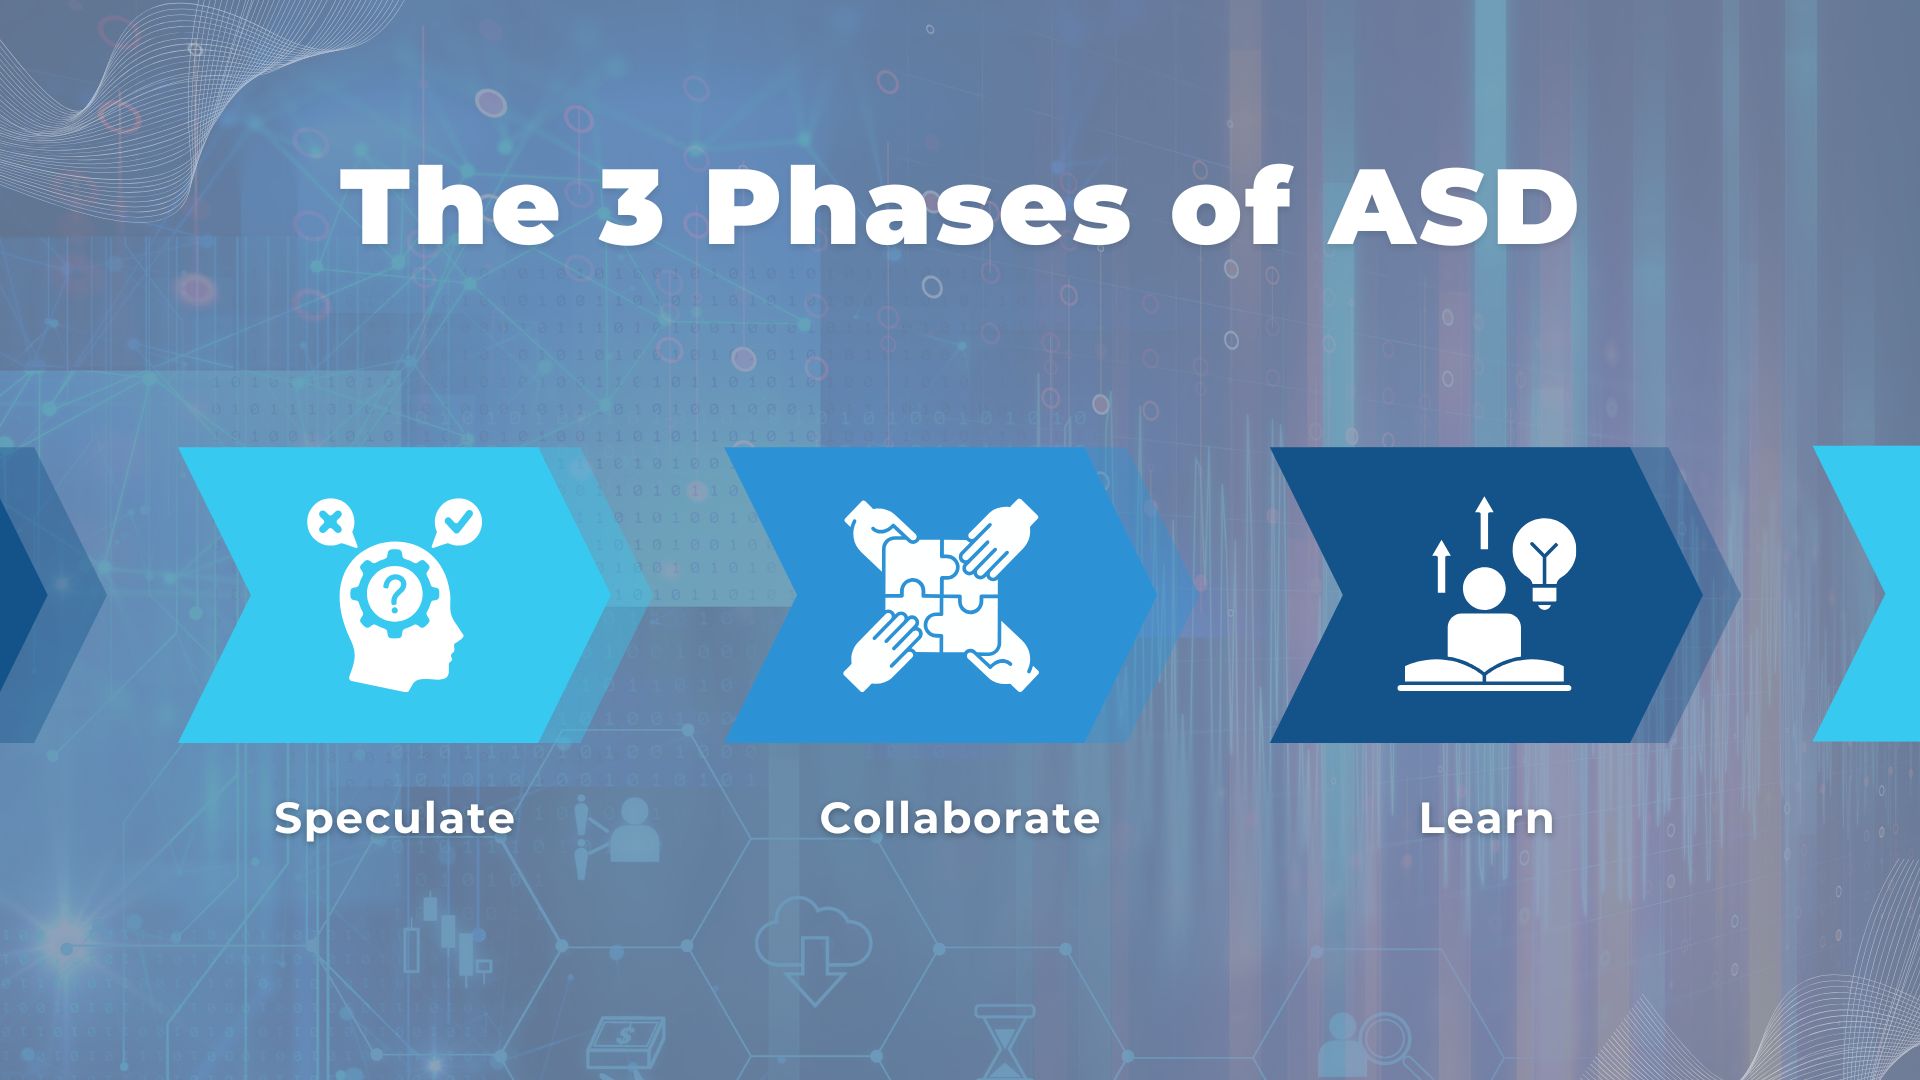
Adaptive Software Development is built around a simple but powerful cycle of Speculate, Collaborate, and Learn. Instead of following a fixed sequence, teams repeat these three phases continuously, using each iteration to refine both the product and the process based on real-world feedback.

Phase 1: Speculate

In ASD, planning starts with speculation rather than prediction. Teams define a clear direction and set of goals, but they avoid locking themselves into detailed, long-term plans that assume certainty. Instead, they identify key assumptions, risks, and unknowns, then create a flexible roadmap that can evolve as new information emerges. This approach allows teams to move forward with intent while staying open to change, which is critical in fast-moving or unclear environments.

Phase 2: Collaborate

Collaboration is where execution happens, and in ASD it is treated as a core capability rather than a supporting activity. Cross-functional teams work closely together, sharing context, solving problems in real time, and maintaining continuous communication with stakeholders. The focus is on collective ownership, not isolated roles, which helps reduce misalignment and accelerates decision-making. This becomes especially important in distributed or offshore setups, where strong collaboration practices are the difference between progress and friction.

Phase 3: Learn

Every iteration ends with deliberate learning. Teams gather feedback from users, stakeholders, and internal reviews, then use those insights to refine both the product and the way they work. This phase is not just about identifying what went wrong, but also about reinforcing what worked and why. Over time, this continuous learning loop helps teams make better decisions, reduce risk, and adapt more effectively to changing conditions.

ASD vs. Agile vs. Waterfall: Key Differences

what is adaptive software development

Each methodology approaches planning, change, and execution differently. Understanding these differences helps you choose the right model based on your project's level of uncertainty, speed requirements, and team structure.

Aspect ASD Agile Waterfall
Core Approach Fully adaptive and change-driven Iterative with structured cycles Linear and plan-driven
Planning Style High-level, speculative planning Sprint-based planning Detailed upfront planning
Handling Change Change is expected and embraced continuously Managed within sprint boundaries Difficult and costly to implement
Development Cycle Continuous phases (speculate, collaborate, learn) Time-boxed iterations (sprints) Sequential phases (design, build, test)
Collaboration Deep, ongoing collaboration across all roles Strong within teams, structured ceremonies Limited, often siloed by phase
Feedback Timing Continuous and integrated into each cycle Regular, typically at sprint reviews Late-stage, often after development
Risk Management Addressed early and revisited continuously Managed per iteration Identified early but often revisited late
Best Fit Complex, uncertain, fast-changing projects Product-focused teams needing flexibility Stable, predictable projects with fixed scope

7 Core Principles of Adaptive Software Development

what is adaptive software development

Adaptive Software Development is built on a set of principles that prioritize flexibility, collaboration, and continuous improvement in fast-changing environments.

  • 1. Adaptability
    ASD emphasizes adaptive, high-level planning over rigid, detailed roadmaps. Teams focus on direction rather than fixed outcomes, allowing them to adjust quickly as requirements or market conditions evolve.
  • 2. Collaborative Environment
    Open communication and strong teamwork are central to ASD. Teams are encouraged to share ideas, align frequently, and build a culture where collaboration drives better outcomes.
  • 3. Continuous Learning
    Each iteration is an opportunity to learn. Feedback from users, stakeholders, and internal reviews is continuously incorporated to improve both the product and the development process.
  • 4. Iterative Development
    Development is broken into small, manageable increments. Each cycle delivers working software, making it easier to validate progress and adapt without large-scale disruption.
  • 5. Responsive to Change
    ASD is designed to handle change at any stage. Teams are structured to respond quickly to new requirements, technologies, or market shifts without slowing down delivery.
  • 6. Risk Management
    Risks are identified early and addressed continuously. Instead of avoiding uncertainty, teams actively manage it as part of the development process.
  • 7. Empowerment and Ownership
    Teams are trusted to make decisions and take responsibility for outcomes. This sense of ownership improves accountability, speed, and overall execution quality.

When Should You Use ASD?

what is adaptive software development

ASD is a powerful methodology, but it works best in environments where change is constant and feedback can be acted on quickly. The key is knowing whether your project actually needs that level of flexibility.

The Best Use Cases for ASD

ASD is well suited for projects where requirements evolve over time, such as startups or new product development. It works best when teams can operate autonomously and make decisions without heavy approval layers. Active stakeholder involvement is also important, since continuous feedback drives progress. ASD is a strong fit for complex systems that need to be built incrementally, and for offshore or distributed teams that require a flexible way to stay aligned across locations.

When ASD Is Not the Right Choice

ASD is less effective when requirements are fixed from the start, such as in regulated or compliance-heavy projects. It also breaks down when stakeholders cannot provide ongoing feedback. Teams that are new to adaptive ways of working may struggle without proper support. For small, stable projects with minimal change, a simpler approach is often more efficient.

ASD and Offshore Teams: What to Look For

Using ASD with offshore teams requires more than adopting a framework. Strong communication habits are essential to keep everyone aligned across time zones. Teams need engineers who can work independently and take ownership, along with a culture of transparency where issues are surfaced early.

This is where many offshore partnerships fail. The challenge is not skill, but execution and alignment.

If you are evaluating an offshore partner, focus on whether they can operate in an adaptive, feedback-driven model in a distributed environment.

At ISB Vietnam (IVC), this is where the difference becomes clear. By combining ASD with Japanese-quality disciplined communication practices, teams stay aligned without losing flexibility. More importantly, the focus is not just on delivering a single project, but on building a process that continuously improves over time.

If you are looking for a long-term offshore partner that can evolve with your product, not just execute tasks, contact IVC to explore how we can support your next phase of growth.

Contact IVC Today

How ASD Works in Offshore Development Teams

what is adaptive software development

Applying ASD in offshore environments is not just about adopting a methodology. It requires aligning process, communication, and team structure to handle distance, time zones, and evolving requirements.

Why ASD suits offshore partnerships

Offshore development introduces natural complexity. Time zone gaps, communication delays, and cultural differences can quickly create misalignment. ASD helps reduce this risk by working in short cycles, emphasizing continuous feedback, and encouraging close collaboration. Instead of relying on fixed plans, teams adjust frequently, which makes it easier to stay aligned even when conditions change.

How IVC applies ASD principles in client projects

At ISB Vietnam (IVC), ASD is applied with a focus on execution discipline. "Speculate" is guided by real business context rather than assumptions. "Collaborate" is supported by structured communication practices, ensuring transparency across teams. "Learn" is treated as an operational process, where insights from each cycle are documented and reflected in both product and workflow improvements. This approach allows projects to stay flexible without losing control.

Communication cadence for distributed ASD teams

For ASD to work in distributed teams, communication needs to be intentional:

  • Daily asynchronous updates help maintain visibility without slowing teams down.
  • Weekly syncs are used for decision-making rather than status reporting.
  • Iteration reviews provide real stakeholder feedback.
  • Retrospectives are used to improve how the team works. This cadence creates alignment without relying on constant real-time interaction.

ASD and Japanese Quality Standards: A Natural Fit

what is adaptive software development

In the unpredictable world of R&D, rigid plans are the enemy of innovation. At IVC, we navigate the "unknowns" of our clients' most ambitious projects by combining the rapid flexibility of Adaptive Software Development (ASD) with the uncompromising discipline of Japanese Quality Management. Here's how this unique synergy transforms shifting requirements into high-quality results.

The "Soul" of the Sprint: Why ASD and Japanese Quality are a Perfect Match

When a client approaches us with an R&D project, the requirements are rarely set in stone. In our AI-powered VR Chat tool project, the goals shifted every time the client saw a new prototype.

While others might struggle with "scope creep", we use it as fuel. We've found a natural harmony between the three phases of ASD and the foundational principles of Japanese Quality Management. In our workflow, Japanese values aren't just cultural additions, they are the "engine" driving each phase.

Speculate: Staying Agile Through Shifting Requirements

In the Speculate phase, we don't lock ourselves into a rigid, year-long plan. Because the client's priorities changed weekly, we updated our roadmap every cycle. This allowed us to treat the client's evolving vision as a strength rather than a distraction, ensuring the project always moved toward their latest goal.

Collaborate: Horenso as the Communication Engine

In a fast-paced AI project, doing is not enough. We have to communicate. This is where Horenso (Report, Update, Consult) becomes vital during the Collaborate phase.

Strategic Soudan (Consultation):

During this project, we were under immense pressure to deliver measurable results in only one month. When the AI analyzed meeting notes and suggested a massive wish list of features, the easiest path would have been to try and build them all poorly.

The "One-Month Quality" Logic:

Instead, we used Soudan to advise the client to focus on just two core features. Why? Because in a high-speed R&D environment, it is better to have two features that are fully functional, tested, and integrated than ten features that crash. This narrow focus allowed us to run the entire flow from AI coding to rigorous manual testing, maintaining Japanese quality standards even under a tight deadline.

Learn: Kaizen as a Feedback Engine

The Learn phase aligns closely with Kaizen (continuous improvement). We review not only what was built, but how it was built.

When issues occurred, such as logic errors from AI outputs, we addressed root causes by refining prompts rather than applying temporary fixes. We also measured AI productivity against human benchmarks to identify inefficiencies. These insights were fed into the next cycle, improving both speed and reliability over time.

The IVC Advantage

For our clients, this means an R&D project doesn't just adapt to their changing ideas. It gets smarter and more reliable with every iteration. We don't just build software. We refine a living process through the PDCA (Plan-Do-Check-Act) cycle.

ASD's Speculate-Collaborate-Learn framework gives us the flexibility to pivot, but Japanese Horenso and Kaizen give us the engine to deliver excellence. That is the IVC promise.

FAQ: Adaptive Software Development

what is adaptive software development

Below are answers to questions we hear most often from CTOs and engineering leads evaluating adaptive methodologies for their offshore projects.

Q: What is the difference between ASD and Agile?

ASD is closely related to Agile but places a stronger emphasis on continuous adaptation in uncertain environments. While Agile typically organizes work into structured sprints, ASD focuses on an ongoing cycle of Speculate, Collaborate, and Learn, allowing teams to adjust more fluidly as conditions change.

Q: What are the three phases of Adaptive Software Development?

The three phases are Speculate, Collaborate, and Learn. Teams first set direction and assumptions, then execute through close collaboration, and finally gather feedback to refine both the product and the process.

Q: Is Adaptive Software Development suitable for offshore teams?

Yes, ASD can work very well with offshore teams when supported by strong communication practices, clear ownership, and continuous feedback loops. It is particularly effective in distributed environments where flexibility and alignment are both required.

Q: Who created Adaptive Software Development?

ASD was introduced by Jim Highsmith and Sam Bayer in the 1990s.

Q: What types of projects benefit most from ASD?

ASD is best suited for projects with high uncertainty, evolving requirements, and complex systems. It is commonly used in startup environments, new product development, and situations where continuous stakeholder feedback is available.

Conclusion

what is adaptive software development

Adaptive Software Development (ASD) gives modern engineering teams a practical way to operate in uncertainty. Instead of trying to predict everything upfront, ASD allows teams to move forward with direction, adapt through collaboration, and improve continuously through learning. This makes it especially valuable for fast-moving products, evolving requirements, and distributed development environments.

For CTOs and engineering leaders, the takeaway is straightforward. The challenge is no longer choosing between speed and quality. The real challenge is building a system that can deliver both, even as conditions change.

If you are scaling your product and considering offshore development, the methodology alone is not enough. Execution, communication, and long-term alignment are what make the difference.

Contact IVC to see how we apply ASD in real-world offshore projects and build partnerships that evolve with your business.

Contact IVC Today

Sources / References

Data and insights in this article are based on the following sources:

External Image Links

  • All images featured in this article are provided by Unsplash, a platform for freely usable images.
  • The diagrams used in this article were created using Canva.
View More
TECH

May 29, 2026

My First Steps from Manual to Automation QC

After more than 1.5 years working in Manual Testing, I realized that for large-scale systems with long-term development cycles, Regression Testing is a major bottleneck. Manually re-executing test cases is not only repetitive and time-consuming but also highly prone to human error. That is when I knew Automation Testing was the inevitable next step.

If you are also starting as a Manual QC like me, don't worry—it is actually a huge advantage. Here is my journey and some tips from when I first started learning Automation with Playwright using Python.

1. What to Prepare Before Starting

Test Case Writing Skills (The Foundation)

This is an essential skill that every QC needs, whether you do manual or automation testing.

  • Proactiveness: If you write your own Test Cases, you will have a better grasp of the requirements (specs). When converting them into scripts, you might discover inconsistencies or gaps in the test cases, allowing you to optimize and update them quickly. If you rely solely on existing Test Cases to write scripts, you might spend too much time trying to understand them. Also, you can't be sure if those Test Cases are still accurate according to the design specs. This makes your scripting process quite passive.
  • Know what to automate: Not everything should be automated. Deep business understanding helps in deciding which cases to automate (high repetition, stable) and which to test manually (frequent UI changes, overly complex logic). This saves a lot of wasted effort.

Basic Knowledge

  • Programming Language: You don't need to be an expert developer. Start with the core concepts: variables, data types, operators, loops, conditional statements (if/else), and functions. Additionally, grasping basic Object-Oriented Programming (OOP) concepts (like Classes and Objects) is highly recommended. Having basic knowledge of a programming language will make the learning curve smoother when approaching a new test scripting language. You can start with Python because its syntax is very close to natural language, making it extremely easy for beginners to learn.
  • Web Knowledge: Explore the HTML/DOM structure and various element attributes to craft effective locators (such as CSS Selectors and XPath). Master the use of browser DevTools (F12) to inspect elements, debug, and monitor Network requests. Additionally, understanding asynchronous mechanisms (Promises, Async/Await) and element states (e.g., visible, enabled) is crucial for leveraging the Auto-wait feature, ensuring that scripts run stably.
  • Version Control (Git): Automation test code is as important as the application's source code. Knowing how to use a Version Control System is a must. You don't need to memorize advanced commands right away. Instead, just get used to basic daily tasks: cloning a repository, creating branches for new test cases, saving your changes (commit), and syncing (pull/push) with platforms like GitHub or GitLab. Knowing these basics will make sure you can manage your script versions safely, track your own changes, and work smoothly with other QCs and Developers without code conflicts.

2. Learning Playwright: Key Concepts

When I started with Playwright, these were the most important things I learned:

Project Setup Commands

Before writing any code, you need to install the Playwright library and the browsers it uses to run the tests. In Python, you just need to type these two simple commands into the terminal:

  • pip install pytest-playwright: This command installs the Playwright framework along with pytest (a very popular testing tool in Python).

  • playwright install: This command downloads the necessary browser engines (like Chromium, Firefox, and WebKit) so Playwright can open them and simulate user actions.

Test Execution Commands 

After writing your test scripts, you need to run them to see if they Pass or Fail. Here are the commands you might use every day:

  • pytest: This command runs all your test files silently in the background (this is called Headless mode - no UI is shown, and it is the default setting).

  • pytest --headed: This command runs the tests and actually opens the browser window for you to see. This is super helpful for beginners, as it lets you watch the bot clicking and typing on the screen with your own eyes.

  • pytest test_login.py: This command only runs one specific test file (for example, the test_login.py file) instead of making the computer run all the files.

Locators (How to find elements)

In the past, QC engineers heavily relied on XPath or CSS Selectors, which can break easily if the DOM structure changes. While Playwright still supports them, it strongly recommends using User-facing Locators—finding elements based on how a user actually perceives them on the screen:

  • get_by_role: Locates elements by their implicit role (e.g., button, input) and display name.

    Python example: page.get_by_role("button", name="Submit").click()

  • get_by_text: Locates elements by the exact text displayed on the screen.

    Python example: page.get_by_text("Forgot password").click()

  • get_by_label: Locates input fields based on their associated Label (for example, an "Email" field).

    Python example: page.get_by_label("Email").fill("test@example.com")

Auto-waiting

This is a "magic" feature. Playwright automatically waits for a button to appear or be ready before clicking it. You don't have to manually write "wait 5 seconds" anymore, which makes your tests much more stable.

Assertions (Checking the results)

To check if a test Passed or Failed, we use expect function.

One of the most powerful features here is auto-retrying assertions. You don't need to write complex code to wait for an element to load. Playwright is smart enough to automatically wait and retry the check until the condition becomes true (or until the timeout is reached).

For example:  

  • Checking if a success message is visible on the screen:

    Python example: expect(page.get_by_text("Login Successful")).to_be_visible() 

  • Checking if an input field contains exactly the expected value:

    Python example: expect(page.get_by_label("Email Address")).to_have_value("test@example.com")

  • Checking if a specific element is disabled (cannot be clicked):

    Python example: expect(page.get_by_role("button", name="Submit")).to_be_disabled()

Read more at: https://playwright.dev/python/docs/test-assertions

3. Automation Support Tools - Work Smarter

Below are the tools that will help you work faster when coding automation test scripts:

  • Codegen: This is a "magical" tool for automatic code generation. You simply interact with the web interface, and Playwright automatically records and converts your actions into source code. It is an excellent way to learn syntax during the early stages.
  • AI Tools (like Cursor): AI is a powerful asset that can speed up code writing based on Test Cases. By crafting a precise prompt in your desired format and providing the Test Case for reference, the AI will quickly generate the test script. Your remaining tasks are to review, run it with Pytest, and refine the logic, saving you the time of coding line by line.
  • UI Mode & Trace Viewer: Don't panic when a script fails. UI Mode and Trace Viewer allow you to replay the "movie" of your test process, inspecting exactly where it failed and seeing the UI state at that moment to find clues for a faster fix.
  • Reports: After running tests, Playwright automatically creates a professional HTML report with full statistics: Passed, Failed, Flaky (intermittent)... and can even include screenshots for each case if configured.

4. Next Steps

Once you master these basics, the next challenge is organizing your code. I highly recommend looking into the Page Object Model (POM)—a design pattern that will make your scripts scalable, readable, and much easier to maintain as your project grows.

Final Thoughts

And that’s everything I’ve learned and prepared while getting started with automation testing.

The journey from Manual to Automation isn’t as scary as I first thought. As long as you have a solid foundation in Manual testing, plus a bit of patience with modern tools like Playwright, you’ll find the work becomes much more exciting and rewarding.

Good luck to you (and to me too!) as we push further on this Automation QC path!

Ready to get started?

Contact IVC for a free consultation and discover how we can help your business grow online.

Contact IVC for a Free Consultation

View More
TECH

April 23, 2026

Understanding AI Terminology (Part 1)

In today’s IT world, we are surrounded by AI talk. Whether you are a developer, a project manager, or a IT translator, understanding these concepts is no longer optional—it is essential. However, the technical jargon can be overwhelming. Let’s break down the most important AI terms into simple, real-world ideas.

The Big Picture: AI, ML, and Deep Learning

AI, ML, and Deep Learning1

To understand how AI is built, imagine a set of Russian Dolls (Matryoshka) where one sits inside the other. (Read more about the AI hierarchy).

The largest, outermost doll is Artificial Intelligence (AI). This is the broad goal of creating machines that can mimic human intelligence. In the early days, this was done using fixed rules. Think of a chess-playing robot from the 90s; it didn't "learn" anything, it just followed a long list of "If-Then" instructions written by a human.

Inside that is the middle doll: Machine Learning (ML). This is a smarter way to reach the goal of AI. Instead of writing every rule, we give the machine a massive amount of data and let it find patterns on its own. A classic example is a Spam Filter. You show the system 10,000 "Spam" emails and 10,000 "Real" emails. The machine eventually notices that spam often contains words like "FREE" or "WINNER" and starts blocking them automatically without being told exactly what to look for.

Finally, the smallest doll at the center is Deep Learning (DL). This is the most advanced type of ML, using "Neural Networks" that act like a human brain to handle very messy data. This technology is what powers the Face-Unlock feature on your phone. To recognize your face—even if you grow a beard, wear glasses, or get older—the AI needs the deep, brain-like power of DL to analyze thousands of tiny details in your features.

Moving to language, we often hear about Large Language Models (LLMs). These are specific types of AI, like ChatGPT or Gemini, that are trained on almost everything written on the internet. You can think of an LLM as a super-advanced "Auto-complete." If you type "The capital of France is...", it predicts the next word is "Paris" simply because it has seen that pattern millions of times before.

How AI Goes to School

How AI Goes to School

Before an AI can work, it must undergo a rigorous learning process. This starts with Annotation (or Data Labeling), which we can think of as the "Teacher Phase." AI doesn't inherently understand the world; it needs to be told exactly what it’s looking at. Humans, known as Annotators, must look at thousands of data points and "tag" them.

For example, for a Self-Driving Car to function, humans must manually draw boxes around objects in street photos, labeling them as "Tree," "Stop Sign," or "Pedestrian." This provides the AI with "Ground Truth"—the factual foundation it needs to perceive reality. Without this meticulous human help, the AI is essentially blind.

Once an AI has gained general intelligence, we can give it "extra lessons" through a process called Fine-tuning. Instead of building a new model from scratch, we take a pre-trained general AI and show it a specific dataset—like 5,000 legal contracts. Through this specialization, it stops being a general chatbot and evolves into a Legal AI Specialist that masters the complex nuances of law. This approach is highly efficient, saving both time and massive computing costs.

However, the biggest challenge in AI is a problem called Overfitting. This happens when an AI learns the training data too perfectly—it memorizes the specific examples instead of learning the logic.

To understand this, let’s look at a simple example: Teaching an AI to recognize a "Bird."

Imagine you give the AI thousands of photos of birds to study. However, there is a small problem: every bird in your photos is red.

  • Balanced Learning (Correct): The AI looks at the wings, the beak, and the feathers. It understands that a bird is a creature with these specific features.
  • Overfitting (The Trap): The AI looks at the color and concludes: "Anything that is red is a bird."

When you test the AI with a photo of a blue bird, the AI will say: "This is NOT a bird" because it isn't red. The AI failed because it didn't learn the "logic" of what a bird is; it only memorized the "color" from your specific photos.

In the IT world, we want our AI to have Generalization—the ability to handle new, unseen situations correctly, rather than just memorizing old data.

Tokens, Memory, and the Art of "Confident Lying"

Tokens, Context Window, and Hallucination

Once we understand how AI learns, we need to look at how it actually "reads" our instructions. While we see words and sentences, the AI sees the world through Tokens. Think of tokens as the "atoms" of language—small fragments that the AI uses to turn our text into numbers it can calculate. A common word like "apple" might be just one token, but a complex one like "terminology" gets chopped into pieces: termin, olo, and gy.

This isn't just a technical detail; it’s the "currency" of AI. Most AI companies charge you based on how many tokens you send in and how many the AI spits out. Interestingly, for us in the IT world, this means language matters. Because of how AI is built, languages like Vietnamese often require more tokens than English to say the same thing, making the "cost" of a conversation slightly different depending on the language you use.

But these tokens don't just cost money; they also take up space. Every AI model works at what I like to call a Context Window—or its short-term memory. Imagine the AI is a brilliant employee sitting at a very small desk. Every PDF you upload, every old message in the chat, and every instruction you give must fit on that desk for the AI to "see" it.

If your conversation gets too long and exceeds the "desk space," the AI has to start throwing the oldest papers into the trash to make room for new ones. This is exactly why, after a long brainstorming session, the AI might suddenly forget your name or the very first rule you set—it simply ran out of room on its desk.

Nowadays, tech giants are racing to build "giant desks," expanding these context windows so AI can "read" an entire book series in one go. But even with a massive memory, AI has a famous flaw: it loves to tell "confident lies," a phenomenon we call Hallucination.

You see, at its heart, an AI is a high-speed probability engine. It doesn't actually check a "truth database" to see if a fact is real. Instead, it asks itself: "Given the words I've seen so far, what is the most likely next word?" If it doesn't have the exact answer, it won't simply say "I don't know" (unless we tell it to). Instead, it will keep predicting the next word to finish the sentence.

This is how you get professional-sounding answers about non-existent coding functions that look perfect but return an undefined error the moment you run them. The AI prioritizes sounding logical and grammatically perfect over being factually true. For those of us working as Developers or PMs, this is the ultimate reminder: never trust numbers or specific names 100%. Always cross-reference and fact-check.

How do we fix this?

To stop these lies, we use RAG (Retrieval-Augmented Generation). AWS provides a great deep dive into this architecture. Think of this as an "Open Book Exam." Instead of letting the AI guess, a RAG system first searches a reliable source—like your company's handbook—and tells the AI: "Only answer based on this text." We also use Prompt Engineering (giving clear, detailed instructions) and Guardrails (safety fences that block dangerous or wrong answers) to keep the AI on the right track.

Quick Advice for IT Professionals

  • Don't trust, verify: Always fact-check names, dates, and code. AI is a master of sounding professional even when it’s wrong.
  • Be specific: Treat AI like a smart intern. The more context you give in your prompt, the better the result.
  • Watch the tokens: Keep your inputs clean to save costs and avoid hitting the memory limit.

Join the AI Revolution with ISB Vietnam

At ISB Vietnam, we are not just watching the AI revolution—we are leading it. We believe that AI is most powerful when handled by experts who understand its strengths and its "hallucinations." That’s why we are constantly training our developers to master AI tools, ensuring that our software solutions are not just fast, but smart and secure.

Whether you need scalable software solutions, expert IT outsourcing, or a long-term development partner, ISB Vietnam is here to deliver.

Are you a tech talent looking to work in an environment that embraces AI? We are always looking for passionate people to join our team and push the boundaries of what's possible.

Let’s build something great together—reach out to us today!

Image source: Generated by Gemini

View More
TECH

April 23, 2026

File Handling in C++ via MapViewOfFile

Memory-mapped files are one of the most powerful features available to Windows C++ developers. At the center of this mechanism is MapViewOfFile, a function that allows you to treat file contents as if they were part of your program’s memory.

In this blog post, we’ll walk through a complete example and explain every handle involved — what it represents, why it exists, and how it fits into the Windows memory model.

What Exactly Is MapViewOfFile?

Memory-mapped files are a core part of the Windows memory management system. Instead of manually reading file data into buffers, Windows allows you to map a file directly into your process’s virtual memory. The function responsible for this is MapViewOfFile.

In simple terms:

MapViewOfFile lets you treat a file on disk as if it were an array in memory.

Once mapped, you can read (or write) file contents using normal pointer operations — no repeated calls to ReadFile, no manual buffering.

This mechanism is part of the Win32 API and works together with:

  • CreateFile
  • CreateFileMapping
  • UnmapViewOfFile

Why Memory-Mapped Files Exist

Traditional file I/O works like this:

  1. Request data from the OS
  2. OS copies file data into a buffer
  3. Your program reads from that buffer

Memory mapping removes extra copying. The operating system:

  • Maps file data into virtual memory
  • Loads pages only when accessed (on demand)
  • Uses the system cache efficiently
  • Allows sharing between processes

This makes memory mapping ideal for:

  • Large files
  • High-performance systems
  • Random file access
  • Inter-process communication

How Mapping a File Works

Mapping a file involves three important objects:

  1. hFile — File Handle
  2. hMapping — File Mapping Handle
  3. pView — Mapped Memory Pointer

Let’s walk through each one conceptually.

hFile — The File Handle

We start by calling CreateFile.

        HANDLE hFile = CreateFile(...);

What It Represents?

hFile is a handle to a file object managed by the Windows kernel. It does not contain the file data. Instead, it represents:

  • A reference to an open file
  • Access permissions
  • File metadata
  • A kernel-managed file object

Think of it as your program’s official permission slip to access the file

Why It’s Needed?

The file handle tells Windows: “I want to work with this file, and here are my access rights.” Without this handle, you cannot create a file mapping.

When It’s Released?

        CloseHandle(hFile);

Once closed, the program no longer has access to the file.

 hMapping — The File Mapping Handle

We start by calling CreateFileMapping.

        HANDLE hMapping = CreateFileMapping(hFile, ...);

What It Represents?

This handle represents a file mapping object, which is a kernel object describing:

  • How the file will be mapped
  • Protection flags (read-only, read/write, etc.)
  • Maximum size of the mapping

Important:
This still does not map the file into memory. Instead, it creates a blueprint for mapping.

Conceptually:

If hFile is the permission slip to the file, hMapping is the architectural plan for how the file will appear in memory.

Why It Exists Separately?

Windows utilizes a structured approach by separating file access into three distinct layers: the file object, the mapping object (configuration), and the view (the actual memory mapping).

This decoupled architecture provides significant flexibility, enabling developers to create multiple mappings with varying protection levels and facilitate seamless shared memory between processes.

Furthermore, this separation offers granular control over advanced memory management tasks.

When It’s Released?

        CloseHandle(hMapping);

This removes the mapping object from the system.

pView — The Mapped View Pointer

We start by calling MapViewOfFile.

        LPVOID pView = MapViewOfFile(hMapping, ...);

This is where the file actually becomes accessible as memory.

What It Represents?

This is not a handle. It is a pointer to virtual memory inside your process. This is where the magic happens.

When you invoke the MapViewOfFile function, Windows performs a sophisticated memory orchestration.

First, it reserves a specific range of address space within your process. It then creates a direct link between this space and the file's data.

Rather than loading the entire file at once, the OS intelligently loads data pages into physical memory only when they are accessed—a process known as 'on-demand paging.'

Consequently, the file ceases to be a distant object on the disk and begins to behave like a standard in-memory array.

You can now do:

        char* data = static_cast<char*>(pView);

        std::cout << data[0];

No ReadFile, no buffers — just pointer access.

When It’s Released?

        UnmapViewOfFile(pView);

This removes the file from your process’s address space.

How the OS Delivers the Data

Unlike ReadFile, the OS does not immediately load the entire file. Instead, it will do the following actions:

  • Accessing memory triggers a page fault
  • The OS loads the required page from disk
  • The system cache keeps it in memory
  • Future accesses are fast

This mechanism is extremely efficient and is one reason memory-mapped files scale well for large datasets.

Cleaning Up Properly

Each object must be released in reverse order:

  • UnmapViewOfFile(pView);
  • CloseHandle(hMapping);
  • CloseHandle(hFile);

Why this order?

It's important to remember that these elements are interconnected. Because the view is tied to the mapping object, and the mapping object is tied to the file handle, they must be released in a specific order. Failing to do so can lead to unexpected crashes or unstable application behavior.

Sharing Memory Between Processes

One powerful feature of file mappings:

If multiple processes open the same-named mapping object, they can share memory.

Instead of mapping a disk file, you can even pass INVALID_HANDLE_VALUE to CreateFileMapping to create shared memory backed by the system paging file.

This is a common IPC (Inter-Process Communication) technique in Win32.

Conclusion

MapViewOfFile is not just a function — it’s a gateway into Windows’ virtual memory system.

The process involves:

  1. Opening a file (CreateFile)
  2. Creating a mapping object (CreateFileMapping)
  3. Mapping a view into memory (MapViewOfFile)
  4. Accessing file data through a pointer
  5. Cleaning up with UnmapViewOfFile

While it may feel lower-level compared to C++ standard streams, it provides unmatched control and performance.

If you're building performance-critical Windows applications — such as game engines, database systems, or file-processing tools — understanding memory-mapped files will make you a significantly stronger systems developer.

Reference:

https://learn.microsoft.com/en-us/windows/win32/api/memoryapi/nf-memoryapi-mapviewoffile

https://learn.microsoft.com/en-us/windows/win32/memory/file-mapping

Ready to get started?

Contact IVC for a free consultation and discover how we can help your business grow online.

Contact IVC for a Free Consultation
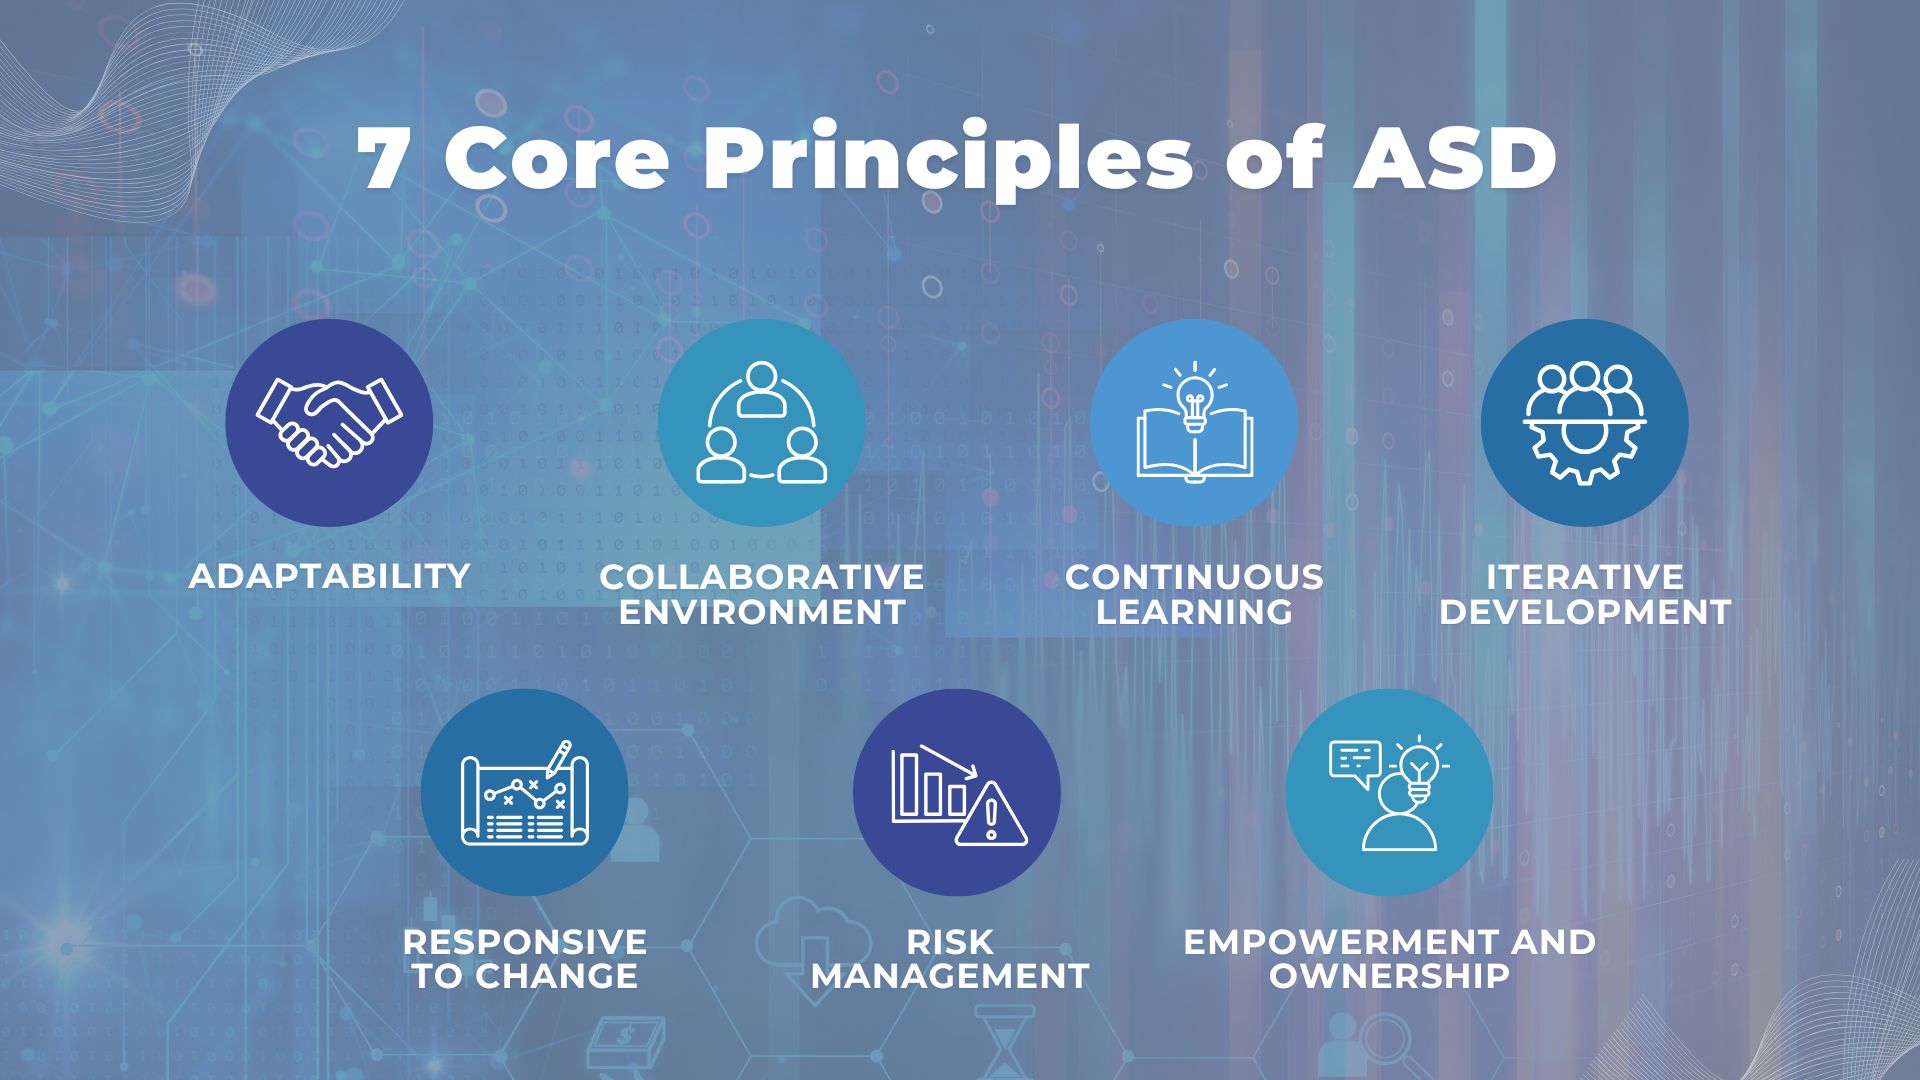
View More
1 2 3 27
Let's explore a Partnership Opportunity

CONTACT US


At ISB Tech Insights, we maintain an open channel for both professional inquiries and information exchange.

If you would like to connect with our team regarding services, relevant industry updates, or other organizational matters, please contact us via our form.

Add the attachment *Up to 10MB