Three.js is a flexible JavaScript library that makes using WebGL easier and more intuitive. It lets developers create detailed 3D graphics for the web without having to deal with the complex details and low-level API of WebGL. Three.js has a variety of features, such as tools for controlling 3D objects, materials, lighting, cameras, and animations. It is created with user-friendly APIs, comprehensive documentation, and a big user base, making it not just simple for beginners to learn and use but also powerful enough for advanced projects. Three.js is a good option for creating eye-catching visual effects, interactive 3D experiences, or just simple animations.
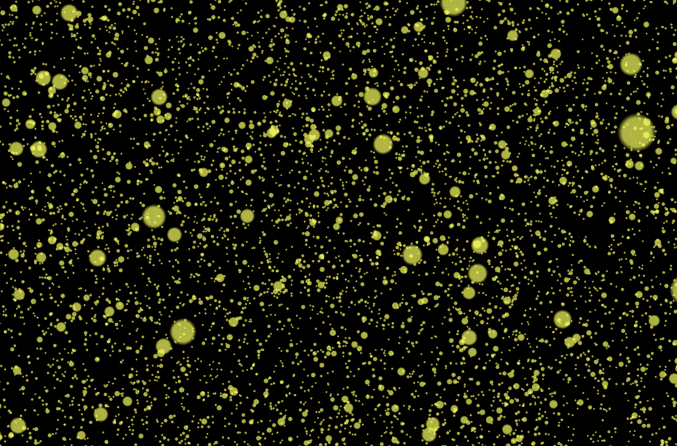
In this blog post, I will share my approach to creating a magical effect where tiny circles (particles) rearrange themselves to form a PNG image.
Before we dive into the code, let's see the result: countless tiny particles dynamically rearrange themselves to form a PNG image, creating a magical transformation effect.
1. Setting up the environment
Before starting, you need to set up Node.js and install the Three.js library:
npm install three
2. Creating the HTML & adding CSS
Add the following HTML and CSS file (index.html):
<!DOCTYPE html><html lang="en"><head> <meta charset="UTF-8" /> <meta name="viewport" content="width=device-width, initial-scale=1.0" /> <title>Transforming tiny circles into a beautiful image</title> <style> /* Reset margin and padding for consistent layout */ * { margin: 0; padding: 0; box-sizing: border-box; } /* Set up a container for the canvas (Full viewport) */ .wrapper { position: relative; width: 100%; height: 100vh; } /* Style the canvas to cover the entire container */ #canvas { position: absolute; top: 0; left: 0; } </style></head><body> <div class="wrapper"> <!-- The canvas where the Three.js scene will be rendered --> <canvas id="canvas"></canvas> </div> <script src="./script.js" type="module"></script></body></html>3. Initializing Three.js
Declaring variables and setting up the renderer, scene, and camera in script.js file:
// Variables for Three.js componentslet renderer, scene, canvas, camera, sizes, particles, texture, geometry;// A vector for calculating center alignmentconst centerVector = new THREE.Vector3(0, 0, 0);// Getting the canvas element from the DOMconst wrapper = document.querySelector(".wrapper");canvas = document.querySelector("#canvas");// Getting the canvas sizessizes = { width: wrapper.getBoundingClientRect().width, height: wrapper.getBoundingClientRect().height,};// Initialize Three.js renderer, scene, and camerafunction init() { renderer = new THREE.WebGLRenderer({ canvas, // Specify the HTML canvas element to render on antialias: true // Make the scene visually smoother }); renderer.setSize(sizes.width, sizes.height); // Set the canvas size scene = new THREE.Scene(); // Camera setup with perspective projection camera = new THREE.PerspectiveCamera( 45, // The field of view (FOV) in degrees sizes.width / sizes.height, // Aspect ratio to match the canvas size 0.1, // the near clipping plane 1000 // the far clipping plane ); camera.position.set(0, 0, 50); // Position the camera camera.lookAt(centerVector); // Make the camera look at the center scene.add(camera); // Handle resizing of the window window.addEventListener("resize", handleResize);}// Function to handle resizing of the viewportfunction handleResize() { // Setting the sizes of the rendering area to match the sizes of the browser window. sizes.width = window.innerWidth; sizes.height = window.innerHeight; camera.aspect = sizes.width / sizes.height; // Update aspect ratio camera.updateProjectionMatrix(); // Recalculate projection matrix renderer.setSize(sizes.width, sizes.height); // Adjust renderer size}init();4. Creating the particle texture
We use a canvas to create a circular particle texture:
const TEXTURE_SIZE = 32.0;// Draw a circular gradient for the particle texturefunction drawRadialGradation(ctx, canvasRadius, canvasW, canvasH) { ctx.save(); // Save the canvas state const gradient = ctx.createRadialGradient( canvasRadius, // Center x-coordinate canvasRadius, // Center y-coordinate 0, // Inner radius (solid color) canvasRadius, // Outer x-coordinate canvasRadius, // Outer y-coordinate canvasRadius // Outer radius (transparent edge) ); // Make a circle that fades from inside to outside gradient.addColorStop(0, "rgba(255,255,255,1.0)"); // Solid white at the center gradient.addColorStop(0.75, "rgba(255,255,255,1)"); // Soft white gradient.addColorStop(1, "rgba(255,255,255,0)"); // Transparent at the edges ctx.fillStyle = gradient; // Apply the gradient as the fill style ctx.fillRect(0, 0, canvasW, canvasH); // Fill the entire canvas with the gradient ctx.restore(); // Restore the canvas state}// Generate the particle texture using the canvasfunction getParticleTexture() { // Create an off-screen canvas const canvas = document.createElement("canvas"); const ctx = canvas.getContext("2d"); canvas.width = TEXTURE_SIZE; // Set canvas width to match the diameter canvas.height = TEXTURE_SIZE; // Set canvas height to match the diameter const canvasRadius = TEXTURE_SIZE / 2; // Calculate the radius // Draw the gradient texture drawRadialGradation(ctx, canvasRadius, canvas.width, canvas.height); const texture = new THREE.Texture(canvas); // Convert the canvas into a Three.js texture texture.type = THREE.FloatType; // For smooth rendering texture.needsUpdate = true; // Mark the texture as ready for rendering return texture; // Return the generated texture}5. Add extracting image data function
Getting image data is really important when we want to make particles from a picture. By looking closely at the pixel information, we can see which parts of the image are visible and use that to position the particles. This helps us bring the image to life in a fun and interactive manner by turning the visible pixels into particles.
// A function that takes image data and reduces its size by a scale ratio.// Return the extracted pixel data of imagefunction getImageData(image, scaleRatio = 0.7) { const imgCanvas = document.createElement("canvas"); imgCanvas.width = Math.round(image.width * scaleRatio); // Reduce image width imgCanvas.height = Math.round(image.height * scaleRatio); // Reduce image height const ctx = imgCanvas.getContext("2d"); ctx.drawImage(image, 0, 0, imgCanvas.width, imgCanvas.height); return ctx.getImageData(0, 0, imgCanvas.width, imgCanvas.height); // Extract pixel data}6. Creating the particle effect
Creating the shape of the particles means using the data from image pixels to figure out where to put them (the tiny circles). Each pixel that we can see, depending on its alpha channel, gets turned into a particle. The main idea is the particles begin in random spots and then move to their places, which makes it look like the image is being created right in front of us. In this process, we also decide how fast (velocities) each particle should move and where it needs to go (destinations).
// Function to create geometry based on the image pixel datafunction createGeometryFromImageData(imagedata) { const initialPositions = []; // Random starting positions of particles const vertices = []; // Actual positions of particles in the scene const destinations = []; // Target positions based on image pixel coordinates const velocities = []; // Speed at which particles move // Process each pixel of the image for (let h = 0; h < imagedata.height; h++) { for (let w = 0; w < imagedata.width; w++) { // Calculate the alpha value for the current pixel // - 'w + h * imagedata.width' computes the pixel index in the data array based on its row and column // - '* 4' accounts for the 4 channels (R, G, B, A) per pixel // - '+ 3' accesses the alpha channel, which is the 4th value constalpha=imagedata.data[(w+h*imagedata.width)*4+3]; // Alpha channel determines visibility // Process only visible pixels // 128 is 50% transparency (it looks similar to opacity: 50%) if(alpha>128){ const x = THREE.MathUtils.randFloatSpread(1000); // Random x position const y = THREE.MathUtils.randFloatSpread(1000); // Random y position const z = THREE.MathUtils.randFloatSpread(1000); // Random z position vertices.push(x, y, z); initialPositions.push(x, y, z); const desX = w - imagedata.width / 2; // Center destination x-coordinate const desY = -h + imagedata.height / 2; // Center destination y-coordinate const desZ = -imagedata.width + THREE.MathUtils.randFloatSpread(20); // Randomize z-depth destinations.push(desX, desY, desZ); // Control circle moving speed constvelocity=Math.random()/200+0.015; velocities.push(velocity); } } } return { vertices, initialPositions, destinations, velocities };}// Function to draw particles and add them to the scenefunction drawObject(imagedata) { geometry = new THREE.BufferGeometry(); // Create buffer geometry for particles const { vertices, initialPositions, destinations, velocities } = createGeometryFromImageData(imagedata); // Add particle positions to the geometry geometry.setAttribute("position", new THREE.Float32BufferAttribute(vertices, 3)); // The current position of particles geometry.setAttribute("initialPosition", new THREE.Float32BufferAttribute(initialPositions, 3)); // Where particles started geometry.setAttribute("destination", new THREE.Float32BufferAttribute(destinations, 3)); // Target positions from the image geometry.setAttribute("velocity", new THREE.Float32BufferAttribute(velocities, 1)); // Speed of particle movement // Define the material for particles const material = new THREE.PointsMaterial({ size: 5, // Size of each particle color: 0xffff48, // Color for particles map: getParticleTexture(), // Circular texture for particles transparent: true, // Allow transparency opacity: 0.7, // Set partial transparency depthWrite: false, // Disable depth writing sizeAttenuation: true, // Make particle size depend on perspective }); // Create the particle system and add it to the scene particles = new THREE.Points(geometry, material); scene.add(particles); // Add particles to the scene animate(); // Start animating the particles}7. Animation
In the drawObject function, we use the animate function to start the animation. Next, we will begin to define what the animate function does.
function animate() { // Function to continuously update particle positions and re-render the scene const tick = () => { const positions = geometry.attributes.position; // Current particle positions const destinations = geometry.attributes.destination; // Target positions from image data const velocities = geometry.attributes.velocity; // Movement speeds for each particle // Create vector representations of current, destination, and initial positions let v3Position = new THREE.Vector3(); let v3Destination = new THREE.Vector3(); // Loop over the particles, re-positions them for (let i = 0; i < positions.count; i++) { v3Position.fromBufferAttribute(positions, i); v3Destination.fromBufferAttribute(destinations, i); // Transit smoothly between the current position and the destination based on velocity // The closer the particle is to the target location, the slower it moves. v3Position.lerp(v3Destination, velocities.array[i]) // Update the particle's position in the geometry positions.setXYZ(i, v3Position.x, v3Position.y, v3Position.z); } // Notify Three.js that the position attribute has been updated geometry.attributes.position.needsUpdate = true; // Render the updated scene with the camera renderer.render(scene, camera); // Call tick again on the next frame requestAnimationFrame(tick); }; tick(); // Start the animation loop}8. Loading the texture and drawing the particles
Initialize the particle system in the init function. To ensure the particle system is drawn after the texture is loaded, use THREE.TextureLoader to load the texture asynchronously:
const textureLoader = new THREE.TextureLoader();textureLoader.load( "./texture.png", // Path to the image file (texture) => { const imagedata = getImageData(texture.image); // Extract image data drawObject(imagedata); });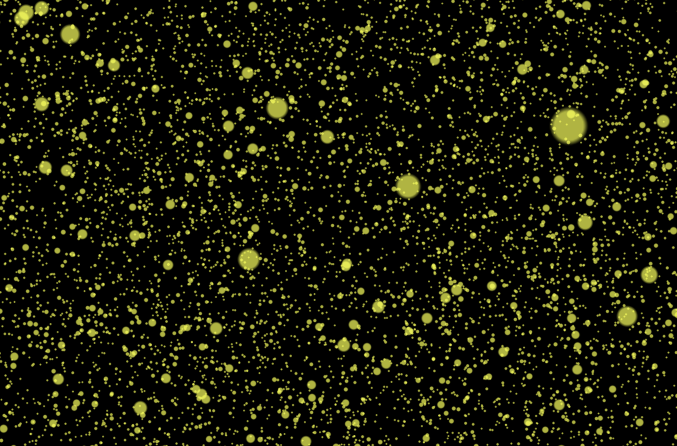
9. Improving the effect
function animate() { const minDistance = 5; // Used to determine whether the particle continues to move** // Function to continuously update particle positions and re-render the scene const tick = () => { const positions = geometry.attributes.position; // Current particle positions const destinations = geometry.attributes.destination; // Target positions from image data const velocities = geometry.attributes.velocity; // Movement speeds for each particle // Create vector representations of current, destination, and initial positions let v3Position = new THREE.Vector3(); let v3Destination = new THREE.Vector3(); // Loop over the particles, re-positions them for (let i = 0; i < positions.count; i++) { v3Position.fromBufferAttribute(positions, i); v3Destination.fromBufferAttribute(destinations, i); // Compute the distance to destination const distance = v3Position.distanceTo(v3Destination); if (distance > minDistance) { // Transit smoothly between the current position and the destination based on velocity // The closer the particle is to the target location, the slower it moves. v3Position.lerp(v3Destination, velocities.array[i]) } else { // Back-and-forth movement: Reverse direction velocities.array[i] = -velocities.array[i]; // Reverse velocity v3Position.x += THREE.MathUtils.randFloatSpread(0.05); v3Position.y += THREE.MathUtils.randFloatSpread(0.05); v3Position.z += THREE.MathUtils.randFloatSpread(0.05); } // Update the particle's position in the geometry positions.setXYZ(i, v3Position.x, v3Position.y, v3Position.z); } // Notify Three.js that the position attribute has been updated geometry.attributes.position.needsUpdate = true; // Render the updated scene with the camera renderer.render(scene, camera); // Call tick again on the next frame requestAnimationFrame(tick); }; tick(); // Start the animation loop}Conclusion
References