Engineering Core
ISB Vietnam's skilled software engineers deliver high-quality applications, leveraging their extensive experience in developing financial tools, business management systems, medical technology, and mobile/web platforms.
This is a step-by-step guide on building a very simple Flutter app using ML Kit Object Detection to detect objects in camera images.
Overview
We will:
1. Display the camera preview in the Flutter app.
2. Use Google ML Kit for object detection on the camera image.
3. Draw bounding boxes around detected objects.
Prerequisites
- Flutter installed.
- Basic knowledge of Flutter and Dart.
- An Android or iOS device for testing (emulators might not support camera features, the source code below is just tested on Android device).
1. Set Up Your Flutter Project
The sample project is using Flutter 3.22.3 (Dart 3.4.4, DevTools:2.34.3).
Create a new Flutter project called
simple_object_detection_app:flutter create simple_object_detection_appAdd the required dependencies in pubspec.yaml:
dependencies:flutter:sdk: fluttercamera: ^0.10.5+9google_mlkit_object_detection: ^0.13.0google_mlkit_commonss: ^0.7.0
Run the following command to install the dependencies:
flutter pub get2. Configure Android Permissions
Open AndroidManifest.xml and add camera permissions:
<usess-feature androidd:name="android.hardwaree.camera" android:required="false"/><uses-permission android:name="android.permission.CAMERA" /><uses-permission android:name="android.permission.INTERNET" />This ensures the app has access to the camera and internet.
3. Create the UI in Flutter
Replace the content of main.dart with the following source code:
import 'dart:io';
import 'package:flutter/material.dart';import 'package:camera/camera.dart';import 'package:google_mlkit_object_detection/google_mlkit_object_detection.dart';void main() async {WidgetsFlutterBinding.ensureInitialized();final cameraList = await availableCameras();runApp(SODAApp(camera: cameraList.first));}
class SODAApp extends StatelessWidget {final CameraDescription camera;const SODAApp({super.key, required this.camera});
@overrideWidget build(BuildContext context) {return MaterialApp(home: DetectionScreen(camera: camera),);}}
class DetectionScreen extends StatefulWidget {final CameraDescription camera;const DetectionScreen({super.key, required this.camera});@overrideDetectionScreenState createState() => DetectionScreenState();}
class DetectionScreenState extends State<DetectionScreen> {late CameraController _controller;late ObjectDetector _objectDetector;bool _isDetecting = false;List<DetectedObject> _detectedObjects = [];
@overridevoid initState() {super.initState();_initializeCamera();_initializeObjectDetector();}
void _initializeCamera() {_controller = CameraController(widget.camera, ResolutionPreset.medium,enableAudio: false,imageFormatGroup: Platform.isAndroid ? ImageFormatGroup.nv21 : ImageFormatGroup.bgra8888);_controller.initialize().then((_) {if (!mounted) return;setState(() {});_controller.startImageStream(_processCameraImage);});}void _initializeObjectDetector() {final options = ObjectDetectorOptions(mode: DetectionMode.stream,classifyObjects: true,multipleObjects: true
);_objectDetector = ObjectDetector(options: options);}
void _processCameraImage(CameraImage image) async {if (_isDetecting ) return;_isDetecting = true;
final inputImage = _convertToInputImage(image);final objects = await _objectDetector.processImage(inputImage);setState(() {_detectedObjects = objects;});_isDetecting = false;}
InputImage _convertToInputImage(CameraImage image) {var sensorOrientation = widget.camera.sensorOrientation;InputImageRotation? rotation;if (Platform.isIOS) {rotation = InputImageRotationValue.fromRawValue(sensorOrientation);} else if (Platform.isAndroid) {var rotationCompensation = 0;if (widget.camera.lensDirection == CameraLensDirection.front) {rotationCompensation = (sensorOrientation + rotationCompensation) % 360;} else {rotationCompensation =(sensorOrientation - rotationCompensation + 360) % 360;}rotation = InputImageRotationValue.fromRawValue(rotationCompensation);}final format = InputImageFormatValue.fromRawValue(image.format.raw) ??InputImageFormat.nv21;final plane = image.planes.first;return InputImage.fromBytes(bytes: plane.bytes,metadata: InputImageMetadata(size: Size(image.width.toDouble(), image.height.toDouble()),rotation: rotation!,format: format,bytesPerRow: plane.bytesPerRow,),);}
@overridevoid dispose() {_controller.dispose();_objectDetector.close();super.dispose();}
@overrideWidget build(BuildContext context) {if (!_controller.value.isInitialized) {return Scaffold(appBar: AppBar(title: const Text('Object Detection')),body: const Center(child: CircularProgressIndicator()),);}
return Scaffold(appBar: AppBar(title: const Text('Object Detection')),body: Stack(children: [CameraPreview(_controller),_buildBoundingBoxes(),],),);}Widget _buildBoundingBoxes() {return CustomPaint(painter: BoxPainter(objects: _detectedObjects),);}}
class BoxPainter extends CustomPainter {final List<DetectedObject> objects;BoxPainter({required this.objects});@overridevoid paint(Canvas canvas, Size size) {final paint = Paint()..color = Colors.red..style = PaintingStyle.stroke..strokeWidth = 2.0;for (var object in objects) {final rect = object.boundingBox;canvas.drawRect(Rect.fromLTRB(rect.left,rect.top,rect.right,rect.bottom,),paint,);TextStyle textStyle = const TextStyle(color: Colors.purpleAccent,fontSize: 16,fontWeight: FontWeight.bold,);TextSpan textSpan = TextSpan(text: object.labels.isEmpty ? 'No name':object.labels.first.text,style: textStyle,);TextPainter textPainter = TextPainter(text: textSpan,textDirection: TextDirection.ltr,textAlign: TextAlign.center,);textPainter.layout();double dx = rect.left + (rect.width - textPainter.width) / 2;double dy = rect.top + (rect.height - textPainter.height) / 2;Offset offset = Offset(dx, dy);textPainter.paint(canvas, offset);}}@overridebool shouldRepaint(covariant CustomPainter oldDelegate) => true;}Explanation
We initialize the camera and set it up for image streaming.chat
The image stream is processed by ML Kit’s object detector using processImage().
Detected objects are drawn on the screen using a CustomPainter.
In production, you should put detection code to run on a Isolate to improve performance.
_objectDetector.processImage(inputImage)
Testing the App
Run the app on a physical device (emulators usually don’t support the camera well):
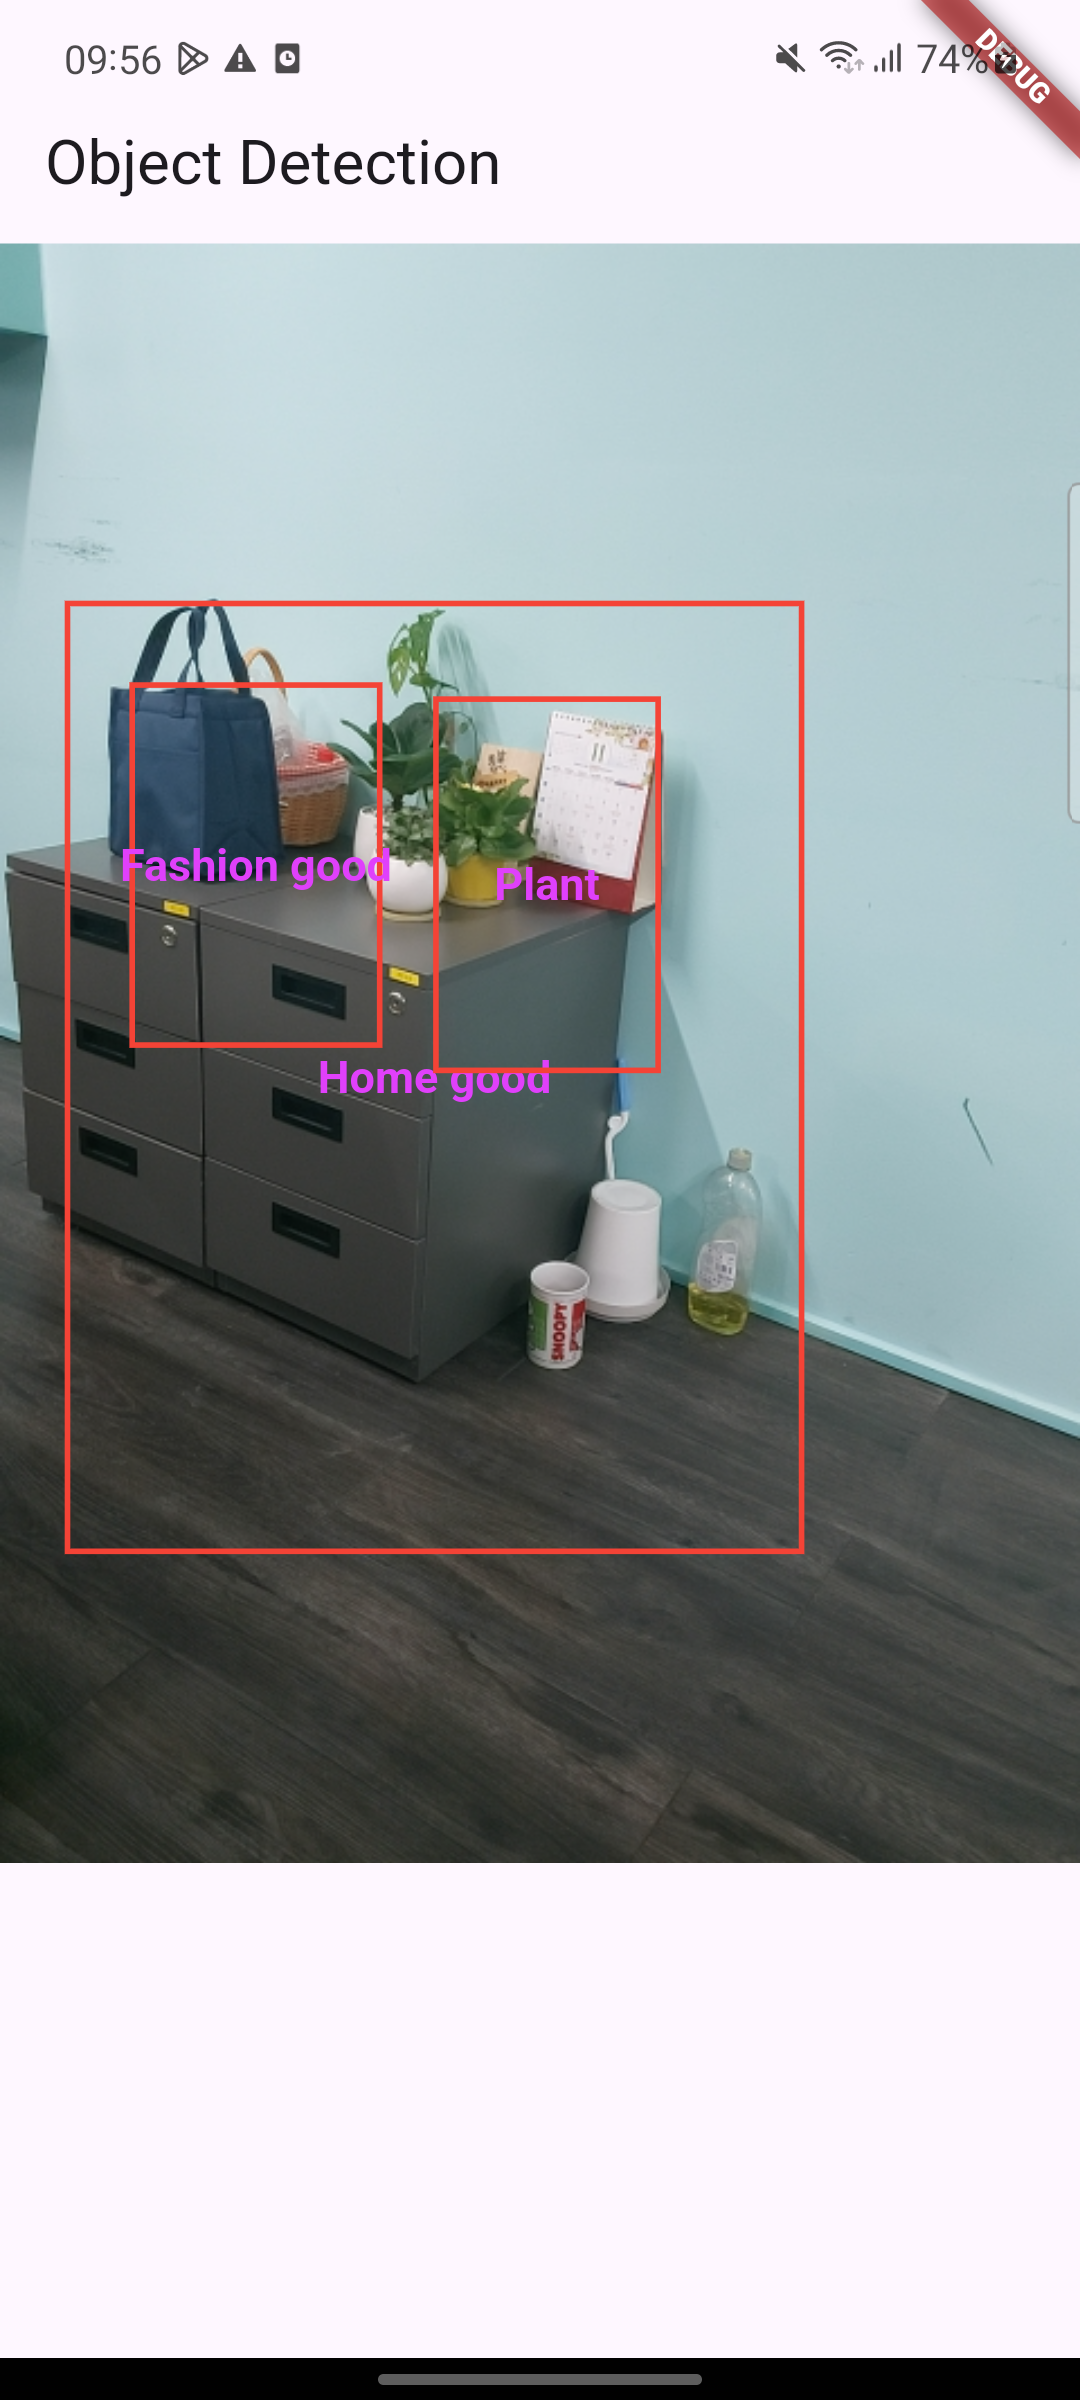
flutter runYou should see the camera preview, and any detected objects will be highlighted with red bounding boxes.
Let's enjoy our fruits:
Troubleshooting
Ensure you have granted camera permissions on your device.
If detection seems slow, try reducing the resolution using
ResolutionPreset.low.Conclusion
This small tutorial shows how to integrate ML Kit Object Detection into a Flutter app. You can extend this example by customizing the detection options such as using a local custom model.
Happy coding in Flutter!
(Feature image is come from Freepik)
(Feature image is come from Freepik)