TECH

November 20, 2024

EC2 Access to S3 Without Access Key and Secret Key.

If you are using AWS services, specifically EC2 and S3. In the usual way, if you want to access from EC2 to S3 to read and write data, you need to use two pieces of information: the access key and secret key.

These two pieces of information are usually stored in the source code or somewhere on the EC2 instance. This approach carries a risk of information leakage, and if hackers obtain these keys, it could result in a loss of data on S3 bucket.

If you do not want to hardcode these keys, you can use an IAM role to grant the necessary permissions to the EC2 instance to access the S3 bucket.
To set this up, you would create an IAM role with permissions to access the S3 bucket and then attach that role to the EC2 instance. Afterward, the EC2 instance can use the role’s temporary security credentials to access the S3 bucket.

Here are the detailed steps to do it.

Step 1: Create an IAM Role for the EC2 Instance

1. Access IAM on the AWS Console.
2. Go to Roles and click Create Role.
3. In the Trusted entity section, select AWS service and select EC2 because this role will be assigned to an EC2 instance.
4. In the Permissions section:

    - Select AmazonS3FullAccess or create a separate policy if you want to allow access to only a specific bucket.
    - If you want to create your own policy, you can select Create policy and use the following JSON to specify access to a specific bucket:

{
    "Version": "2012-10-17",
    "Statement": [
        {
            "Effect": "Allow",
            "Action": [
                "s3:PutObject",
                "s3:GetObject"
            ],
            "Resource": "arn:aws:s3:::your-bucket-name/*"
         }
    ]
}

5. Confirm and name the role, for example EC2S3AccessRole.

Step 2: Assign IAM Role to EC2 Instance

1. Go to EC2 Console and select the instance you want to assign permissions to.
2. On the Actions tab, select Security > Modify IAM role.
3. Select the EC2S3AccessRole role you created in the step above and confirm.

Step 3: Example upload images from EC2 to S3

With the IAM Role assigned, the EC2 instance will have access to S3 without using the Access Key or Secret Key. Here is an example Python code to upload images from EC2 to S3:

1. Install boto3 if not already present:

pip install boto3

2. Write Python code to upload images to S3:

import boto3

# Initialize S3 client
s3 = boto3.client('s3')

# Define bucket and file name
bucket_name = 'your-bucket-name'
file_path = '/path/to/your/image.jpg'
s3_key = 'uploads/image.jpg' # Path on S3

# Upload file
try:
    s3.upload_file(file_path, bucket_name, s3_key)
    print("Upload successful!")
except Exception as e:
    print("An error occurred:", e)

Note:
    - IAM Role ensures access only from the assigned EC2 instance without using a direct key.
    - If you need more specific permissions, adjust the policy to suit your needs.

Conclusion

Using IAM Roles helps to enhance security and eliminate risks associated with managing and transmitting Access Keys and Secret Keys. Hopefully the above guide will help you easily deploy and secure your system when uploading data from EC2 to S3 bucket.

References:

View More
TECH

November 18, 2024

Repository pattern in C#

The Repository Pattern is a design pattern used to abstract data access logic, providing a clean separation between the business logic and data access layers in an application. By implementing this pattern, you encapsulate data access logic in a repository class that acts as an intermediary between the business logic and the data source (like a database, web service, or API).


In C#, the Repository Pattern helps to centralize data access logic and makes it easier to swap out different data sources (e.g., switching from an SQL database to a NoSQL database) without affecting the rest of the application. It also simplifies testing by allowing mock repositories to be used instead of actual data sources.

1. Components of the Repository Pattern

Entity: A class that represents the model of the data being stored in the database (e.g., Company, Customer..).

Repository Interface: Defines the contract for how data access operations are handled.

Repository Implementation: Implements the data access logic, such as querying the database.

Business Logic: The service layer or business rules of the application.

2. Example of the Repository Pattern in C#

Step 1: Define the Entity
Let's start with an entity class representing a Customer.
public class Customer
{
    public int Id { get; set; }
    public string Name { get; set; }
}
Step 2: Create the Repository Interface
The repository interface defines the contract that all repository classes must implement. It usually includes methods for basic CRUD (Create, Read, Update, Delete) operations.
public interface ICustomerRepository
{
    IEnumerable GetAll();
    Product GetById(int id);
    void Add(Customer customer);
    void Update(Customer customer );
    void Delete(int id);
}
Step 3: Implement the Repository
In this step, you create the concrete repository class that implements the interface. Here’s an example using Entity Framework as the data access technology.
public class CustomerRepository : ICustomerRepository
{
    private readonly EntitiesDbContest _context;

    public CustomerRepository(EntitiesDbContest context)
    {
        _context = context;
    }

    public IEnumerable GetAll()
    {
        return _context.Customers.ToList();
    }

    public Customer GetById(int id)
    {
        return _context.Customers.Find(id);
    }

    public void Add(Customer customer)
    {
        _context.Customers.Add(customer);
        _context.SaveChanges();
    }

    public void Update(Customer customer)
    {
        _context.Customers.Update(customer);
        _context.SaveChanges();
    }

    public void Delete(int id)
    {
        var Customer = _context.Customers.Find(id);
        if (Customer != null)
        {
            _context.Customers.Remove(Customer);
            _context.SaveChanges();
        }
    }
}
Step 4: Using the Repository:
public class ProductService
{
    private readonly IProductRepository _productRepository;

    public ProductService(IProductRepository productRepository)
    {
        _productRepository = productRepository;
    }

    public IEnumerable GetProducts()
    {
        return _productRepository.GetAll();
    }

    public void AddProduct(Product product)
    {
        _productRepository.Add(product);
    }

    // Additional service methods can be added as needed
}

3. Benefits of the Repository Pattern

Ease of Testing: Interfaces allow for easy mocking, making unit testing more straightforward. Code Reusability: Common data access logic is centralized in the repository. Maintenance: Changes in data access logic (e.g., switching from SQL Server to MongoDB) require changes in only one place. Support for Multiple Data Sources: Different implementations can be created for different data sources while maintaining the same interface.

Conclusion

The Repository Pattern is an effective way to decouple business logic from data access in C# applications. It makes the code more maintainable, testable, and scalable. By abstracting the data access layer, the repository pattern promotes cleaner and more organized architecture, especially when working with complex systems where data access logic can become tangled with business logic. In modern applications, especially those built with ASP.NET Core, using the Repository Pattern along with Dependency Injection and Entity Framework results in a robust and flexible architecture that is easier to manage in the long term.

View More
TECH

November 18, 2024

Web Programming Series - Client-Side Rendering (CSR)

Besides SSR, we also have a newer concept, which is CSR. And today I will share about CSR (Client-Side Rendering).
This is also an important area of knowledge in web development.
The article will provide insights into how CSR works, its strengths, and its limitations.
Let's get started...

View More
TECH

November 18, 2024

Web Programming Series - Server-Side Rendering (SSR)

Continuing the series on web development, This article shares knowledge about UI rendering mechanisms that allow users to see the content of a web page.
In this post, I will present the concept of server-side Rendering (SSR) along with its advantages and disadvantages.
I hope that the article will bring a lot of useful knowledge to everyone.
 

View More
TECH

November 18, 2024

ABP - Open source web application framework

If you are considering a framework for the .NET and the ASP.NET Core platforms, ABP Framework is an ideal candidate. It streamlines development, improves productivity, and ensures a consistent experience for building modern web solutions. The ABP Framework offers several compelling reasons for its adoption, let's explore…

View More
TECH

November 15, 2024

DICOM Services

Following the post "Overview of DICOM Image", this time I’ll introduce DICOM Services, which are used to store and share medical images between different systems.

View More
TECH

November 15, 2024

How to use the Laravel Vite plugin

Introduce the Laravel Vite plugin

Laravel Vite is an integration tool that brings the benefits of Vite to Laravel applications. Vite is a cutting-edge build tool designed to enhance the development workflow by offering rapid build times and efficient handling of front-end assets. Unlike older bundlers such as Webpack, Vite uses a modern approach that allows for quick updates and seamless development with contemporary JavaScript frameworks. This results in a more streamlined and productive experience when managing assets and building applications.

In this blog, Vue is the framework chosen, which provides a flexible and progressive approach to building user interfaces. It offers a lightweight core with an ecosystem of libraries and tools, making it ideal for small-scale and large-scale projects. The reactive data binding and component-based architecture make it particularly effective for developing dynamic, interactive applications. 

Benefits of Using Vite

Vite is a game-changing tool built specifically for modern front-end development. It’s optimized for frameworks like Vue, React, and other JavaScript-based ecosystems, offering a range of features that set it apart from older solutions. Here’s why Vite is a standout choice for modern web development:

  • Fast Development Server: Vite starts quickly, even for large projects, by using ES Modules directly in the browser, skipping the bundling process for faster local development.

  • Quick Hot Module Replacement (HMR): Vite provides instant updates in the browser without refreshing, making it ideal for real-time UI feedback in frameworks like Vue and React.

  • Efficient Production Builds with Rollup: For production, Vite uses Rollup to create small, optimized builds with features like tree-shaking and module splitting.

  • Built-in Framework Support: Vite supports Vue, React, TypeScript, and has plugins for additional frameworks like Svelte and Preact .

  • Full ESM Compatibility: By leveraging native ES Modules, Vite skips transpiling in development, leading to faster load times.
  • Rich Plugin Ecosystem: Vite supports rollup and custom plugins, allowing features like JSX support and environment management.

  • Modern JS and CSS Support: Vite manages CSS modules, preprocessors, and assets like images and fonts effectively.

  • Future-Ready Platform: Built for modern standards like HTTP/2 and ESM, Vite is equipped for the next generation of JavaScript applications.

How to use Laravel with Vite

First, we create the new project with the command, please choose name of the project. In the blog, laravel-mix-vue was chosen because it points to the combination of Laravel and Vue.js with the support of Vite, bringing the assets of Vue.js after the bundling process to Laravel:

          composer create-project laravel/laravel laravel-mix-vue

Composer is a dependency manager specifically designed for PHP. Composer handles libraries and packages in PHP projects, allowing developers to define and manage the libraries or frameworks they need in a project. If you have not installed Composer on your local machine, please refer to https://getcomposer.org/download/ for instructions.

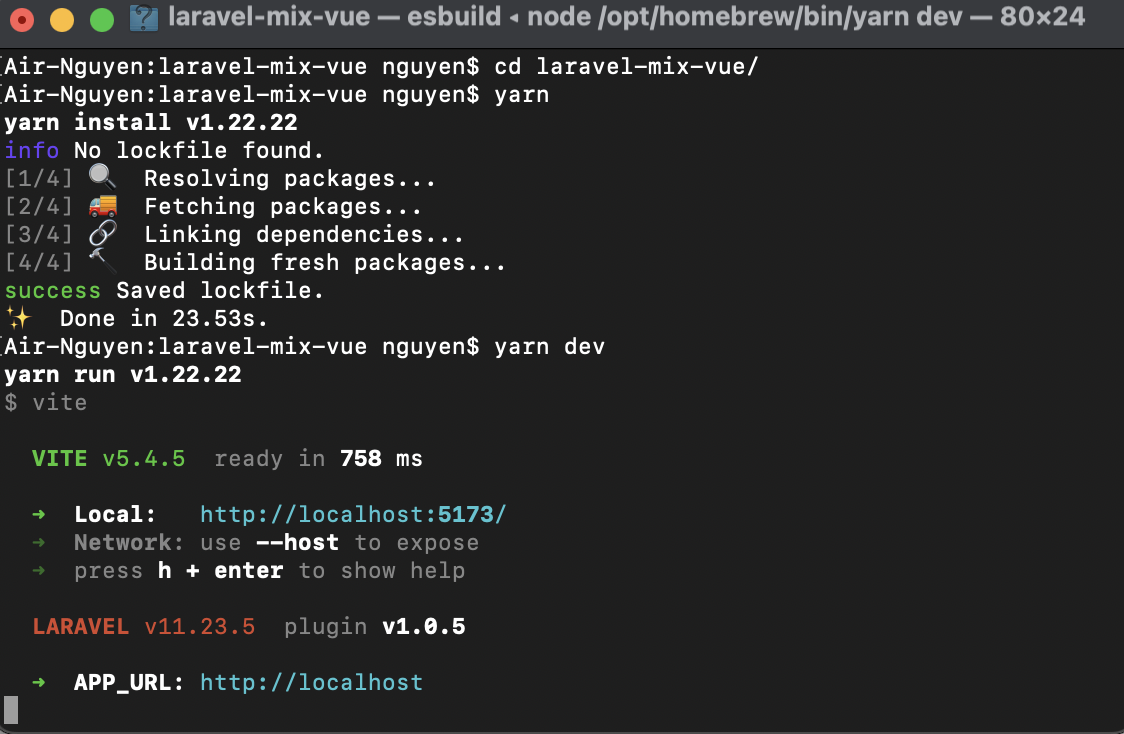
Then navigate to the folder container of the project and run the commands below to install dependencies and start it:

            yarn 

            yarn dev

install-vite-via-cmd

After completing all task to set up the project, you can install Vue JS and write an example component.

            yarn add vue --dev

            yarn add @vitejs/plugin-vue --dev

In Yarn, the --dev flag is used to add packages specifically for development purposes. When you use --dev, Yarn installs the package as a development dependency, meaning it’s only needed during development and not in production.

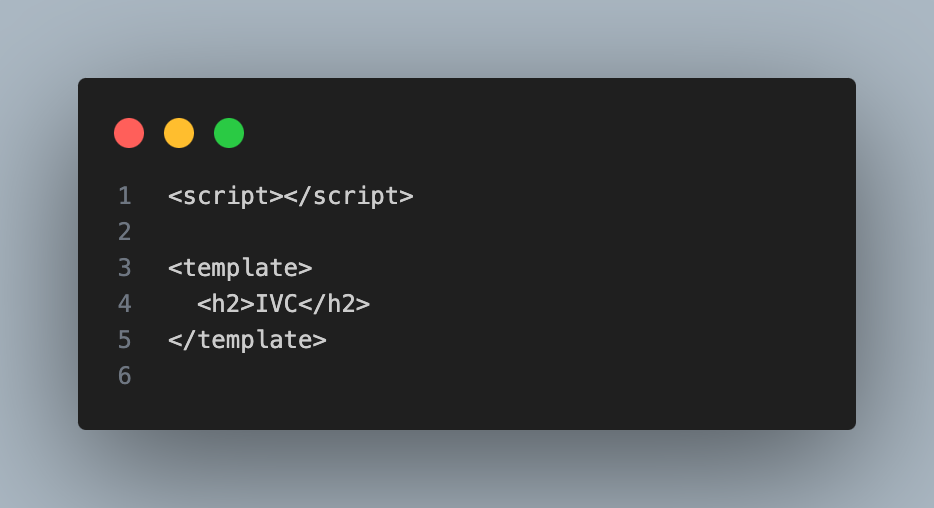
Create the new file for the first component Vue js (resources/js/components/ComponentExample.vue) like the following code

This structure includes:

  • <script>: Where you can define the component’s name, data, and methods.
  • <template>: The actual HTML structure rendered by the component.

vue-component-template

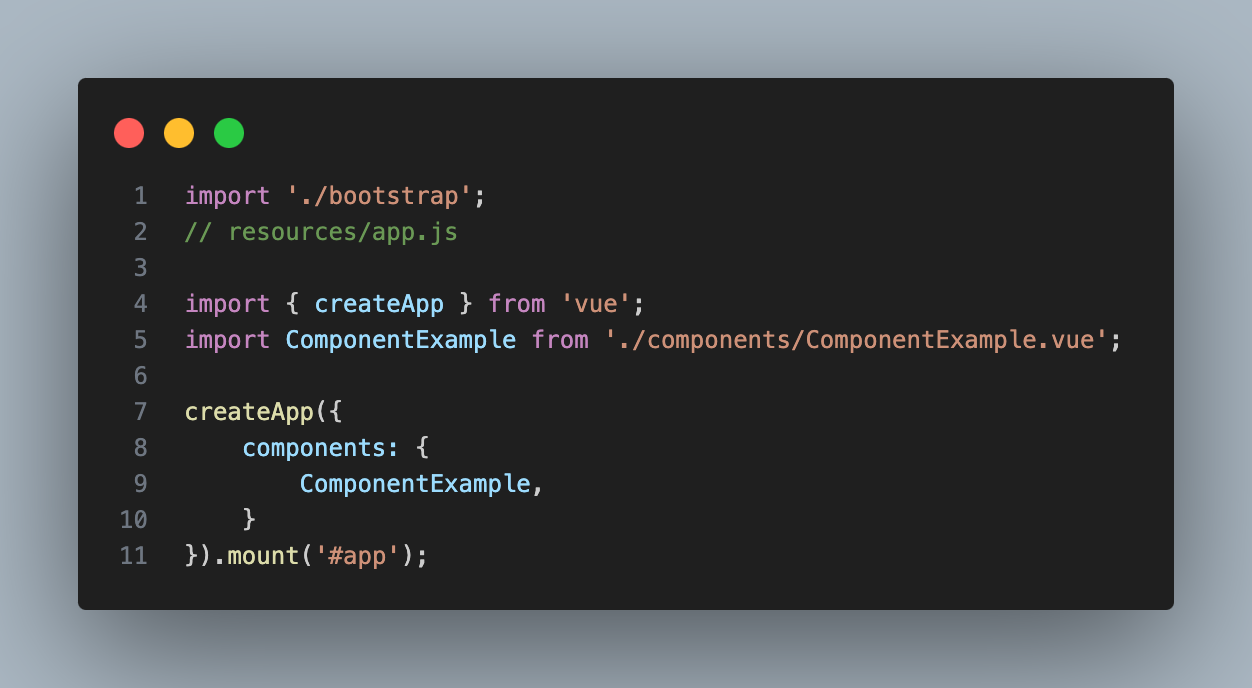
Open up resources/app.js and update its refer code below. 

  • createApp: This is a method used to create a new Vue app instance. It takes an options object that defines the behavior of the app.
  • mount: This method attaches the Vue app to an element in the DOM with the id="app". This is where the app will be rendered.
  • components: Components are the fundamental building blocks in Vue.js. They encapsulate their own logic, template, and styles, making them reusable and modular.

resources_appjs_vue

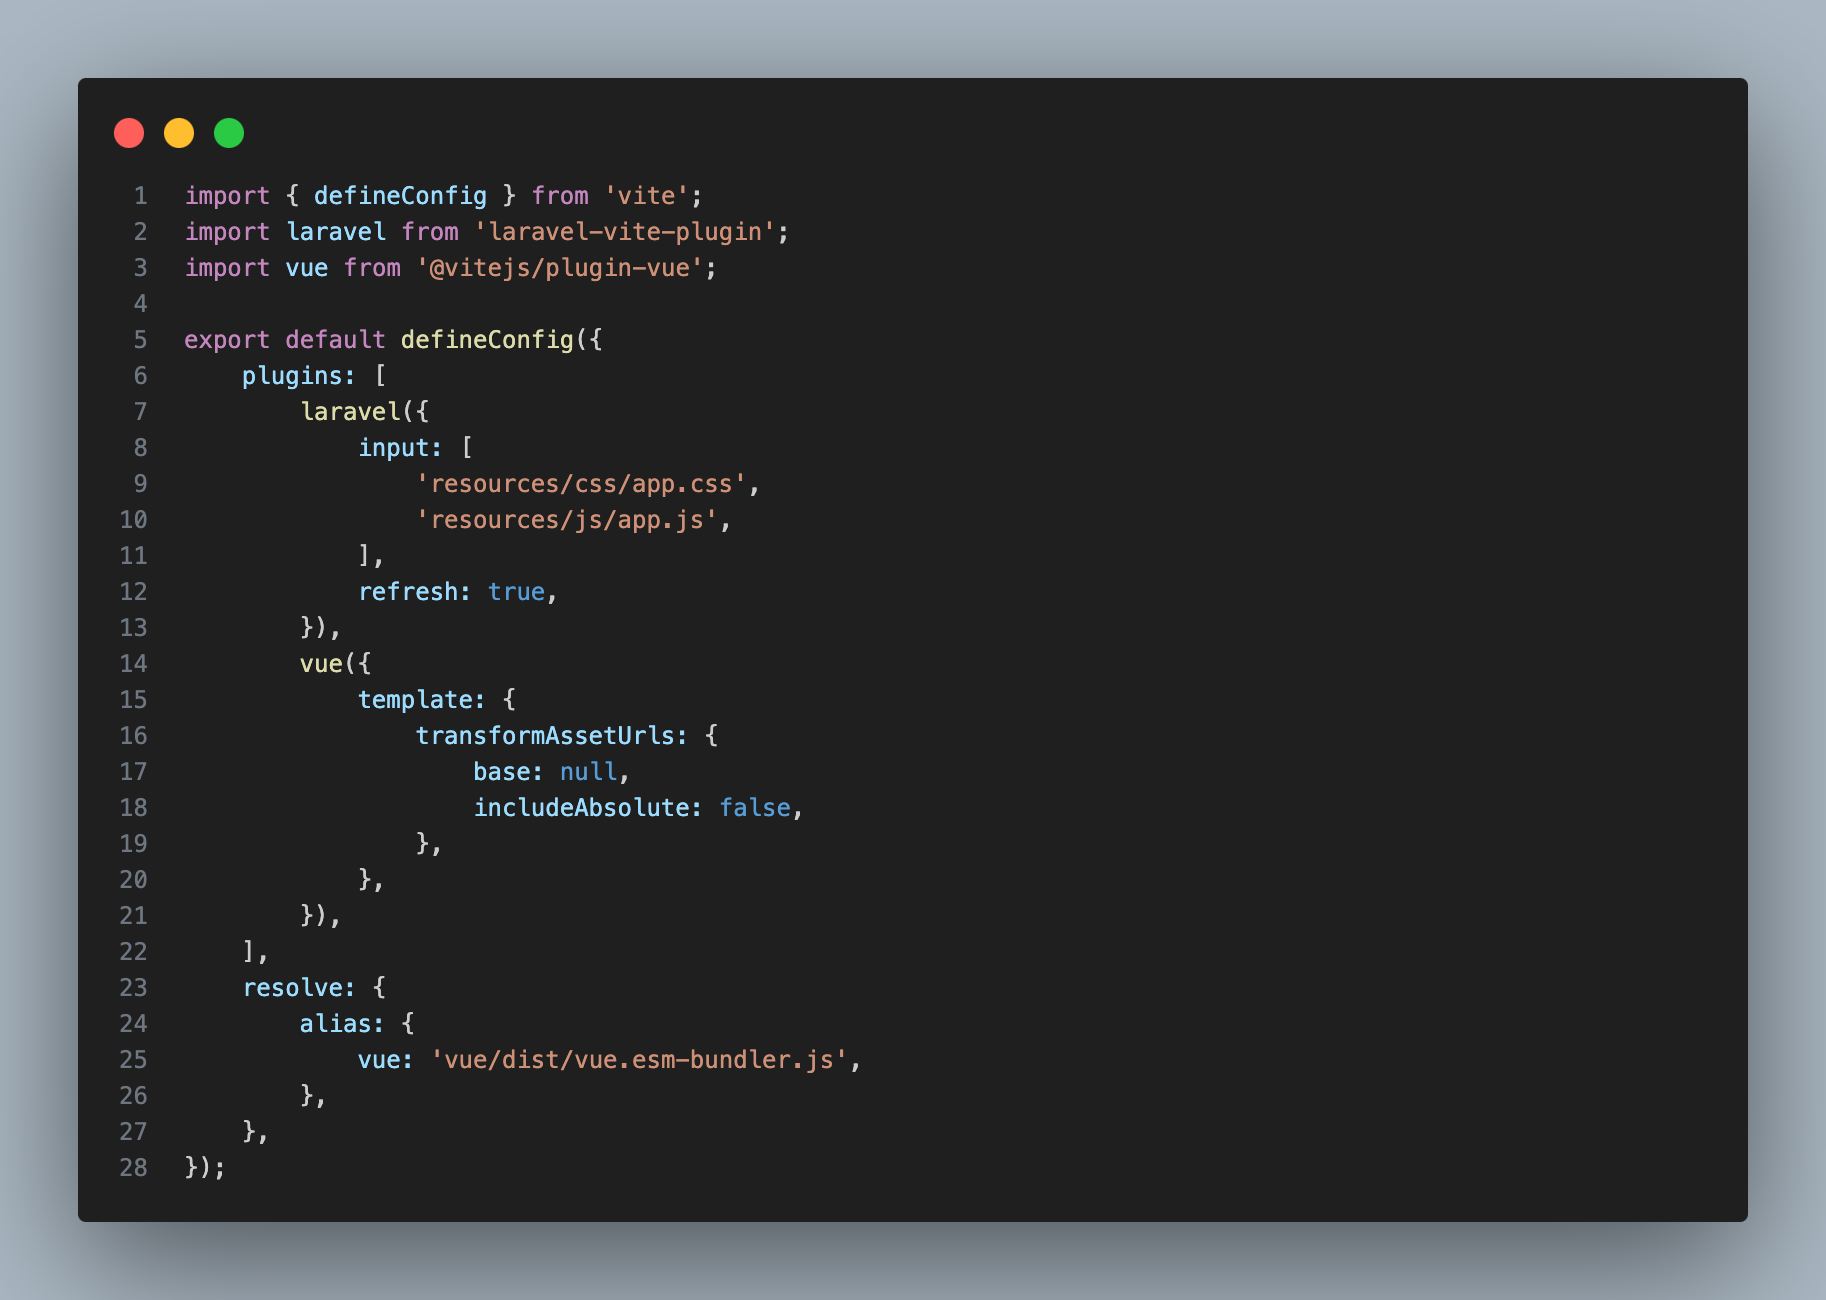
Open the file vite.config.js to define the Vue plugin.

plugins: [ ... ]:

  • This section defines the list of plugins to use in the Vite build process.
  • The Laravel plugin is responsible for managing the entry points (e.g., app.css, app.js) and enabling the automatic injection of Vite-generated assets into Blade views.
  • The Vue plugin is responsible for enabling Vue.js component processing. The template configuration inside the Vue plugin allows customization of how asset URLs are transformed in Vue templates.

transformAssetUrls:

  • The configuration inside Vue allows controlling how URLs in Vue component templates are processed. Setting base: null avoids adding a base path to URLs, and includeAbsolute: false prevents absolute URLs from being transformed.

resolve: { alias: { vue: 'vue/dist/vue.esm-bundler.js' } }

  • This defines an alias for the Vue package to ensure that the correct version of Vue is used with Vite (specifically, the Vue 3 build that supports the bundler).

vite-configjs

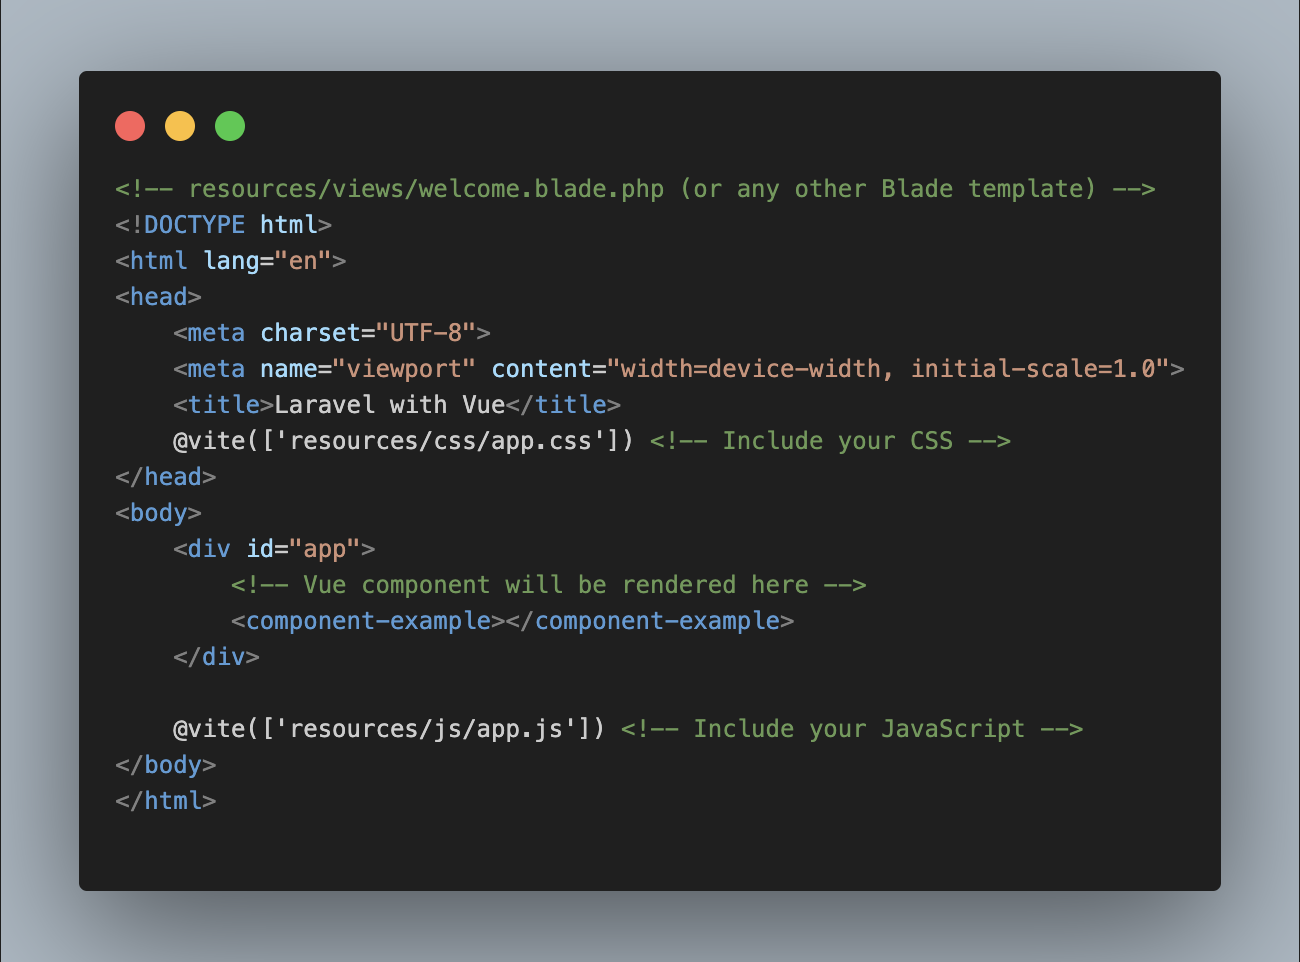
Finally, you need to modify the template in resources/views/welcome.blade.php.

Use the following commands to build and run your application:

  • yarn build to compile the assets.
  • php artisan serve to run your application.

The yarn build command compiles and bundles your Vue.js code, transforming it into optimized JavaScript and CSS files. These files will be placed in the public directory, where Laravel can access them. This process is managed by Laravel, which uses Vite to bundle and version the assets. Versioning ensures that the most up-to-date assets are served to users, preventing caching issues.

The command php artisan serve starts a local development server, typically accessible at http://127.0.0.1:8000/. This server will handle requests to your Laravel backend and serve your Blade templates along with the compiled Vue.js frontend assets.

view_laravel

The component should now be rendered tag H2 with content IVC.

Reference

https://laravel.com/docs/11.x/vite

https://www.freepik.com/free-photo/programming-background-collage_34089162.htm#fromView=search&page=1&position=4&uuid=1f081427-5991-4534-bc69-05ace07f9193

 (Cover image)

View More
TECH

November 14, 2024

Common Errors and Handling Errors in JavaScript

When you write JavaScript, you'll run into errors. The trick is to know how to deal with them and use debugging tools to find out why they happen. This guide will help you grasp error handling, use good debugging methods, and show you some real examples.

View More
TECH

November 13, 2024

Development an object detection Flutter application with Google ML Toolkit

This is a step-by-step guide on building a very simple Flutter app using ML Kit Object Detection to detect objects in camera images.

Overview

We will:
1. Display the camera preview in the Flutter app.
2. Use Google ML Kit for object detection on the camera image.
3. Draw bounding boxes around detected objects.


Prerequisites

  • Flutter installed.
  • Basic knowledge of Flutter and Dart.
  • An Android or iOS device for testing (emulators might not support camera features, the  source  code below is just tested on Android device).

1. Set Up Your Flutter Project

The  sample  project  is using Flutter 3.22.3 (Dart 3.4.4, DevTools:2.34.3).
Create a new Flutter project called simple_object_detection_app:
flutter create simple_object_detection_app
Add the required dependencies in pubspec.yaml:
dependencies:
flutter:
sdk: flutter
camera: ^0.10.5+9
google_mlkit_object_detection: ^0.13.0
google_mlkit_commonss: ^0.7.0


Run the following command to install the dependencies:
flutter pub get

2. Configure Android Permissions

Open AndroidManifest.xml and add camera permissions:
<usess-feature androidd:name="android.hardwaree.camera" android:required="false"/>
<uses-permission android:name="android.permission.CAMERA" />
<uses-permission android:name="android.permission.INTERNET" />
This ensures the app has access to the camera and internet.

3. Create the UI in Flutter

Replace the content of main.dart with the following source code:
import 'dart:io';


import 'package:flutter/material.dart';
import 'package:camera/camera.dart';
import 'package:google_mlkit_object_detection/google_mlkit_object_detection.dart';
void main() async {
WidgetsFlutterBinding.ensureInitialized();
final cameraList = await availableCameras();
runApp(SODAApp(camera: cameraList.first));
}


class SODAApp extends StatelessWidget {
final CameraDescription camera;
const SODAApp({super.key, required this.camera});


@override
Widget build(BuildContext context) {
return MaterialApp(
home: DetectionScreen(camera: camera),
);
}
}


class DetectionScreen extends StatefulWidget {
final CameraDescription camera;
const DetectionScreen({super.key, required this.camera});
@override
DetectionScreenState createState() => DetectionScreenState();
}


class DetectionScreenState extends State<DetectionScreen> {
late CameraController _controller;
late ObjectDetector _objectDetector;
bool _isDetecting = false;
List<DetectedObject> _detectedObjects = [];


@override
void initState() {
super.initState();
_initializeCamera();
_initializeObjectDetector();
}


void _initializeCamera() {
_controller = CameraController(widget.camera, ResolutionPreset.medium,enableAudio: false,
imageFormatGroup: Platform.isAndroid ? ImageFormatGroup.nv21 : ImageFormatGroup.bgra8888);
_controller.initialize().then((_) {
if (!mounted) return;
setState(() {});
_controller.startImageStream(_processCameraImage);
});
}
 
void _initializeObjectDetector() {
final options = ObjectDetectorOptions(
mode: DetectionMode.stream,
classifyObjects: true,
multipleObjects: true


);
_objectDetector = ObjectDetector(options: options);
}


void _processCameraImage(CameraImage image) async {
if (_isDetecting ) return;
_isDetecting = true;


final inputImage = _convertToInputImage(image);
final objects = await _objectDetector.processImage(inputImage);
setState(() {
_detectedObjects = objects;
});
_isDetecting = false;
}


InputImage _convertToInputImage(CameraImage image) {
var sensorOrientation = widget.camera.sensorOrientation;
InputImageRotation? rotation;
if (Platform.isIOS) {
rotation = InputImageRotationValue.fromRawValue(sensorOrientation);
} else if (Platform.isAndroid) {
var rotationCompensation = 0;
if (widget.camera.lensDirection == CameraLensDirection.front) {
rotationCompensation = (sensorOrientation + rotationCompensation) % 360;
} else {
rotationCompensation =(sensorOrientation - rotationCompensation + 360) % 360;
}
rotation = InputImageRotationValue.fromRawValue(rotationCompensation);
}
final format = InputImageFormatValue.fromRawValue(image.format.raw) ??
InputImageFormat.nv21;
final plane = image.planes.first;
return InputImage.fromBytes(
bytes: plane.bytes,
metadata: InputImageMetadata(
size: Size(image.width.toDouble(), image.height.toDouble()),
rotation: rotation!,
format: format,
bytesPerRow: plane.bytesPerRow,
),
);
}


@override
void dispose() {
_controller.dispose();
_objectDetector.close();
super.dispose();
}


@override
Widget build(BuildContext context) {
if (!_controller.value.isInitialized) {
return Scaffold(
appBar: AppBar(title: const Text('Object Detection')),
body: const Center(child: CircularProgressIndicator()),
);
}


return Scaffold(
appBar: AppBar(title: const Text('Object Detection')),
body: Stack(
children: [
CameraPreview(_controller),
_buildBoundingBoxes(),
],
),
);
}
Widget _buildBoundingBoxes() {
return CustomPaint(
painter: BoxPainter(objects: _detectedObjects),
);
}
}


class BoxPainter extends CustomPainter {
final List<DetectedObject> objects;
BoxPainter({required this.objects});
@override
void paint(Canvas canvas, Size size) {
final paint = Paint()
..color = Colors.red
..style = PaintingStyle.stroke
..strokeWidth = 2.0;
for (var object in objects) {
final rect = object.boundingBox;
canvas.drawRect(
Rect.fromLTRB(
rect.left,
rect.top,
rect.right,
rect.bottom,
),
paint,
);
TextStyle textStyle = const TextStyle(
color: Colors.purpleAccent,
fontSize: 16,
fontWeight: FontWeight.bold,
);
TextSpan textSpan = TextSpan(
text: object.labels.isEmpty ? 'No name':object.labels.first.text,
style: textStyle,
);
TextPainter textPainter = TextPainter(
text: textSpan,
textDirection: TextDirection.ltr,
textAlign: TextAlign.center,
);
textPainter.layout();
double dx = rect.left + (rect.width - textPainter.width) / 2;
double dy = rect.top + (rect.height - textPainter.height) / 2;
Offset offset = Offset(dx, dy);
textPainter.paint(canvas, offset);
}
}
@override
bool shouldRepaint(covariant CustomPainter oldDelegate) => true;
}

Explanation

We initialize the camera and set it up for image streaming.chat
The image stream is processed by ML Kit’s object detector using processImage().
Detected objects are drawn on the screen using a CustomPainter.
In production, you should put detection code to run on a Isolate to improve performance.
_objectDetector.processImage(inputImage)


Testing the App

Run the app on a physical device (emulators usually don’t support the camera well):
flutter run
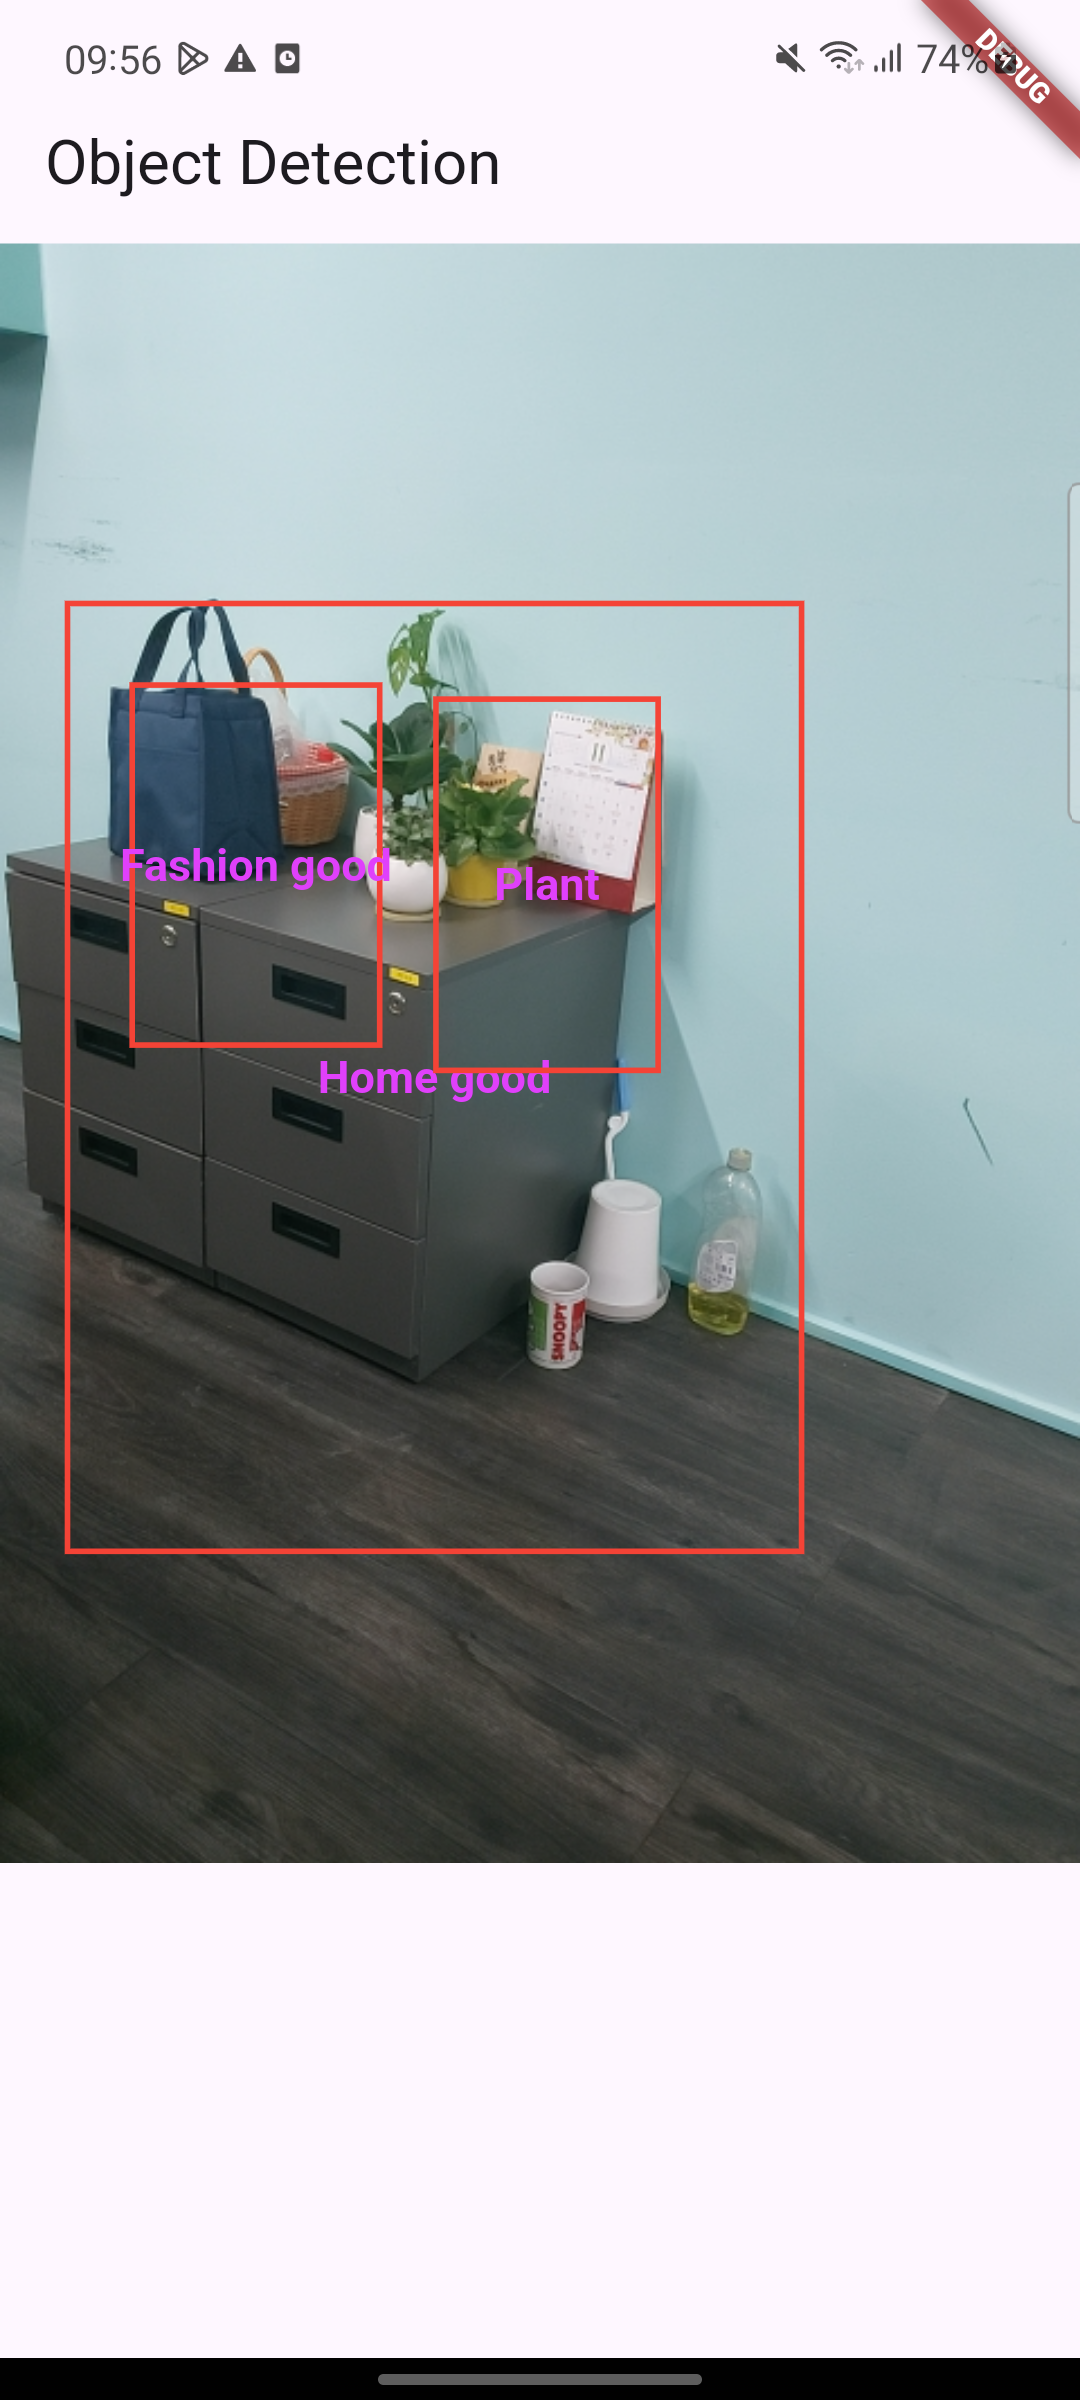
You should see the camera preview, and any detected objects will be highlighted with red bounding boxes.
Let's enjoy our fruits:
Troubleshooting

Ensure you have granted camera permissions on your device.
If detection seems slow, try reducing the resolution using ResolutionPreset.low.

Conclusion

This small tutorial shows how to integrate ML Kit Object Detection into a Flutter app. You can extend this example by customizing the detection options such as using a local custom model.
Happy coding in Flutter!
(Feature image is come from Freepik)
View More
TECH

November 6, 2024

Understanding Vector Databases: What, How, and Why They Matter in AI

Understanding Vector Databases: What, How, and Why They Matter in AI

If you've been exploring the world of artificial intelligence (AI), you might have come across the term "vector database." This concept is gaining traction, especially with applications like image recognition, natural language processing, and recommendation systems. But what exactly is a vector database, and why is it so valuable in these contexts? In this blog post, we'll dive into what a vector database is, how it works, and why you should consider using it for your AI projects.

View More
1 14 15 16 17 18 25