TECH

November 24, 2023

Some useful extensions in Visual Studio Code

Visual Studio Code is a useful programming tool, it supports almost all popular programming languages: Python, JavaScript, HTML, CSS, TypeScript, C++, Java, PHP, Go, SQL, Ruby, ...


Another thing regarding language support is that documentation for popular programming languages in homepage. Shows that the development direction of this editor is aimed at all programmers, regardless of what programming language or field they use in the programming industry.

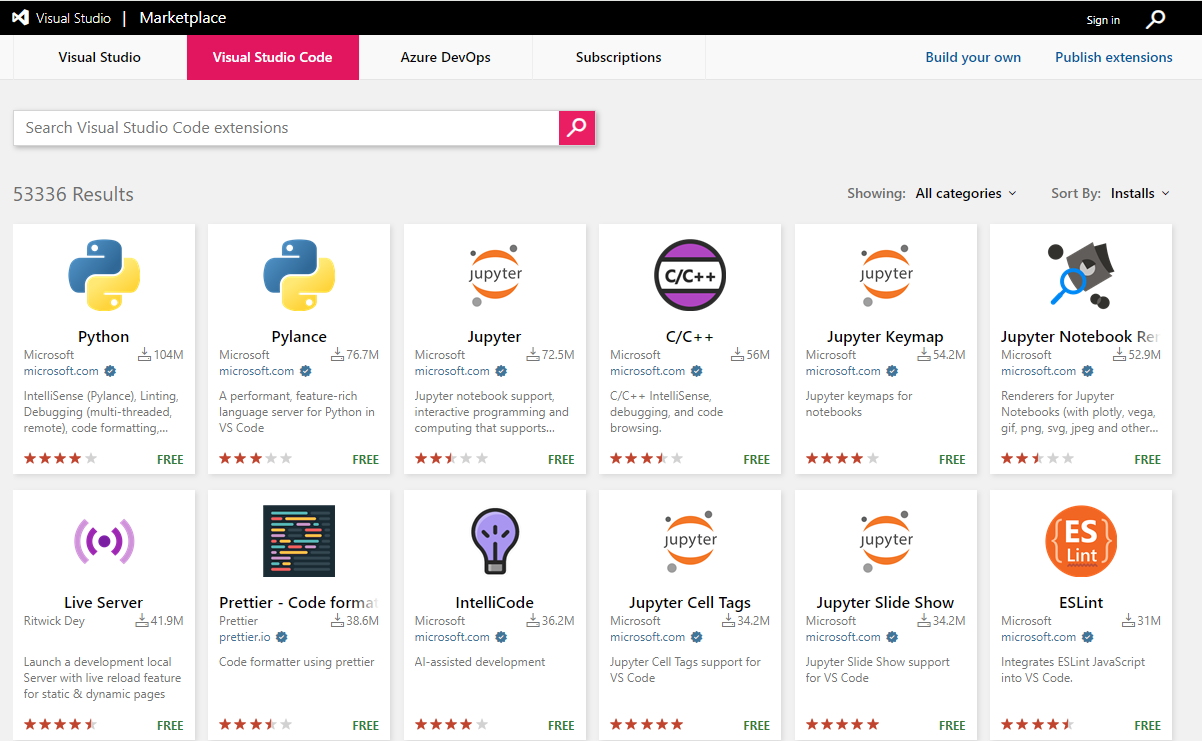
It can be said that it is one of the software with the richest extension store with thousands of extensions of all types such as programming languages, themes, services,...

VS Code extensions let you add languages, debuggers, and tools to your installation to support your development workflow.


In my work,  I have found some extensions to be particularly useful, so I would like to share them with everyone below.

The first:  I will introduce about install 
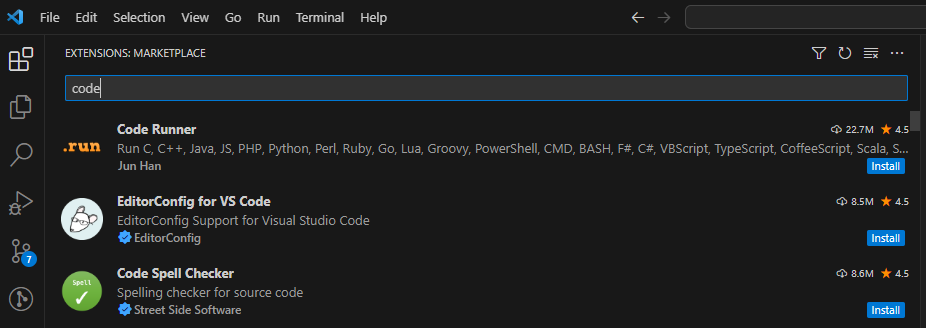
+ Find and install an extension:
In the Extensions, input 'code' the search box to filter the Marketplace offerings to extensions with 'code' in the title or metadata.
You can see this extension and choose what you want use.


Some useful application for developers:
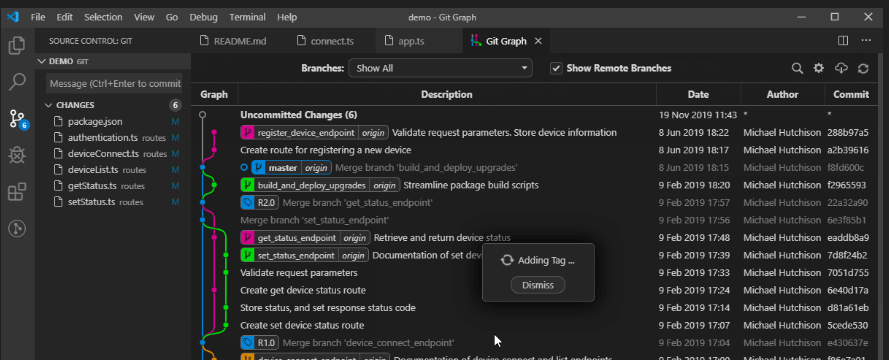
 

1.Git Graph

- Introduce: 

View a Git Graph of your repository, and easily perform Git actions from the graph.

Normally we will use some tools like Tortoise Git, Source Tree, Git Base to manage our git,
track commits, merge requests, see git branches, people committing code,...

The purpose is to know where the information about these branches will come from, when they committed, and who committed them in a clear diagram with easy-to-see colors.

To meet this need, we will have an extension called Git Graph, we can use the extension to review all necessary information without using other external tools.


- Install: Menu Extensions-> Search Git Graph -> Click Install Button

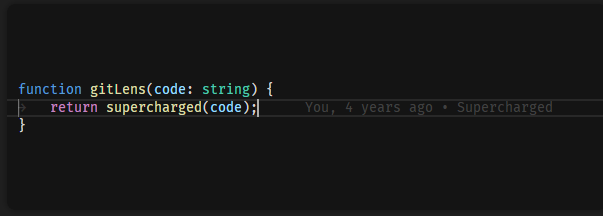
2.GitLens — Supercharge

- Introduce: 

If Git Graph helps us review all the information through the commit schedule.

But it has a limitation: to view information, we need to click on the menu of this extensions , and only view each file.

On the contrary, GitLens can help us see information about each line of code: who wrote this line of code, what date it was committed, branch name, version ,...

We just need to click the cursor directly on that line of code to see the information


- Install: Menu Extensions-> Search GitLens -> Click Install Button

3. Rainbow Tags
- Introduce:

Rainbow Tags are extremely useful Extensions, especially for web programmers, for pages with too much html code.

It is difficult for us to check the opening and closing of tags, parent tags, and child tags.

Rainbow Tags will help us review code easily, the tags are colored differently for each level, there will be no color overlap if the same type of tag

Then we will easily see the opening and closing of this tab. Color will make us feel more interested in programming


- Install: Menu Extensions-> Search Rainbow -> Click Install Button


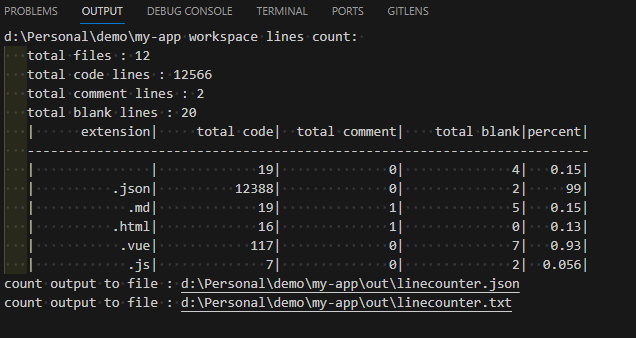
4. Lines of Code (LOC)

- Introduce:

At the end of the project, we will have an extremely important job: to summarize the number of lines of code of that project.

This is for the purpose of accurately evaluating and making statistics about our projects to report to superiors, customers, to evaluate KPIs, Sales,...

And Lines of Code will support us very well in this.

Lines of Code can be listed by file or by entire project: total number  files, number code, number of comment lines, number of blank lines

The results are exported as json files and txt files


- Install: Menu Extensions -> Search Lines of Code -> Click Install Button

[Reference Source]

https://code.visualstudio.com/

https://miro.medium.com/v2/resize:fit:720/format:webp/0*vz3WV7ng_xjlY06r

https://marketplace.visualstudio.com/VSCode

https://github.com/mhutchie/vscode-git-graph/raw/master/resources/demo.gif

https://raw.githubusercontent.com/gitkraken/vscode-gitlens/main/images/docs/current-line-blame.png

https://gitlab.com/voldemortensen/rainbow-tags/-/raw/main/example_color.png

https://miro.medium.com/v2/resize:fit:720/format:webp/1*P7lknJxmmKQc6b_VkCATtQ.jpeg


View More
TECH

November 24, 2023

Excel4node lib for Vuejs

For Vue programmers, a great excel file creation library with full format is required. It's Excel4node.

Excel4node is a node.js module that allows you to create and manipulate Microsoft Excel spreadsheets.

It's easy to use as generating Excel files with complex formatting, formulas, and charts, hide sheet, protection sheet,...

Strength

1. Simple: it is simple to makes it easy to generate Excel files in just a few lines of code.
2. Formulas: can add and edit formulas in your spreadsheet.
3. Charts: can create charts and graphs in your Excel files.
4. Flexibility: allows to create and modify Excel files with a variety of formatting options, including cell alignment, font style and color, and background color.

Weakness

1. Read: don't support function read file in lib, must use other lib to read.
2. Environment: some time, when export at other environment and get it to read have problem.

Demo

I would like to show you how to use it in Vuejs.

The first : We need to install package excel4node

+ Open cmd of windows and go to project: I use project Demo in here D:\.

cmd : D:\Demo\web>npm i excel4node

+ Import the library into the project : To use this library, We need import it to project.

// Require library
var xl = require('excel4node');

+  Create file excel with sheet name [sheet 1] with 5 column and 3 row have special template

+ Create css common apply for excel : border color 000000, style thin , font-size = 11, font family MS PGothic

+ Apply column B to column F , Line 2 to line 5 

// Apply

ws1.cell(2, 2, 5, 6, false).style(styleBorder)

+ Add data to column 

B2 :
. have text : Text demo 1
. (text bold) : text is bold
. text red) : text is red color
C2 :
. have text : Text demo 2
. (text bold) : text is bold
. text red) : text is red color

D2 :
. have text : Text demo 3
E2 :
. have text : Text demo 4
F2 :
. have text : Text demo 5

+ Finally we will get the excel file as expected : 

  1. Column B to column F , line 2 to line 5 : have border
  2. Column B to column E , line 2 to line 5 : have background #fcd5b4
  3. Column B and column C , line 2 have text data as format

Upgrade how your team handles data?

Excel4node brings fast, accurate, and professional Excel exports to your Vue.js applications.

Contact IVC for a Free Consultation

[Reference Source] 

https://www.npmjs.com/package/excel4node

https://assets-global.website-files.com/603fbb650184a06b268ce08b/62eeaa4f06d84810c1b8a22c_excel-project-plan-templates-p-1600.jpg

View More
TECH

November 24, 2023

What is CI/CD?

Nowadays, developing a software project requires many processes. To reduce time and improve product quality. One of the most widely applied processes today is CI/CD.
So what is the meaning of CI/CD? What are the benefits of the CI/CD process?
Let's find out together!

1. What is CI/CD?

The CI/CD (Continuous Integration/Continuous Delivery) process is a method used to deploy software regularly by applying automated methods during the software development process. The main idea of CI/CD is to continuously perform software integration, migration, and deployment on a regular basis.

This process includes the following steps:

  • Build: Build based on the source code and add new features.
  • Test: In-depth testing of newly changed features and code.
  • Deliver: Codes and features that have been tested will be put into the testing environment.
  • Deploy: New changes and features are deployed in the final product to users.

Build Automation & CI/CD


The CI/CD process helps integration happen faster and the finished product is delivered to users in the shortest time.

Currently, CI/CD has been widely applied to the workflow of businesses in the IT field, along with DevOps and Agile.

2. Why use CI/CD?

The CI/CD process helps automate software development and faster product deployment. It helps software development teams test, integrate, and deploy products continuously and synchronously. This enables software development teams to focus on creating higher-quality products while reducing the time and cost of product development.

The benefits of a CI/CD process include:

  • Increase productivity: CI/CD processes enable software development teams to focus on creating higher-quality products while reducing product development time and costs.
  • Minimize errors: The CI/CD process helps software development teams check and handle errors during product development quickly and effectively.
  • Increased stability: CI/CD processes enable software development teams to continuously test and verify product stability, ensuring that the product always performs well.
  • Increase reuse: The CI/CD process enables software development teams to create reusable components that are tested and verified for stability, saving time and costs in the process. product development process.

3. Disadvantages.

Although the CI/CD process has many benefits, there are also some disadvantages.
Here are some disadvantages of the CI/CD process:

  • Security: CI/CD pipelines can encounter security issues, including security vulnerabilities and issues related to identity management.
  • Resources: The CI/CD process requires many resources, including servers, tools, and human resources.
  • Implementation difficulties: Deploying a CI/CD pipeline can present many difficulties, including integrating tools and managing software versions.
  • Difficulty of change: Changing the CI/CD process can be fraught with difficulties, including changing tools and managing software versions.

4. Software\tools commonly used for CI/CD process.

Currently, there are many tools used for the CI/CD process.

Here are some common tools used in the CI/CD process:

  • Jenkins: Jenkins is a popular open-source tool for deploying CI/CD.
  • GitLab CI/CD: GitLab offers CI/CD integration within its source code management platform.
  • Travis CI: Travis CI is a CI/CD integration service commonly used in the open-source software development community.
  • CircleCI: CircleCI is a CI/CD integration tool widely used in enterprises.
  • TeamCity: TeamCity is a CI/CD integration tool developed by JetBrains.


Conclusion:

CI/CD is closely related to Agile and DevOps. The combination of CI/CD, Agile, and DevOps creates a flexible, optimized, and high-performance software development process.
Hopefully, through this post, you will have an overview of what CI/CD is and the benefits of CI/CD.

[Reference Source]

  1. https://www.portainer.io/blog/best-ci/cd-concepts-for-devops (Source of images)
  2. https://about.gitlab.com/solutions/continuous-integration
  3. https://docs.gitlab.com/ee/ci/


View More
TECH

November 24, 2023

Some Tips And Tricks In Javascript Help You Code Easier

JavaScript is a scripting language that enables you to create dynamically updating content, control multimedia, animate images, and pretty much everything else.

To help everyone handle things more simply in JavaScript, I would like to introduce some tips and tricks that I have learned.

1. Every and some function:

every function returns a boolean value. If all elements in the array satisfy the condition, it returns true. Besides, some function only checks if there exists at least one element in the array that meets the condition and returns true.

     const numberArray1 = [2, 4, 6, 8, 10];

     const numberArray2 = [2, 4, 5, 8, 10];

     const isEvenNumber = (number) => {

          return number % 2 === 0;

     }

     console.log(numberArray1.every(isEvenNumber)); // return true (because all elements in this array satisfy the condition)

     console.log(numberArray2.every(isEvenNumber)); // return false (because there is an element 5 that does not satisfy the condition)

     console.log(numberArray1.some(isEvenNumber)); // return true (there exists an element that satisfies the condition)

     console.log(numberArray2.some(isEvenNumber)) // return true (there exists an element that satisfies the condition)


2. Convert from Number to Boolean:

Declaring a variable with a boolean value, in addition to the usual declaration (giving the value of the variable true or false), can be done in the following way.

     const isTrue = !0;

     const isFalse = !1;

     const alsoFalse = !!0;

     console.log(isTrue); // return true

     console.log(isFalse); // return false

     console.log(alsoFalse); // return false


3. Convert to String type:

With other programming languages, we can convert numbers to strings using the toString() function. Although Javascript is the same, there is another faster way to do it.

     const string = 1 + ''; 

     console.log(string); // return '1'


4. Convert to Number type:

In Javascript, there are many ways to convert from String to Number. For example, parseInt(),... But there is a shorter way to do this, which is to use the ( + ) operator.

     const value = '10';

     value = +value;

     console.log(value); // return 10

     console.log(typeof value); // return 'number'


5. Convert from Decimal to Integer:

If you want to convert from a decimal number to an integer, you can use Object Math functions like Math.floor(), Math.ceil() or Math.round(). But the fastest way to do this is to use the bitwise OR ( | ) operator.

     console.log(10.9 | 0); // return 10

     console.log(10.1 | 0); // return 10


6. Use splice() instead of delete:

When using the delete method, an application replaces an item with undefined instead of removing it from the array. So it is better to use splice() to remove an item from an array.

When using delete:

    const fruits = ['apple', 'orange', 'kiwi', 'banana', 'lemon'];

     fruits.length; // return 5

     delete fruits[3]; // return true

     fruits.length; // return 5

     console.log(fruits); // ['apple', 'orange', 'kiwi', undefined, 'lemon']

When using splice():

     const fruits = ['apple', 'orange', 'kiwi', 'banana', 'lemon'];

     fruits.length; // return 5

     fruits.splice(3, 1); // return ['banana']

     fruits.length; // return 4

     console.log(fruits); // ['apple', 'orange', 'kiwi', 'lemon']


7. Combine two Objects using the spread operator:

There are many situations where you have to combine two or more data sets from different sources. In such cases, there are ways to do this in JavaScript.

Below is a typical example:

     const person = {id: '001', name: 'Tran Van A'};

     const address = {id: '001', add: 'district 1'};

     const personDetail = Object.assign({}, person, address);

     console.log(personDetail); // return { id: '001', name: 'Tran Van A', add: 'district 1'}

However, you can use the spread operator to combine person and address into a single object.

     const personDetail = { …person, …address };

     console.log(personDetail); // return { id: '001', name: 'Tran Van A', add: 'district 1'}

An important note is that duplicate keywords will be overwritten on previous objects.


Conclusion:

Like any other programming language, JavaScript has many tips and tricks to handle Objects, Arrays, etc., allowing us to write our programs simpler and more beautifully without using functions, and verbose methods. Hope it will be of some help to those of you who are learning Javascript.


References: 

https://legacy.reactjs.org/docs/getting-started.html

https://www.w3schools.com/js/js_functions.asp

https://developer.mozilla.org/en-US/docs/Web/JavaScript/Guide/Functions


View More
TECH

November 23, 2023

Tips to communicate and work effectively with Japanese

Working in a Japanese company and coming into contact with the Japanese side, surely you will gradually get used to the personality and working style of Japanese people. However, each person's personality and working style are different, so getting along with everyone is not easy.

The purpose of this post is to share a little of my experience in nearly 10 years of supporting project members to communicate with Japanese members (members of parent company).

For me, to communicate and work effectively with the Japanese side, we need to pay attention to the following points:

  1. Always in time

Punctuality is a habit that is deeply ingrained in each individual and gradually becomes an implicit rule, a basic consciousness. Japanese people always avoid bothering others. Therefore, being late for an appointment is considered impolite behavior, causing harm to others. Being on time is the right thing to do in every situation.

Therefore,

  • Pay attention to the time in everything.
  • Remember the meeting time and always arrive at least 10 minutes before.
  • Whatever time you report to do (release, submit report, etc.), remember to do it on time. In a force majeure situation, at the time you discover that you cannot respond in time at the reported time, you must immediately contact the Japanese side and explain the situation (reason, cause, etc.) fully.


  1. Create a habit of greeting

The greeting in different situations will have different ways of saying it, and Japanese greetings are extremely important in daily life and communication. Therefore, we must pay attention when communicating with Japanese people, remember to say the greeting no matter what you do.

For example,

When sending email or chat message:

Type Japanese English
Opening greeting お疲れ様です Thanks for your effort
お忙しいところ失礼致します I apologize for the inconvenience
昨日は遅くまでお疲れ様でした Thank you for staying up late yesterday
Closing greetings 以上、よろしくお願いいたします Thank you very much for your understanding
ご検討をお願いします Please consider this
ご連絡お待ち申し上げます We look forward to hearing from you


When meeting online:

Type Japanese English
Opening greeting おはようございます Good morning
お疲れ様です Thanks for your effort
お久しぶりです Long time no see
Closing greetings ありがとうございました Thank you very much
お疲れ様でした Thanks for your hard work
失礼いたします Excuse me


  1. Don't be surprised to hear the word “Sorry” a lot

While Vietnamese people only thank when they receive a favor and apologize when they cause something really annoying to others. For Japanese people, constantly using the phrase "Sorry" is a daily habit, their minimum politeness. Therefore, you do not need to be surprised when the story always starts.

                                    申し訳ございませんが、(I'm really sorry but …)

Therefore, when working with Japanese people, do not think too deeply about the word "Sorry", consider it just a word used to say hello.


  1. Listen patiently and don't be afraid to confirm

With the above mindset of avoiding offending others, Japanese people rarely say "No" to people who are not close to them. Instead, they often talk in circles and hope to receive the other person's understanding when communicating. They do not express their feelings and thoughts clearly but always keep those feelings within a very vague limit. Therefore, it is not easy to know what the other person is thinking or feeling.

For example, when making a request, they won't say "I want you to do this" right away but will explain the context surrounding the request. And they won't say directly "you should do this", but they will say "I think we should do this". That's why many times the interpreters are confused after hearing the request, not knowing what they want them to do in the end. At that time, your job is to confirm the request again if you do not understand the request clearly.

For example, you can confirm that "So we understand that we will do ABC, right?" If they confirm that you got it right, then just do it. If you make a mistake, they will explain again until you understand what they want.

Please listen patiently and confirm if you do not understand clearly.


  1. Should not directly say "No"

If you pay attention, you will see that it is very rare for Japanese people to answer you "No" right away, because they care about your feelings, so instead of bluntly saying "No", they will be more flexible. They will say "I think it's unlikely, but I'll reconsider" for example.

To respond to this gentle behavior, we should do the same, right? For example, when receiving a request, even if you know 80% of it is "impossible", instead of bluntly answering "No, we can't do it, it's too unreasonable", please answer that "I understand your request, but because we need more research, we cannot answer you right away. Please give me some time, we will reply to you as soon as we have the results of the investigation."

Why do you need to do that, because if you immediately answer "We can't", firstly, with a blunt "No" answer they will be shocked, secondly if they ask you again "Why can't you do it? Can you explain right at that time why it's not possible? Can you give a basis for what you say?”

Therefore, based on the investigation results, it will help them understand your "impossible".

Source of images: https://www.pexels.com/

View More
TECH

November 21, 2023

The Benefits of Multiskilled Developers in a Software Company

Having multiple skilled developers in a software company is crucial for adapting to the ever-evolving target market and staying competitive in the tech industry. Here are some reasons why diverse skill sets are essential:

View More
TECH

November 15, 2023

GraphQL - The ecosystem needs to be explored

1. What is GraphQL?

GraphQL is an open-source data query manipulation language intended for developing APIs.

- Provides an easy-to-understand data structure.

- Determine what you need or no need when you request.

- With many developer tools and easier upgrades in the future.


2. Major advantages of GraphQL

- One of the best solutions for microservices and complex systems.

- Using Hierarchical Structure.

- Way faster than other communication APIs.

- Easy to learn, use, and explore an API quickly.

- It only has a single endpoint.

- Fetching only the exact and specific data in a single request.


3. Language support

GraphQL supports many popular current programming languages such as:

  • JavaScript
  • Python
  • C# / .NET
  • Go
  • PHP
  • Ruby
  • Java / Kotlin
  • Rust
  • Swift / Objective-C
  • Elixir
  • Scala
  • Flutter


4. Some compare between GraphQL and Rest API

Data access

  • Rest API: multiple endpoints.
  • GraphQL: has a single URL endpoint.

Response data

  • Rest API: the server fixes the Rest API structure response data.
  • GraphQL: the client fixes GraphQL structure response data.

Best suited

  • Rest API: suitable with simple data sources where resources are well-defined.
  • GraphQL: suitable with large, complex, and interrelated data sources.

Validate error

  • Rest API: check and return in client if the returned data is valid.
  • GraphQL: the schema structure will reject the invalid data.


Here’s an example of how a REST API and a GraphQL API would handle a request for a user’s name, email, and phone number:

Rest API

GraphQL

GET api/informations/13
{
 "name": "Thormetal",
 "email": "thormetal@ivc.com", 
 "phone": "xxx-xxx-xx90",
 "infor": {
   "street": "123 Cong Hoa",
   "city": "HCM",
   "company": "ISB",
   "section": "Sec 6"
 }
}
GET api/graphql
query {
 information(id: 13) { 
   name
   email
   phone
 }
}


In the below example, I just want to get information on name, email, and phone number.

- The REST API returns a fixed data structure that includes: name, email, phone number, and many other information.

- The GraphQL API, on the other hand, allows you to specify exactly what data you need, so it will return the correct data you.

specified (name, email, phone)


[Reference Source]

  • https://graphql.org/
  • https://medium.com/swlh/a-quick-intro-to-graphql-1c6e651562c8
  • https://www.javatpoint.com/graphql-advantages-and-disadvantages
  • https://aws.amazon.com/compare/the-difference-between-graphql-and-rest
  • https://dev.to/callebdev/understanding-graphql-and-its-design-principles-fd6
View More
TECH

November 15, 2023

Visual Basic for Applications and its practical applications in daily life

Have you ever wondered how health data from devices like Smartwatch, Smart Band, etc., can be displayed in visually appealing charts such as bar charts, line charts, etc., creating an aesthetically pleasing and user-friendly experience?

View More
TECH

November 15, 2023

Introduce about free DICOM image tools DVTK

To handle DICOM images in the medical field, there are numerous tools available, both paid and free. Based on my experience, one of the free tools that offers considerable functionality is the DVTK toolkit. This toolkit comprises various individual tools, and in this article, I'll introduce three commonly used ones.

View More
TECH

November 15, 2023

Mutable Object In JavaScript And How To Change From Mutable Object To Immutable Object

Data type in JavaScript has been analyze to 2 type Primitive and Reference. By default, reference data types are mutable including function, array, object..


1. What is Mutable in JavaScript?

Let's consider the following example:

let arr1 = [2, 3, 4];

let arr2 = arr1;

arr2[0] = "javascript";

console.log(arr1);

// ['javascript', 3, 4]


Variable arr1 has data type Array, variable arr2 is created from variable arr1. But when we change the value of variable arr2, variable arr1 is also changed. So, if a data type is mutable it will allow you to modify existing values without creating new values.

When the array or object is created, a pointer is added to the stack and this pointer points to a value on the Heap.

When we create the variable arr2, another pointer is added to the stack, but both point to the same object on the heap. When doing let arr2 = arr1; Reference data does not copy values on the heap, but only pointers on the stack.


2. How to copy values Object, Array are mutable?

The solution is to always create a reference for each new object when you want to clone an object. There are many ways to clone an Object, now I will only introduce the two ways that are considered the most practical: using the Object.assign() method and the rest operator (...).

Here's the syntax:

Object.assign(target, source)

    • The target: clone the source properties into the target and return the final result.
    • The source: is the place where the original drugs are stored.

Note: The target can be an empty object {}.

For example:

const obj1 = { name: "Java", age: 20 }

const obj2 = Object.assign({}, obj1);

obj2.age = 40;

console.log(obj1.age); // 20

console.log(obj2.age); // 40


The value of obj2.age has been converted to 40 and does not affect the value of obj1.

The rest operator (...) is quite simple to use, just add the sign ... in front of the name of the object to be copied.

For example:

const obj1 = { name: "Java", age: 20 }

const obj2 = { ...obj1};

obj2.age = 40;

console.log(obj1.age); // 20

console.log(obj2.age); // 40


3. How to create immutable Objects in JavaScript?

Normally Objects in javascript are mutable. However, you can also create immutable Objects. In this article, we will cover the usage of Object.defineProperty.

To create an immutable Object with Object.defineProperty, just define the property with writable as false (the default value of writable is false so you can ignore this).

const object1 = {};

Object.defineProperty(object1, 'property1', { value: 10, writable: false });

object1.property1 = 20; // throws an error in strict mode

console.log(object1.property1); // 10

Once we have defined an Object with Object.defineProperty, we will not be able to change the values of the properties in the Object.


4. Conclusion

Through this article, you will understand mutable properties in JavaScript. This will help you avoid errors regarding this feature during programming.

Objects are mutable but in some cases can still prevent the ability to change. Let's continue exploring JavaScript.


[Reference Source]

  • https://www.freecodecamp.org/news/mutability-vs-immutability-in-javascript/
  • https://www.pexels.com/
View More
1 19 20 21 22 23