Qt Quick 3D in a Nutshell
Qt Quick 3D is Qt’s high-level 3D API that extends the familiar Qt Quick world into three dimensions. Instead of bolting on an external engine, Qt Quick 3D plugs directly into the Qt Quick scene graph, so you can mix 2D and 3D content in the same UI and control everything from QML: bindings, states, animations, and input. doc.qt.io
For many apps that “just need some 3D”—dashboards, visualizations, XR UIs, small games—this gives you a much simpler workflow than writing a custom renderer or embedding a full game engine.
Starting Simple: Built-in 3D Primitives
The easiest way to learn Qt Quick 3D is with the built-in primitive meshes. A Model type can load either a .mesh file or one of several primitives by setting source to special names like #Cube or #Sphere. doc.qt.io+1
Supported primitives include:
-
- #Rectangle – a flat quad, handy as a floor, wall, or screen.
- #Cube – a box, good for quick blocking-out of shapes.
- #Sphere – obvious, but great for lights or markers.
- #Cylinder
- #Cone
Example:
Model {
source: "#Cube"
materials: PrincipledMaterial {
baseColor: "red"
}
}
With View3D, a PerspectiveCamera, some lights, and a few primitives, you can already build small scenes and prototypes.
But for anything realistic—like an old bar interior or a detailed UFO—you usually want pre-modeled assets created in tools such as Blender or Maya.
From Primitives to Real Scenes with Pre-Modeled Assets
Qt Quick 3D supports importing 3D models from standard interchange formats like glTF 2.0, FBX, OBJ, and others. These assets typically include:
- geometry (mesh)
- multiple materials
- texture maps (albedo, normal, roughness, etc.)
- sometimes animations
The official “Qt Quick 3D Introduction with glTF Assets” guide shows exactly this: starting from a minimal green View3D, then importing the famous Sponza and Suzanne models from the glTF sample repository using Qt’s asset tools, and finally lighting and animating them. doc.qt.io
To make this efficient at runtime, assets are pre-processed into Qt’s own mesh and texture formats instead of loading raw glTF/FBX directly. That’s where Balsam comes in.
Balsam & BalsamUI: Converting 3D Assets to QML
Balsam is Qt Quick 3D’s asset import tool(usually stored in "[your installed Qt folder]\[Qt version: like 6.8.3]\msvc2022_64\bin\" folder). It takes files from DCC tools (Blender, Maya, 3ds Max, …) and converts them into:
- a QML component (sub-scene) like qml
- one or more .mesh files under a meshes/ directory
- textures copied and organized under a maps/ directory qt.io+1
High-level idea:
balsam myModel.gltf# → generates:# meshes/myModel.mesh# MyModel.qml# maps/* (textures)
Inside your QML scene you simply write:
import QtQuick3D MyModel { id: modelInstance}
Qt also ships BalsamUI (balsamui), a GUI frontend where you pick the source asset and output folder, and tweak options like generating normals, LODs, or lightmap UVs. doc.qt.io+1
Supported formats include OBJ, FBX, COLLADA, STL, PLY and glTF2 (.gltf, .glb). doc.qt.io
So the workflow for designers and developers becomes:
1. Model & texture in your DCC tool.
2. Export as glTF (or FBX/OBJ…).
3. Run balsamui (or balsam) to generate QML + meshes + textures.
4. Instantiate the generated QML type inside your Qt Quick 3D scene.
Example: An Old Bar with a Floating UFO
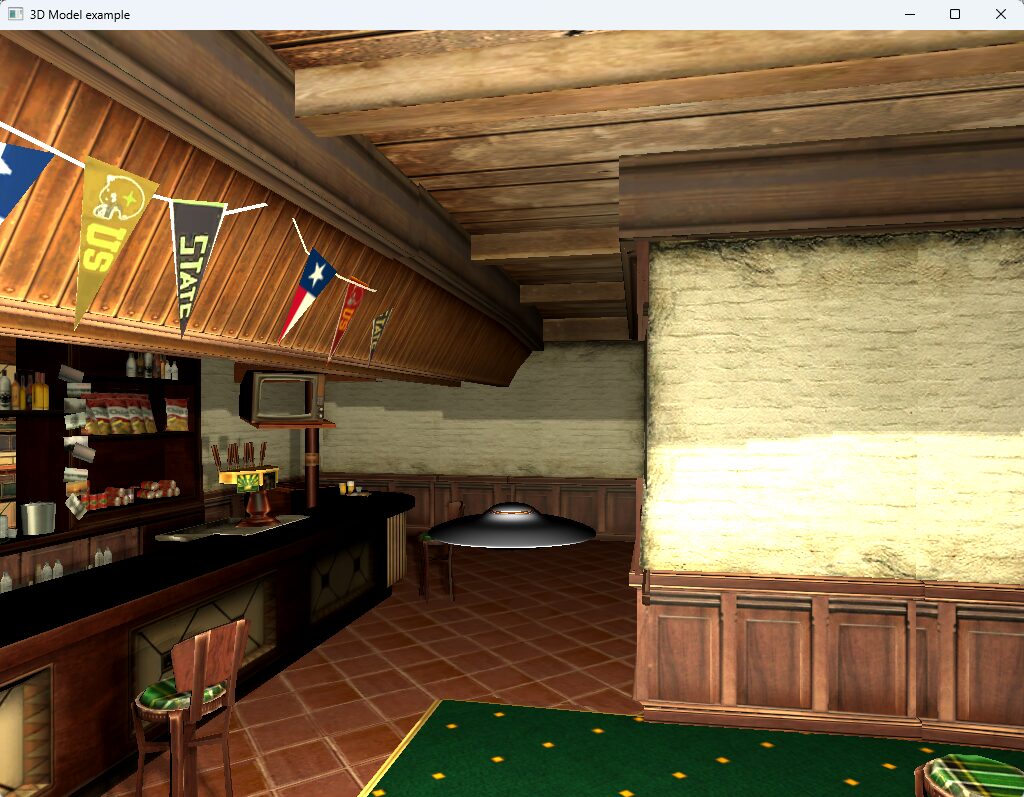
Let’s put everything together with a small sample: a walkable old bar scene with a hovering UFO that always stays in front of the camera, rotates, and emits light.
We’ll use two Sketchfab models (downloaded in glTF format):
- Old bar
https://sketchfab.com/3d-models/old-bar-bab28c8336f944afad0cc759d7f5ec0b - UFO (flying saucer)
https://sketchfab.com/3d-models/ufo-flying-saucer-spaceship-ovni-094ce2baf6ee40aa8f083b7d0fcf0a9f
Make sure you respect each asset’s license when you download and ship them.
Step 1 – Skeleton QML App
First we create a minimal Qt Quick application with a single Window and a View3D:
import QtQuick
import QtQuick3D
import QtQuick3D.Helpers
Window {
width: 1024
height: 768
visible: true
title: qsTr("3D Model example")
View3D {
anchors.fill: parent
environment: SceneEnvironment {
backgroundMode: SceneEnvironment.SkyBox
}
PerspectiveCamera {
id: camera
}
WasdController {
controlledObject: camera
}
}
}
This is very similar to the “skeleton application” shown in the Qt glTF asset intro article: a View3D, a camera, and a WasdController so we can fly around the scene. doc.qt.io
Step 2 – Convert the Bar and UFO with BalsamUI
- Download the Old Bar and UFO models from Sketchfab as glTF.
- Start balsamui (it ships with Qt Quick 3D).
- In balsamui:
- Choose the input file, e.g. gltf.
- Set an output directory inside your project, e.g. assets/bar/.
- Click Convert.
- Repeat for the UFO glTF file.
For each asset you’ll get something like:
- qml (or a name based on the source file)
- meshes/Bar.mesh
- maps/* textures
and similarly for UFO.qml.
These QML files are sub-scenes: self-contained node trees with models, materials and textures that you can instantiate inside any View3D. doc.qt.io+1
Place them in your project (for example in the same directory as main.qml) so that QML can find them by name.
Step 3 – Instantiating the Converted Models
Now we pull those generated components into our scene.
- Bar becomes the environment (room).
- UFO is a smaller object floating in front of the camera.
You already prepared a final QML; here it is as the complete sample:
import QtQuick
import QtQuick3D
import QtQuick3D.Helpers
Window {
width: 1024
height: 768
visible: true
title: qsTr("3D Model example")
View3D {
anchors.fill: parent
environment: SceneEnvironment {
backgroundMode: SceneEnvironment.SkyBox
}
PerspectiveCamera {
id: camera
y: 650
z: 200
Node {
id: ufoAnchor
y: -30 // below eye level
z: -150 // distance in front
Node {
id: ufoRig
// UFO rotates around itself
PropertyAnimation on eulerRotation.y {
from: 0
to: 360
duration: 8000
loops: Animation.Infinite
}
UFO {
id: ufo
scale: Qt.vector3d(4, 4, 4)
}
PointLight {
id: ufoFillLight
y: 0
color: "#fff2c0"
brightness: 50
castsShadow: true
shadowFactor: 60
}
}
}
}
Bar {
scale: Qt.vector3d(100, 100, 100)
}
WasdController {
controlledObject: camera
}
}
}
Output of this sample application looks like below image:
Walking Through the QML
Let’s briefly describe each important item in this QML:
Window
The top-level application window:
- Fixed size 1024 × 768 for simplicity.
- Contains a single View3D that fills the entire area.
View3D
The 3D viewport where our bar and UFO live:
- fill: parent – covers the whole window.
- Has an environment with SkyBox. In a real app you can assign a light probe / HDR sky texture for reflections and ambient lighting.
SceneEnvironment
Controls the global rendering environment:
- Here we only set backgroundMode: SkyBox, but it’s also where you can enable image-based lighting, fog, post-processing effects, etc.
PerspectiveCamera
Our player camera:
- Positioned at y: 650, z: 200 to stand inside the bar at a reasonable height.
- Acts as the parent for the UFO anchor, so when the camera moves or rotates, the UFO follows.
ufoAnchor (Node)
- Node under the camera that defines where the UFO is relative to the camera.
- y: -30 moves the UFO slightly below eye level.
- z: -150 places the UFO 150 units in front of the camera (Qt Quick 3D cameras look along the negative Z axis).
Because this node is a child of the camera, if you walk around with WASD or look around with the mouse, the UFO stays fixed in front of you like a HUD element in 3D space.
ufoRig (Node + PropertyAnimation)
- Holds the actual UFO model and its light.
- Has a PropertyAnimation on y that continuously rotates from 0 to 360 degrees in 8 seconds, looping forever.
- That means the UFO rotates around its own vertical axis like a hovering saucer.
UFO (generated component)
- This is the QML component generated by Balsam/BalsamUI from the UFO glTF file.
- Inside it there will be one or more Model nodes, materials, textures, etc. – all created by the import tool.
- Here we simply set scale: Qt.vector3d(4, 4, 4) to enlarge it to match the bar’s scale.
PointLight ufoFillLight
- A point light attached to ufoRig, so it moves and rotates with the UFO.
- Gives a warm glow (color: "#fff2c0") with moderate brightness; enough to make the UFO and surrounding surfaces visible.
- castsShadow: true + shadowFactor: 60 produce nice dynamic shadows from the UFO onto the bar interior.
This, combined with emissive materials on the UFO windows (optional extra), creates the feeling that the light comes from the craft itself.
Bar (generated component)
- The bar environment, generated via Balsam from the “Old Bar” glTF file.
- scale: Qt.vector3d(100, 100, 100) enlarges it so that the heigh/width feels natural when walking around with WASD, similar to how the Qt glTF intro example scales Sponza by 100. qt.io
WasdController
- Convenience helper from Helpers.
- Handles keyboard + mouse controls:
- WASD / RF keys for moving forward/back/left/right/up/down.
- Mouse to look around (when grabbed).
- We simply point it at our camera with controlledObject: camera.
Conclusion
In this small scene we covered the full typical pipeline:
- Start from a simple View3D + camera + controller.
- Import detailed assets from DCC tools using Balsam/BalsamUI.
- Instantiate the generated QML components (Bar, UFO) directly in the scene.
- Use Qt Quick 3D’s usual QML features—nodes, property bindings, animations, lights—to make it interactive and alive.
From here you can expand with:
- more lights and reflection probes,
- UI overlays in Qt Quick 2D on top of the 3D view,
- XR support via Xr,
- or runtime asset loading using RuntimeLoader when you really need user-provided models.
※ References:
https://doc.qt.io/qt-6/qtquick3d-index.html
https://doc.qt.io/qt-6/qml-qtquick3d-model.html
https://doc.qt.io/qt-6/quick3d-asset-intro.html
https://doc.qt.io/qt-6/qtquick3d-tool-balsam.html
https://sketchfab.com/3d-models/old-bar-bab28c8336f944afad0cc759d7f5ec0b
https://sketchfab.com/3d-models/ufo-flying-saucer-spaceship-ovni-094ce2baf6ee40aa8f083b7d0fcf0a9f
Ready to get started?
Contact IVC for a free consultation and discover how we can help your business grow online.
Contact IVC for a Free Consultation