While creating web applications and websites, compatibility with prominent web browsers is very important. Yet, given the extensive variety of browsers available globally, it is not always easy to decide which ones to support.
Choosing the right browsers in advance is important, but it is just as important to test cross-browser compatibility after development. Ensuring your website works smoothly across different browsers improves the user experience (UX) and increases your business potential for success.
To be able to make wise decisions, staying up-to-date with the latest browser market share data is necessary. In this article, we present to you the newest global web browser market share statistics by StatCounter, a leading web traffic analytics website, to provide you with the update.
What You’ll Learn in This Article
- Latest Browser Market Share (as of January 2025)
- Desktop + Mobile
- Desktop
- Mobile
- Browser Market Share Trends Over the Past Decade (2015–2024)
- Desktop + Mobile
- Desktop
- Mobile
Understanding not only the latest browser market share but also the long-term trends from the past decade can help predict future developments in the browser landscape.
Overall Browser Market Share (Desktop + Mobile) in January 2025
First, let’s start with the global browser market share across both desktop and mobile platforms as of January 2025.
|
Browser
|
Market Share
|
|
Chrome
|
67.1%
|
|
Safari
|
18.0%
|
|
Edge
|
5.2%
|
|
Firefox
|
2.5%
|
|
Samsung Internet
|
2.2%
|
|
Opera
|
2.1%
|
|
UC Browser
|
0.8%
|
|
Android
|
0.6%
|
|
Yandex Browser
|
0.4%
|
|
360 Safe Browser
|
0.3%
|
|
QQ Browser
|
0.3%
|
|
Coc Coc
|
0.1%
|
|
Whale Browser
|
0.1%
|
|
IE
|
0.1%
|
|
Mozilla
|
0.04%
|
|
Instabridge
|
0.03%
|
|
Sogou Explorer
|
0.03%
|
|
Ecosia
|
0.02%
|
|
KaiOS
|
0.02%
|
|
Puffin
|
0.02%
|
|
Edge Legacy
|
0.02%
|
|
Unknown
|
0.01%
|
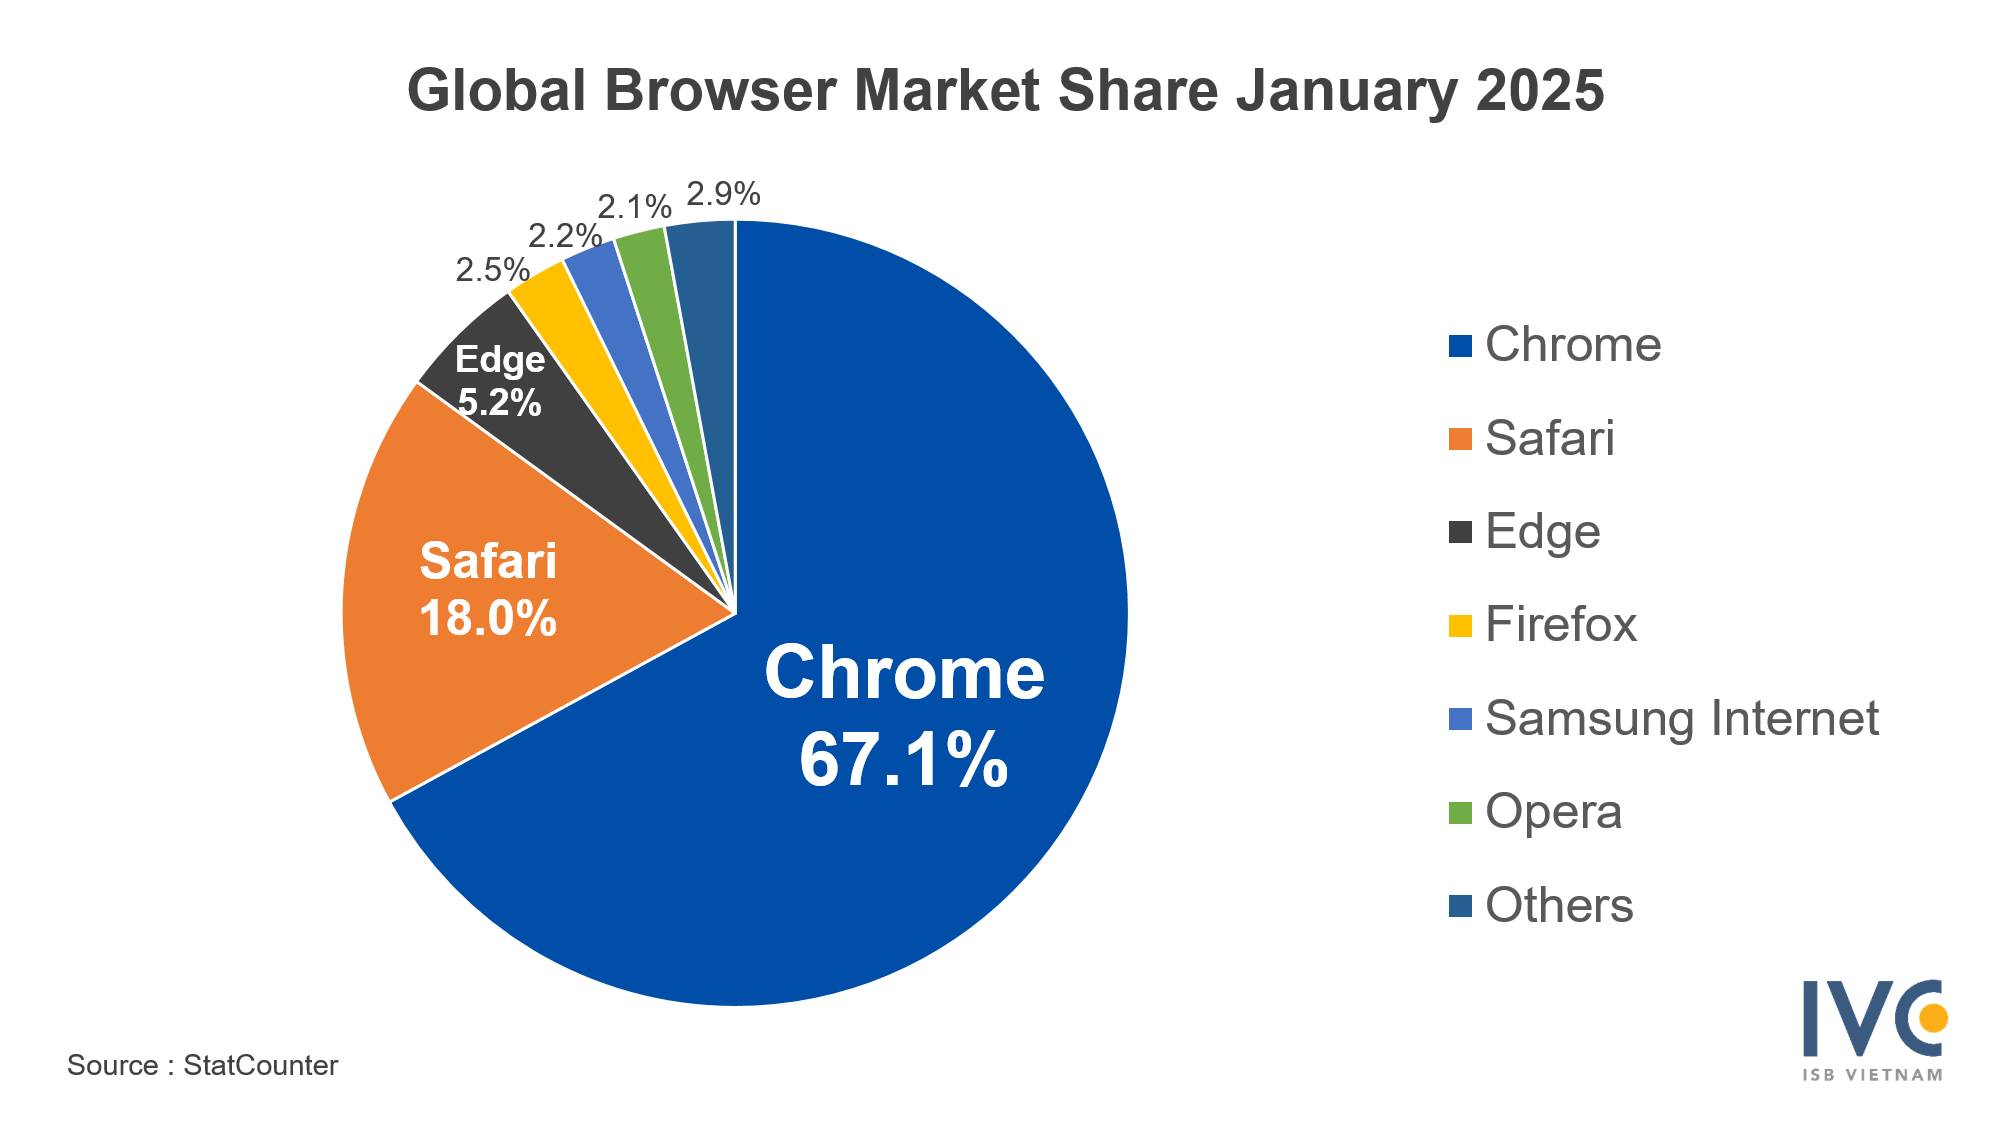
According to StatCounter's January 2025 data, Google Chrome continues to dominate the global browser market with a huge 67.1% market share. That's more than three times the market share of the second-most popular browser.
At second position is Apple's Safari with an 18.0% market share, capturing nearly one-fifth of the global market. At third is Microsoft Edge with 5.2%.
These three browsers Chrome, Safari, and Edge have a total market share of 90.2% of the global market, which makes them the leading browsers used across the world in 2025.
At fourth position is Firefox (2.5%), followed by Samsung Internet (2.2%) and Opera (2.1%).
Why Is Chrome So Dominant?
Chrome's extreme domination of the market share is warranted on some significant grounds:
- Seamless Google integration: As a Google product, Chrome is tightly integrated with Gmail, Google Docs, Google Drive, etc., and therefore one of the best for home and office use.
- Fast page loading rates: Chrome is also fast-based, offering a smooth browsing experience.
- Huge extension ecosystem: Chrome Web Store is a huge repository of extensions, making it easier to use and more productive.
- Cross-platform compatibility: Chrome can be used on Windows, macOS, Android, and iOS, so it is easy to use across various devices.
Let's move on to the desktop and mobile browser market share breakdown next.
Desktop Browser Market Share in January 2025
Now let's have a closer look at the desktop browser market share in January 2025.
|
Browser
|
Market Share (Desktop)
|
|
Chrome
|
65.8%
|
|
Edge
|
13.8%
|
|
Safari
|
8.8%
|
|
Firefox
|
6.3%
|
|
Opera
|
2.9%
|
|
360 Safe Browser
|
0.8%
|
|
Yandex Browser
|
0.6%
|
|
IE
|
0.3%
|
|
QQ Browser
|
0.2%
|
|
Coc Coc
|
0.1%
|
|
Mozilla
|
0.1%
|
|
Sogou Explorer
|
0.1%
|
|
Whale Browser
|
0.1%
|
|
Edge Legacy
|
0.04%
|
|
UC Browser
|
0.02%
|
|
Other
|
0.05%
|
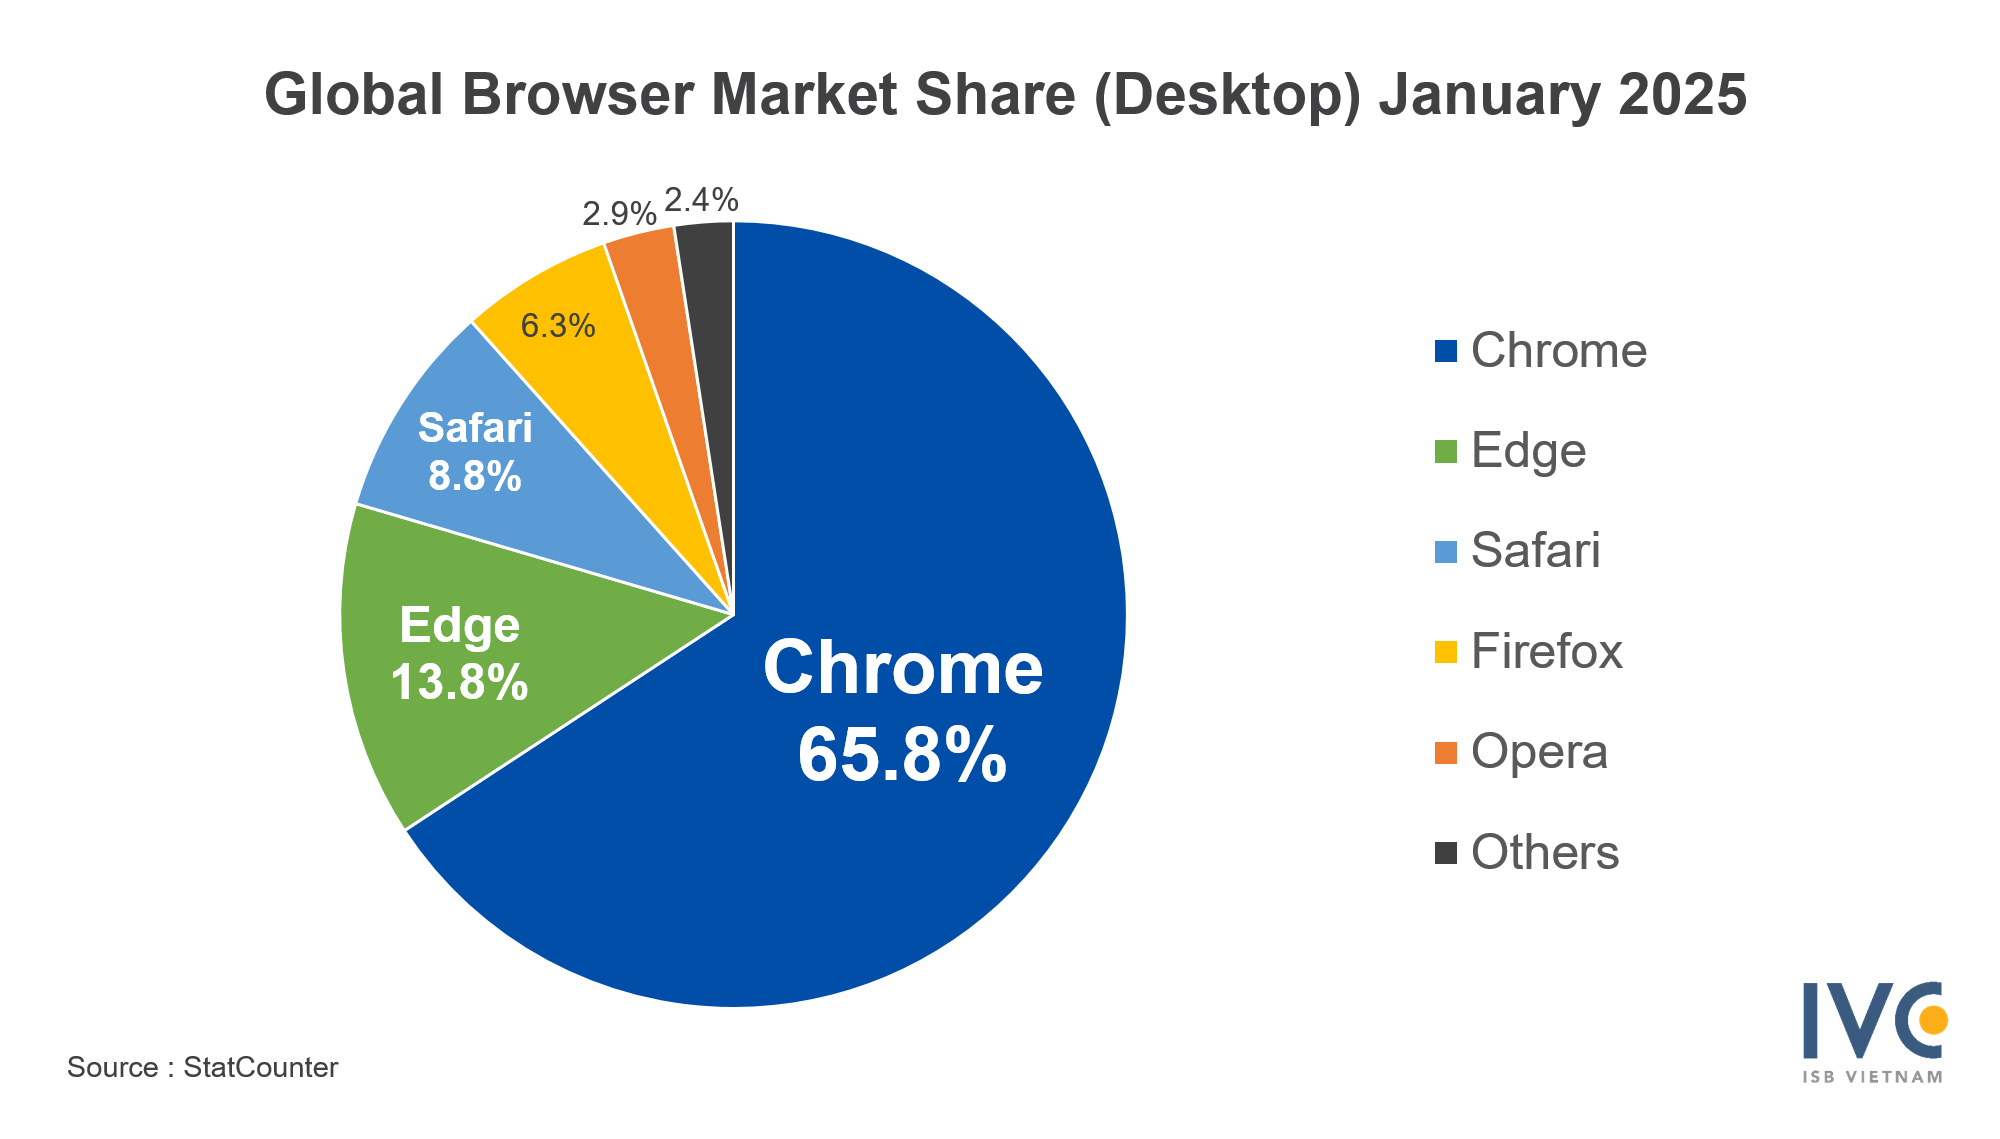
Chrome Reigns Supreme, but Edge has Serious Market Share
Even in the desktop browser market, Google Chrome rules supreme with 65.8% of the market. But the second-placed browser is unlike the overall market share list.
Unlike in the combined (desktop + mobile) category—where Microsoft Edge holds only 5.2%—Edge secures 13.8% of the desktop market, making it the second most popular desktop browser in 2025.
Meanwhile, Safari ranks third with 8.8%, significantly lower than its 18.0% share in the overall market. This suggests that Safari’s strength primarily comes from its dominance in the mobile segment, where Apple devices are prevalent.
The Five Key Desktop Browsers
Following the first three, Firefox holds fourth place (6.3%), followed by Opera at 2.9%.
Notably, Chrome, Edge, Safari, Firefox, and Opera collectively hold 97.6% of the desktop market share, and in reality, essentially all desktop activity happens within these five browsers.
What This Means for Web Development
For companies and web developers, cross-browser support is a must. With these desktop browser market share statistics as the basis, the top desktop web development priority would be Safari, Chrome, Edge, and Firefox. And including Opera in the tests for compatibility would mean covering nearly all of the desktop user base.
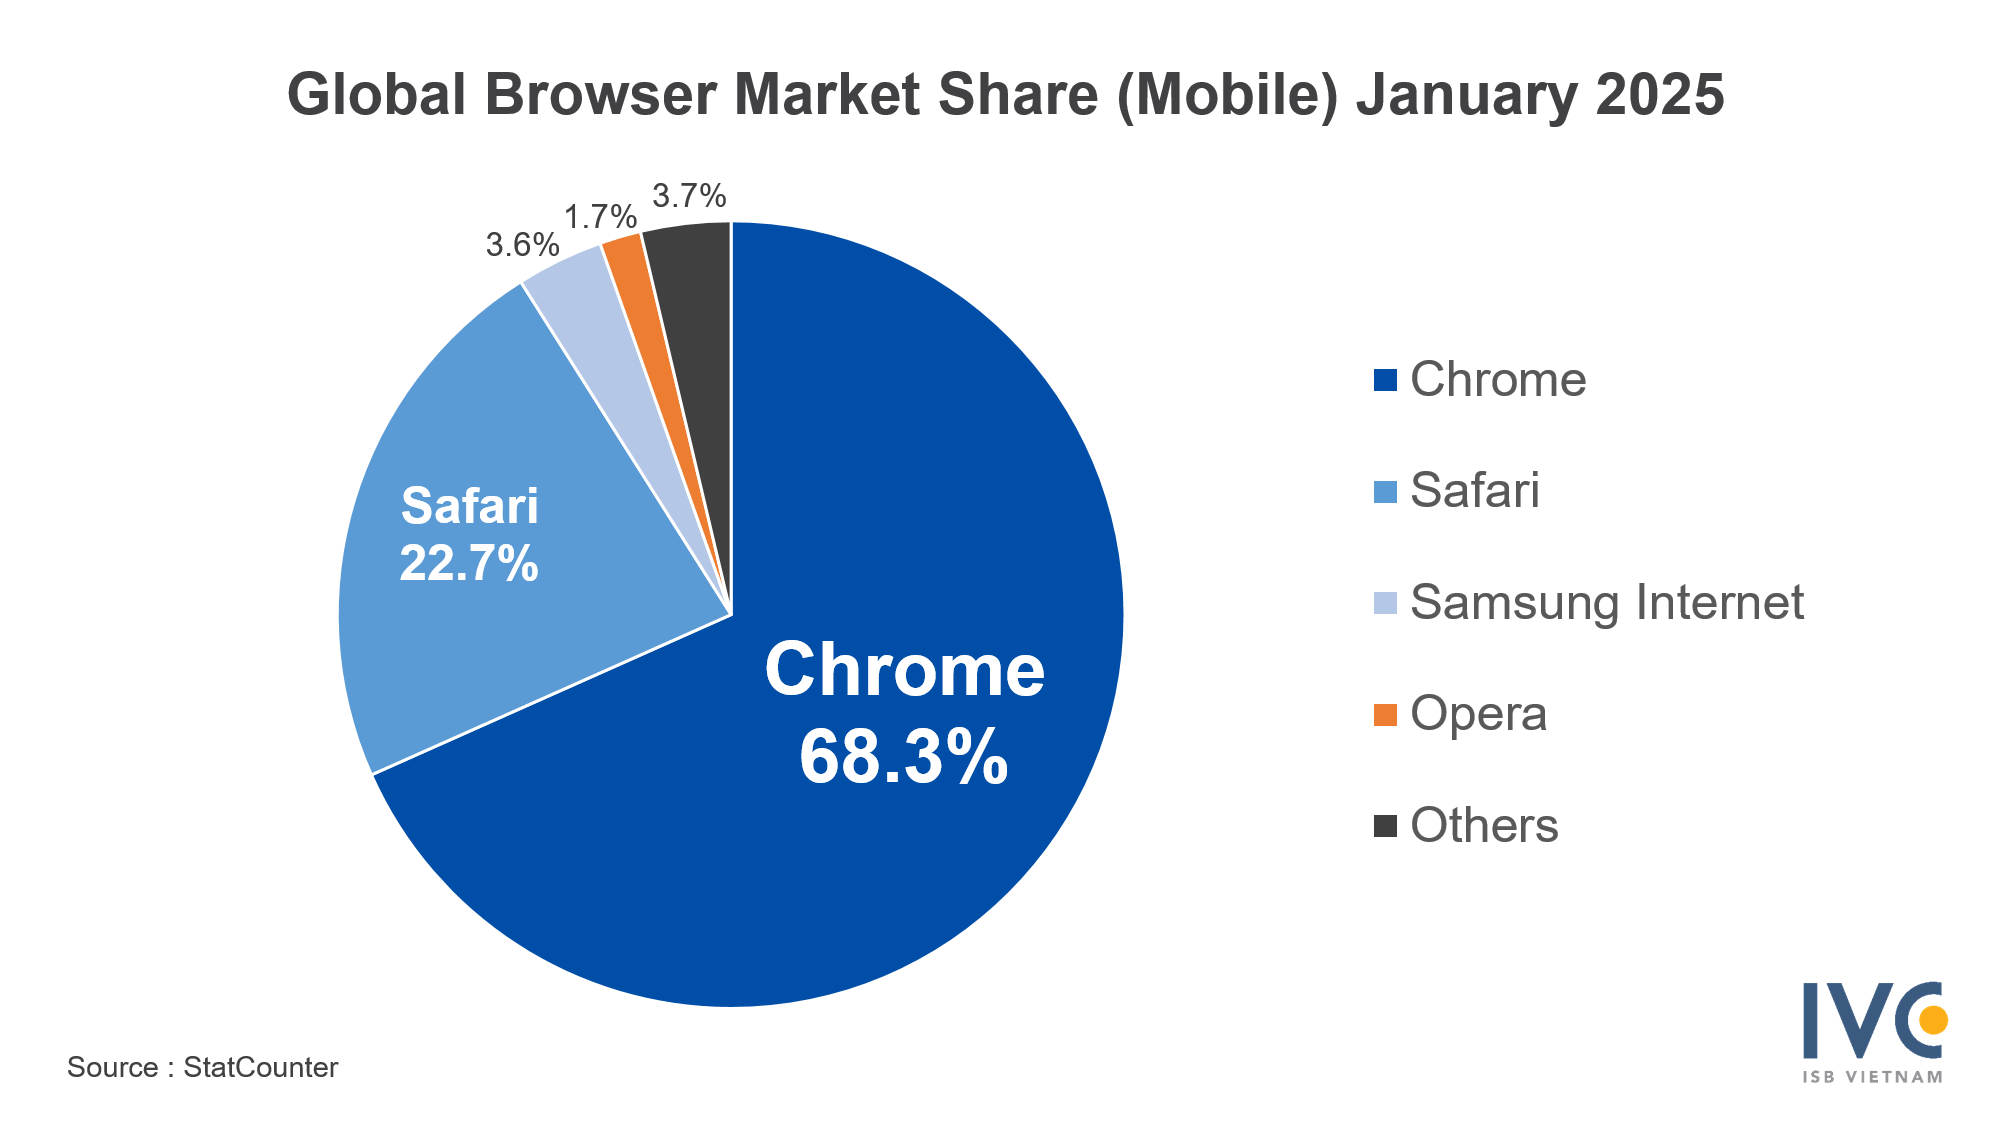
Mobile Browser Market Share in January 2025
Now, let's see the mobile browser market share as of January 2025.
|
Browser
|
Market Share (Mobile)
|
|
Chrome
|
68.3%
|
|
Safari
|
22.7%
|
|
Samsung Internet
|
3.6%
|
|
Opera
|
1.7%
|
|
UC Browser
|
1.3%
|
|
Firefox
|
0.5%
|
|
Edge
|
0.5%
|
|
Android
|
0.4%
|
|
QQ Browser
|
0.3%
|
|
Yandex Browser
|
0.3%
|
|
Whale Browser
|
0.1%
|
|
Coc Coc
|
0.1%
|
|
Instabridge
|
0.1%
|
|
KaiOS
|
0.03%
|
|
Ecosia
|
0.03%
|
|
Puffin
|
0.02%
|
|
Unknown
|
0.02%
|
|
Phoenix
|
0.01%
|
|
Other
|
0.02%
|
Chrome is Still the Champion of Mobile Browsing
As in the overall and desktop browser market share, Google Chrome is the clear champion of mobile browsing. Chrome has 68.3% of the mobile browser market, meaning it is used by around 70% of mobile users worldwide.
One of Chrome’s defining characteristics is its consistency across platforms. While other browsers exhibit significant differences between desktop and mobile market share, Chrome maintains a near 70% share across both platforms.
Safari’s Strength in Mobile: A Reflection of iPhone Popularity
Ranking second in the mobile segment, Safari holds a 22.7% market share, which is significantly higher than its 8.8% share in the desktop market—nearly 2.5 times more.
This sharp growth is indicative of the widespread use of iPhones across the globe, as Safari is the default browser for all Apple products. The mobile space is highly polarized, with Chrome and Safari accounting for 91.0% of the whole mobile browser market.
The Rest of the Mobile Browser Market
Outside of Safari and Chrome, the remaining market share of other mobile browsers shrinks significantly. Samsung Internet comes in third with 3.6%, on the strength of preinstallation on Samsung devices. Opera follows at fourth position with 1.7%. While these browsers still maintain some traction in the mobile space, their market share is still relatively low compared to the virtual monopoly of Safari and Chrome.
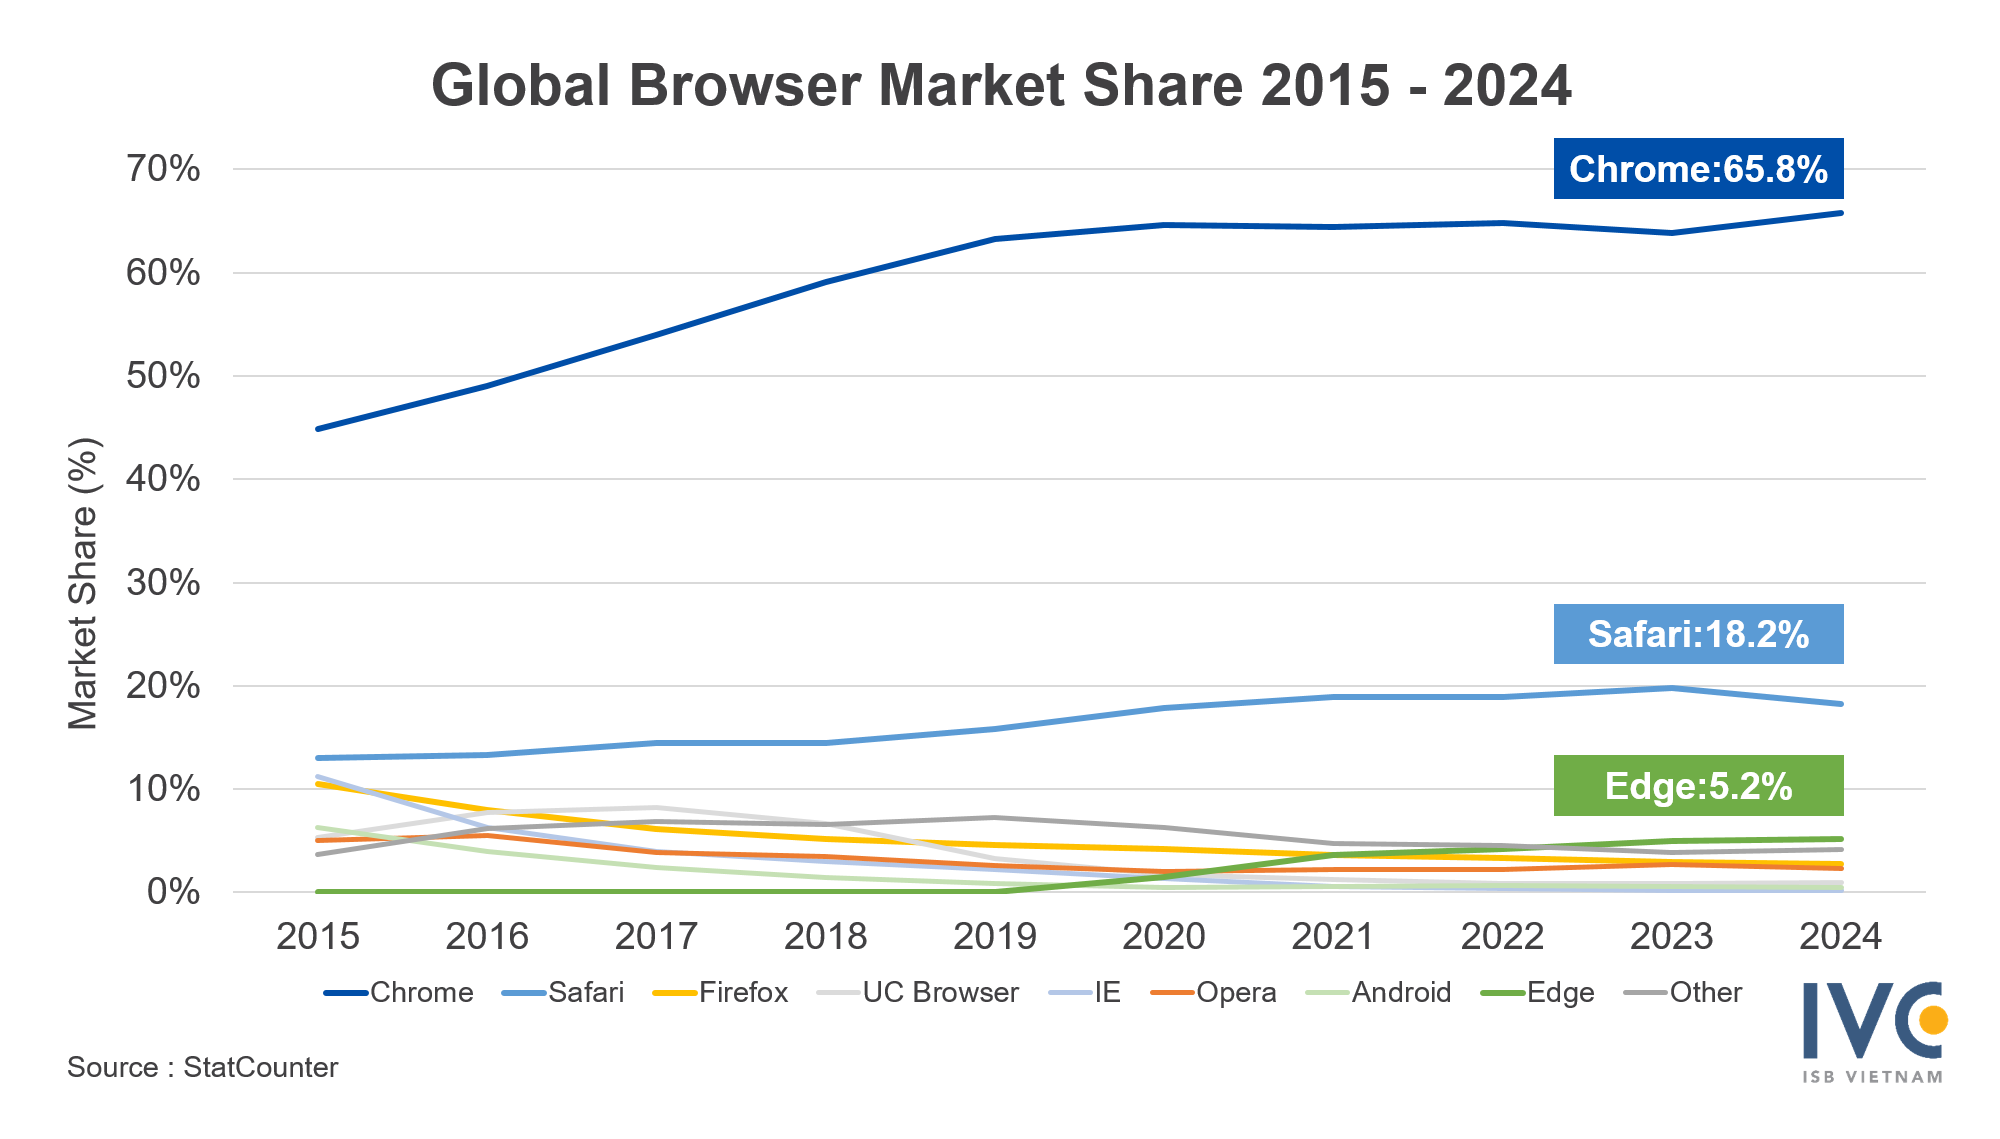
Browser Market Share Trends (2015–2024)
Now, let us examine the browser market share trends of the past decade (2015–2024), categorized into three segments:
- Overall Market Share (Desktop + Mobile)
- Desktop Market Share
- Mobile Market Share
Analyzing the past decade's shifts in market share, we can set meaningful observations on the long-term browser dominance trends. These historical statistics will also help us predict how browser market share is likely to evolve post-2025 and in future years.
Overall Browser Market Share Trends (2015–2024)
Now, let's see what has been the trend in the global browser market share in the last decade (2015–2024).
| Browser |
2015
|
2016
|
2017
|
2018
|
2019
|
2020
|
2021
|
2022
|
2023
|
2024
|
|
Chrome
|
44.9%
|
49.1%
|
54.0%
|
59.1%
|
63.3%
|
64.6%
|
64.5%
|
64.8%
|
63.9%
|
65.8%
|
|
Safari
|
13.1%
|
13.3%
|
14.5%
|
14.4%
|
15.9%
|
17.8%
|
18.9%
|
18.9%
|
19.8%
|
18.2%
|
|
Firefox
|
10.5%
|
8.0%
|
6.2%
|
5.2%
|
4.6%
|
4.2%
|
3.6%
|
3.4%
|
3.0%
|
2.8%
|
|
UC Browser
|
5.4%
|
7.8%
|
8.3%
|
6.7%
|
3.3%
|
1.7%
|
1.2%
|
0.9%
|
0.9%
|
0.9%
|
|
IE
|
11.2%
|
6.3%
|
4.0%
|
3.0%
|
2.2%
|
1.4%
|
0.6%
|
0.4%
|
0.2%
|
0.2%
|
|
Opera
|
5.0%
|
5.5%
|
3.8%
|
3.5%
|
2.6%
|
2.0%
|
2.2%
|
2.2%
|
2.7%
|
2.3%
|
|
Android
|
6.3%
|
4.0%
|
2.4%
|
1.5%
|
0.9%
|
0.5%
|
0.6%
|
0.7%
|
0.6%
|
0.5%
|
|
Samsung
Internet
|
0.0%
|
2.3%
|
3.3%
|
2.8%
|
3.5%
|
3.4%
|
3.1%
|
2.8%
|
2.5%
|
2.5%
|
|
Edge
|
0.0%
|
0.0%
|
0.0%
|
0.0%
|
0.0%
|
1.5%
|
3.6%
|
4.2%
|
5.0%
|
5.2%
|
|
Edge Legacy
|
0.3%
|
1.4%
|
1.9%
|
2.0%
|
2.1%
|
1.4%
|
0.2%
|
0.1%
|
0.1%
|
0.0%
|
|
Other
|
3.4%
|
2.4%
|
1.8%
|
1.9%
|
1.7%
|
1.6%
|
1.4%
|
1.6%
|
1.4%
|
1.6%
|
Chrome's Market Share Growth: Ten Years of Domination
In 2025, it is still the undisputed leader in the world browser market, but looking back, Chrome's reign was already evident in 2015 when it had a share of 44.9%—almost half of the world market.
From 2015 to 2019, Chrome's market share grew at a steady rate of 4–5% per year, reaching 63.3% by 2019. Although its growth slowed after 2020, Chrome has maintained a stronghold of around 65%, solidifying its position as the most widely used web browser worldwide.
Safari’s Steady Growth and IE’s Decline
Safari held the second-largest market share of the world's browsers at 13.1% in 2015, followed closely by Internet Explorer (11.2%) and Firefox (10.5%). But over the past decade, the browser world has transformed beyond recognition, with some of them making gains while others lost their hold.
Safari gradually increased its share of the market, from 13.1% in 2015 to 18.2% in 2024. Such consistent increase has placed it at number two in usage, with an enormous gap from other browsers.
On the other hand, Internet Explorer fell, mostly due to Microsoft's transition to Edge and Edge Legacy. As IE commanded 11.2% market share in 2015, its market share gradually eroded, and it retained just 0.2% in 2024. However, its successor, Edge, managed to gain some traction in the market, holding 5.2% share by 2024.
Similarly, Firefox, with a good 10.5% market share in 2015, has been gradually going down the slope over the years. Its market share plummeted to a low of 2.8% in 2024, a sign of its declining position in the browser market.
The Rise of Chrome and Safari as Market Leaders
Looking back at the past decade, Chrome has continued to tighten its hold, growing from 44.9% in 2015 to nearly 70% by 2024. Meanwhile, Safari—while far behind Chrome—has steadily gained traction, solidifying itself as the world's second most popular browser.
Meanwhile, Internet Explorer and Firefox, which both had more than 10% market share each in the past, have seen their influence fade significantly. While Edge did pick up some speed, it still lags far behind the two Tech giants.
What to Expect in the Coming Years
According to these trends, it is likely that the "two-browser dominance" of Safari and Chrome will continue in the short term. However, Chrome's large market share shows that, instead of a duopoly, the market is rather a "Chrome-dominated landscape". Although Edge has gradually gained share, it is still a far third, so it is not likely to challenge the top two in the near future.
Desktop Browser Market Share Trends (2015–2024)
The dominant players in the desktop browser market share have yet to change over the course of the past decade from 2015 to 2024; however, some small rotations were witnessed within major browsers aside from Chrome.
| Browser |
2015
|
2016
|
2017
|
2018
|
2019
|
2020
|
2021
|
2022
|
2023
|
2024
|
|
Chrome
|
54.4%
|
61.2%
|
63.4%
|
68.0%
|
70.0%
|
68.7%
|
67.3%
|
66.4%
|
64.6%
|
65.3%
|
|
Firefox
|
17.5%
|
15.5%
|
13.9%
|
11.0%
|
9.5%
|
8.7%
|
7.9%
|
7.8%
|
6.3%
|
6.7%
|
|
IE
|
18.9%
|
12.1%
|
9.0%
|
6.6%
|
4.9%
|
3.0%
|
1.5%
|
0.9%
|
0.5%
|
0.4%
|
|
Safari
|
5.1%
|
4.8%
|
5.5%
|
5.4%
|
6.8%
|
9.0%
|
9.9%
|
9.3%
|
11.9%
|
8.9%
|
|
Edge
|
0.0%
|
0.0%
|
0.0%
|
0.0%
|
0.0%
|
3.2%
|
8.5%
|
10.4%
|
10.9%
|
13.2%
|
|
Opera
|
1.8%
|
1.9%
|
2.1%
|
2.4%
|
2.4%
|
2.4%
|
2.7%
|
3.0%
|
3.9%
|
3.0%
|
|
Edge Legacy
|
0.5%
|
2.6%
|
3.9%
|
4.2%
|
4.5%
|
2.8%
|
0.3%
|
0.2%
|
0.1%
|
0.1%
|
|
Other
|
1.9%
|
2.0%
|
2.2%
|
2.4%
|
1.9%
|
2.2%
|
2.0%
|
1.9%
|
1.8%
|
2.5%
|
Chrome’s Continued Dominance in the Desktop Market
Since 2015, Chrome was the widely adopted browser on the desktop market. At the beginning of the decade, its dominance started when it took, at a minimum, 54.4% of the pie and all others lagged behind. For the few years after that, this dominance only got bigger, hitting the peak of 70.0% in 2019. Then, after those all-time high numbers, the market share of Chrome saw a slight decline and stabilized at around 65% by 2024.
Despite this modest dip, Chrome is still the clear leader in the desktop browser market, having outdone its competitors for over a decade.
The Decline of Internet Explorer and the Emergence of Edge
As of 2015, Internet Explorer was the second most used desktop browser, holding 18.9% of the market share. Microsoft's move towards dropping IE for Edge and Edge Legacy, though, saw the legacy browser gradually lose ground. By 2024, IE's market share fell to 0.4%, technically marking the death of its existence in the market.
At the same time, Microsoft's Edge gradually became popular over the last decade. Although it did not exist in 2015, the browser began to grow its market share in 2020 up to 13.2% by 2024 and becoming second only to Chrome.
Firefox’s Gradual Decline and Safari’s Growth
Firefox, with a respectable 17.5% market share in 2015, saw a steady decline over the years. In 2024, it had dwindled to a paltry 6.7%, dropping out of the big players' category. A once-trendy second option to Chrome, Firefox has gradually lost ground to some other browsers, particularly Edge and Safari.
Safari, on the other hand, has shown steady growth. Initially holding 5.1% in 2015, it gradually increased its market share, peaking at 11.9% in 2023 before settling at 8.9% in 2024. Safari’s presence in the desktop market remains far smaller than in the mobile segment, but its growth suggests that Apple's expanding ecosystem continues to attract users.
The Outlook for the Desktop Browser Market
In the future, the desktop browser market will be led by Chrome, with Edge and Safari holding strong second positions to it. While Edge has been consistently increasing, it is still far from putting an end to Chrome's reign.
As Firefox and Internet Explorer fade into the background, the desktop browser market has now reduced to a three-horse race, with Chrome leading the pack, followed by Edge and Safari. Unless there is a sudden change in user behavior or technological advancements to shake up the current stability, this trend is likely to continue.
Mobile Browser Market Share Trends (2015–2024)
The market for mobile browsers has greatly evolved in the last decade with some of the browsers gaining power and others losing market share.
| Browser |
2015
|
2016
|
2017
|
2018
|
2019
|
2020
|
2021
|
2022
|
2023
|
2024
|
|
Chrome
|
33.6%
|
38.4%
|
48.9%
|
54.2%
|
60.1%
|
62.5%
|
63.3%
|
64.4%
|
64.1%
|
66.7%
|
|
Safari
|
18.8%
|
17.9%
|
18.1%
|
18.8%
|
20.8%
|
24.1%
|
24.8%
|
24.8%
|
25.4%
|
23.3%
|
|
UC Browser
|
15.1%
|
17.6%
|
15.6%
|
12.3%
|
6.2%
|
3.2%
|
2.1%
|
1.4%
|
1.6%
|
1.5%
|
|
Opera
|
11.0%
|
10.2%
|
5.6%
|
4.8%
|
2.9%
|
1.7%
|
2.0%
|
1.8%
|
1.9%
|
2.0%
|
|
Samsung
Internet
|
0.0%
|
5.4%
|
6.4%
|
5.5%
|
6.9%
|
6.5%
|
5.7%
|
4.9%
|
4.5%
|
4.1%
|
|
Android
|
15.4%
|
7.3%
|
3.5%
|
2.0%
|
1.0%
|
0.4%
|
0.5%
|
0.7%
|
0.7%
|
0.4%
|
|
Other
|
6.0%
|
3.3%
|
2.0%
|
2.5%
|
2.2%
|
1.7%
|
1.6%
|
2.1%
|
1.8%
|
2.0%
|
Chrome’s Rapid Growth and Mobile Market Dominance
Back in 2015, Chrome was already the most-used mobile browser but at a mere 33.6%, or one-third of the entire market share. Competition was much tougher: Safari was getting away with 18.8% of it, the Android Browser with 15.4%, UC Browser with 15.1%, and Opera with 11.0%. While Chrome was on top, there was no dominant browser: nearly everyone listed had some market presence.
However, in the next decade, Chrome took a giant leap upward, largely as a result of being the default web browser across Android devices. Chrome, being the default browser of Android, gradually supplanted the Android Browser and saw a steady decline in its market share.
In 2024, Chrome almost double-upped its market share, at 66.7%, penetrating almost 70% of the mobile browser market share.
Safari’s Growth as Apple’s Default Browser
Safari has also experienced steady growth as the default browser on iPhones. While its market share was 18.8% in 2015, it peaked at 25.4% in 2023 before slightly declining to 23.3% in 2024. This reflects the continued popularity of iPhones worldwide, solidifying Safari as the second-most used mobile browser.
The Decline of UC Browser, Opera, and Android Browser
While some browsers have grown significantly over the past decade, others that once held a strong presence in the mobile market have experienced sharp declines.
UC Browser, which was at 15.1% market share in 2015, has plummeted to a mere 1.5% in 2024—a staggering fall of nearly 90%. Similarly, Opera, at 11.0% in 2015, has lost considerable market presence too. But whereas UC Browser has plummeted, Opera has stabilized at around 2.0% in 2024, retaining a minuscule but consistent user base.
The other drastic shift has been the near complete disappearance of the Android Browser. From a clear runner-up position with 15.4% market share in 2015, it has been completely displaced by Chrome and has shrunk to just 0.4% in 2024.
Whereas Samsung Internet, though less well-known than Chrome or Safari, has managed to maintain a stable if niche user base. Whereas it still holds 4.1% in 2024, it has continued to fall from its peak of 6.9% in 2019, showing its declining share in the saturated mobile browser market.
A Unique Two-Browser Dominance: Safari and Chrome
Chrome and Safari together hold nearly 90% of the mobile browser market share in 2024. This is a radical shift from 2015, when a number of browsers shared the market more equally.
In the future, absent any new entrant, Chrome will likely dominate the market, and Safari will stay at number two based on Apple's ecosystem. Other browsers, including Edge, Opera, and Samsung Internet, will be niche players in the mobile browser market.
Conclusion
The browser landscape has undergone a tremendous transformation in the past decade, with Google Chrome still dominating both the desktop and mobile browsers. Safari has continued to be the second-most popular browser, particularly in the case of mobile browsers, while Edge has continued to gain its share in the desktop market. Meanwhile, erstwhile giants like Internet Explorer, Firefox, UC Browser, and Opera have lost a great deal of ground, reflecting shifting user preferences and industry trends.
Something to note is that the browser market share figures quoted in this article are worldwide. Market share distribution varies significantly by region and country, depending on device choice, operating system adoption, and regional browser policies. For instance, while Chrome and Safari are dominant globally, there may be more utilization of other browsers such as Samsung Internet or regional browsers in some regions.
If you want to refine your web development and testing strategy for browser market share within a country or region of interest, our expert professionals at ISB Vietnam are here to provide the necessary help. Contact us now and have your web applications tailored for the appropriate audience with the most relevant browser compatibility.