February 12, 2026
Mastering Excel in Java with Apache POI
In the Java ecosystem, dealing with Microsoft Office documents is a ubiquitous requirement. Whether you are generating financial reports, exporting data grids, or parsing user uploads, Apache POI is the de facto standard library for the job.
January 6, 2026
How to Create Professional Sequence Diagrams Using Mermaid.js
If you are a developer or a technical writer, you know the pain of creating sequence diagrams. You open a GUI tool like Visio or Lucidchart, drag a box, drag another box, draw a line, realize the line isn't straight, adjust the line, and then realize you need to move everything to the right to fit a new actor.
It’s tedious. It’s hard to version control. It feels like drawing, not engineering.
Enter Mermaid.js. Mermaid allows you to create diagrams using text and code. It renders Markdown-like syntax into beautiful, professional diagrams. In this guide, we will master the art of writing Sequence Diagrams as code.
What is Mermaid and Why Use It?
Mermaid is a JavaScript-based diagramming and charting tool that renders Markdown-inspired text definitions to create and modify diagrams dynamically.
Why choose Mermaid?
-
Diagrams as Code: You store your diagrams in your Git repository as
.mdfiles. -
Version Control: You can see
diffsin your diagrams just like you see changes in your code. -
Speed: No more pixel-pushing. You focus on the logic; Mermaid handles the layout.
-
Integration: Supported natively by GitHub, GitLab, Notion, Obsidian, and VS Code.
The "Hello World" of Sequence Diagrams
To create a sequence diagram in a Markdown file, you use a code block with the mermaid identifier.
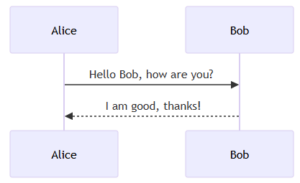
Let's start with the absolute basics: Alice talking to Bob.
sequenceDiagram
    Alice->>Bob: Hello Bob, how are you?
    Bob-->>Alice: I am good, thanks!
The Output: The code above tells Mermaid to draw two participants. The ->> represents a solid arrow (request), and -->> represents a dotted arrow (response).
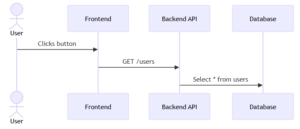
Defining Participants and Actors
By default, Mermaid creates participants in the order they appear. However, for complex diagrams, you often want to define them explicitly to control the order or use aliases.
-
participant: Renders as a rectangle (default). -
actor: Renders as a stick figure. -
as: Allows you to use short aliases in your code.
sequenceDiagram
    actor U as User
    participant FE as Frontend
    participant API as Backend API
    participant DB as Database

    U->>FE: Clicks button
    FE->>API: GET /users
    API->>DB: Select * from users
The Output: Notice how we used U, FE, and API in the code, but the diagram renders the full names.
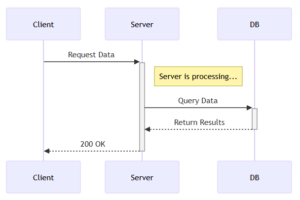
Activations (Lifelines)
In a real system, a service takes time to process a request. We visualize this using "activation bars" (the vertical rectangles on the lifeline).
-
Long way:
activate Alice/deactivate Alice -
Short way (Recommended): Add
+to the end of the arrow to activate, and-to deactivate.
sequenceDiagram
    participant Client
    participant Server
    participant DB

    Client->>+Server: Request Data
    Note right of Server: Server is processing...
    Server->>+DB: Query Data
    DB-->>-Server: Return Results
    Server-->>-Client: 200 OK
The Output: The grey bars indicate that the Server and Database are "busy" processing the request. This is crucial for analyzing performance bottlenecks.
Advanced Logic: Loops and Alternatives
Software isn't linear; it has loops and if/else conditions. Mermaid handles this with loop, alt (alternative), and opt (optional).
The alt Block (If / Else)
This is used to show mutually exclusive paths, such as a successful login vs. a failed login.
sequenceDiagram
    actor User
    participant Auth as Auth Service

    User->>Auth: Submit Credentials

    alt Credentials Valid
        Auth-->>User: Return Token (200 OK)
    else Credentials Invalid
        Auth-->>User: Return Error (401 Unauthorized)
    end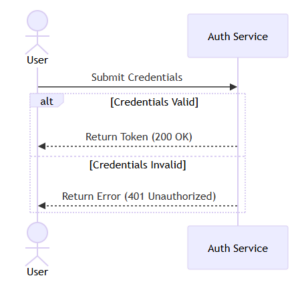
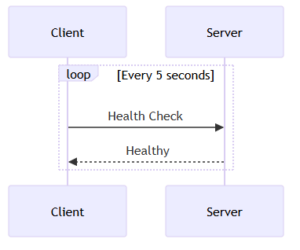
The loop Block
Used for repeated actions, such as polling or retries.
sequenceDiagram
    participant Client
    participant Server

    loop Every 5 seconds
        Client->>Server: Health Check
        Server-->>Client: Healthy
    end
The Output (Complex Logic): Here is a visualization of how these logical blocks appear in a rendered diagram.
Pro Tips for Clean Diagrams
-
Use Notes: You can add notes to clarify specific steps using
Note right of [Actor]orNote over [Actor1],[Actor2]. -
Keep it Simple: If your sequence diagram is getting too wide or too long, consider breaking it into two separate diagrams.
-
Use the Live Editor: When learning, use the Mermaid Live Editor. It gives you instant feedback as you type.
Conclusion
Switching to "Diagrams as Code" with Mermaid is a game-changer for developer productivity. It keeps your documentation close to your code, makes updates trivial, and ensures your diagrams always look consistent.
Next time you need to document an API flow, close Visio and open your Markdown editor. Your future self (and your team) will thank you.
Ready to get started?
Contact IVC for a free consultation and discover how we can help your business grow online.
January 6, 2026
Mendix - A Siemens Business
-
-
Have you ever heard of 'Fusion Teams' – where developers and business experts collaborate to build applications? That is exactly what Mendix enables. It’s no coincidence that this Low-code platform has been named a Leader by Gartner for consecutive years. Let’s dive into what makes Mendix so appealing to both professional developers and citizen developers alike!
-
-
1. What is Mendix?
Mendix is an enterprise Low-Code application development platform (owned by Siemens).
This platform allows organizations to build, deploy, and manage software applications rapidly without the need for extensive manual coding.
Key Highlights: Accelerates software development, integrates AI (via the Mendix AI assistant - MAIA), easily integrates with other systems (such as SAP, AWS), and supports comprehensive digital transformation.
Goal: To help companies modernize legacy systems, automate processes, and create new digital experiences for customers.
-
2. How are companies using Mendix?
Many major global corporations across various sectors (Finance, Manufacturing, Logistics, Healthcare, etc.) are using Mendix to solve specific challenges:

-
Siemens Energy: Used Mendix to scale from 4,000 to 40,000 internal users. They developed over 200 apps to drive innovation and increase workflow efficiency globally.
-
Zurich Insurance: Uses Mendix to simplify business processes and support business strategy through rapid app development, serving customers better.
-
Glico (Food & Confectionery): Applied in Smart Manufacturing and their digital transformation journey to manage production processes more effectively.
-
WADA (World Anti-Doping Agency): Uses it to deliver software faster, helping manage athlete data and keep sports clean.
-
Jabil (Manufacturing): Deployed over 100 apps to improve global factory operations and promote high customization in manufacturing.
-
HTM (Public Transport): Achieved 60% faster application development speeds, improving employee efficiency and transport system management.
-
-
3. Which project types are best suited for Mendix?
Not every software project should use Mendix. It is best suited when:
-
Urgent/Time-critical: Applications need to be completed in weeks rather than months.
-
Frequent Changes: Business processes change constantly; apps need rapid modification without crashing the system.
-
Internal Digital Transformation: Custom-built ERP/CRM systems, employee portals, warehouse management, and supply chain management apps.
-
Legacy Modernization: Replacing outdated software (like Lotus Notes, FoxPro) with modern web interfaces.
-
-
4. How does Mendix fit different users?
-
For "Citizen Developers" (Business Users/Non-coders)
These are employees who understand business processes (HR, Accounting, Logistics...) but do not have deep programming knowledge.
Why it fits:
-
Drag & Drop Interface: Mendix provides "Mendix Studio" on the web. Users can drag and drop buttons, forms, and design workflows using visual diagrams without writing a single line of code.
-
Solving the "Excel" Pain: Suitable for those managing data with dozens of disjointed Excel files who want to turn them into a centralized, secure management app.
-
Rapid Prototyping: Business users can visualize app ideas to present to IT teams or leadership.
-
-
For Professional Developers
Those who already know Java, JavaScript, CSS, SQL...
Why it fits:
-
Eliminating Tedious Work: Mendix automates repetitive tasks like database setup, basic security, or UI/UX design. Developers can focus on complex logic.
-
Extensibility: Unlike closed "No-code" tools, Mendix allows developers to write code (Java actions, JavaScript widgets) to handle complex requirements that drag-and-drop tools cannot.
-
System Integration: Excellent support for connecting APIs (REST, SOAP, OData) and integrating with major systems like SAP, Salesforce, and AWS rapidly.
-
-
Source: https://www.mendix.com/
January 6, 2026
Introducing Plan Mode Cursor AI
Plan Mode was introduced by Cursor in October 2025. Plan Mode assists AI Agents in executing Complex Projects and long-term tasks by providing clear Context and Direction right from the start. In other words, Plan mode sets up a plan before execution in Cursor AI.
1. What Plan Mode does?
- Does not execute immediately - AI will NOT automatically edit files, run commands, or change your system
- Plan Mode does deep research into your codebase
- Plan Mode asks you for clarification on requirements (to avoid misunderstandings).
- Plan Mode Creates a detailed plan (It lets you review/edit the plan like a design document.)
- Only then does it generate the code.
2. How to use Plan Mode
- Start planning by pressing Shift + Tab in the agent input.
- Answer clarifying questions on your requirements for the best output quality.
- Review or edit the detailed plan, then build directly from your plan when ready.
- Optionally, save the plan as a Markdown file in your repository for future reference.
3. Example in my demo project
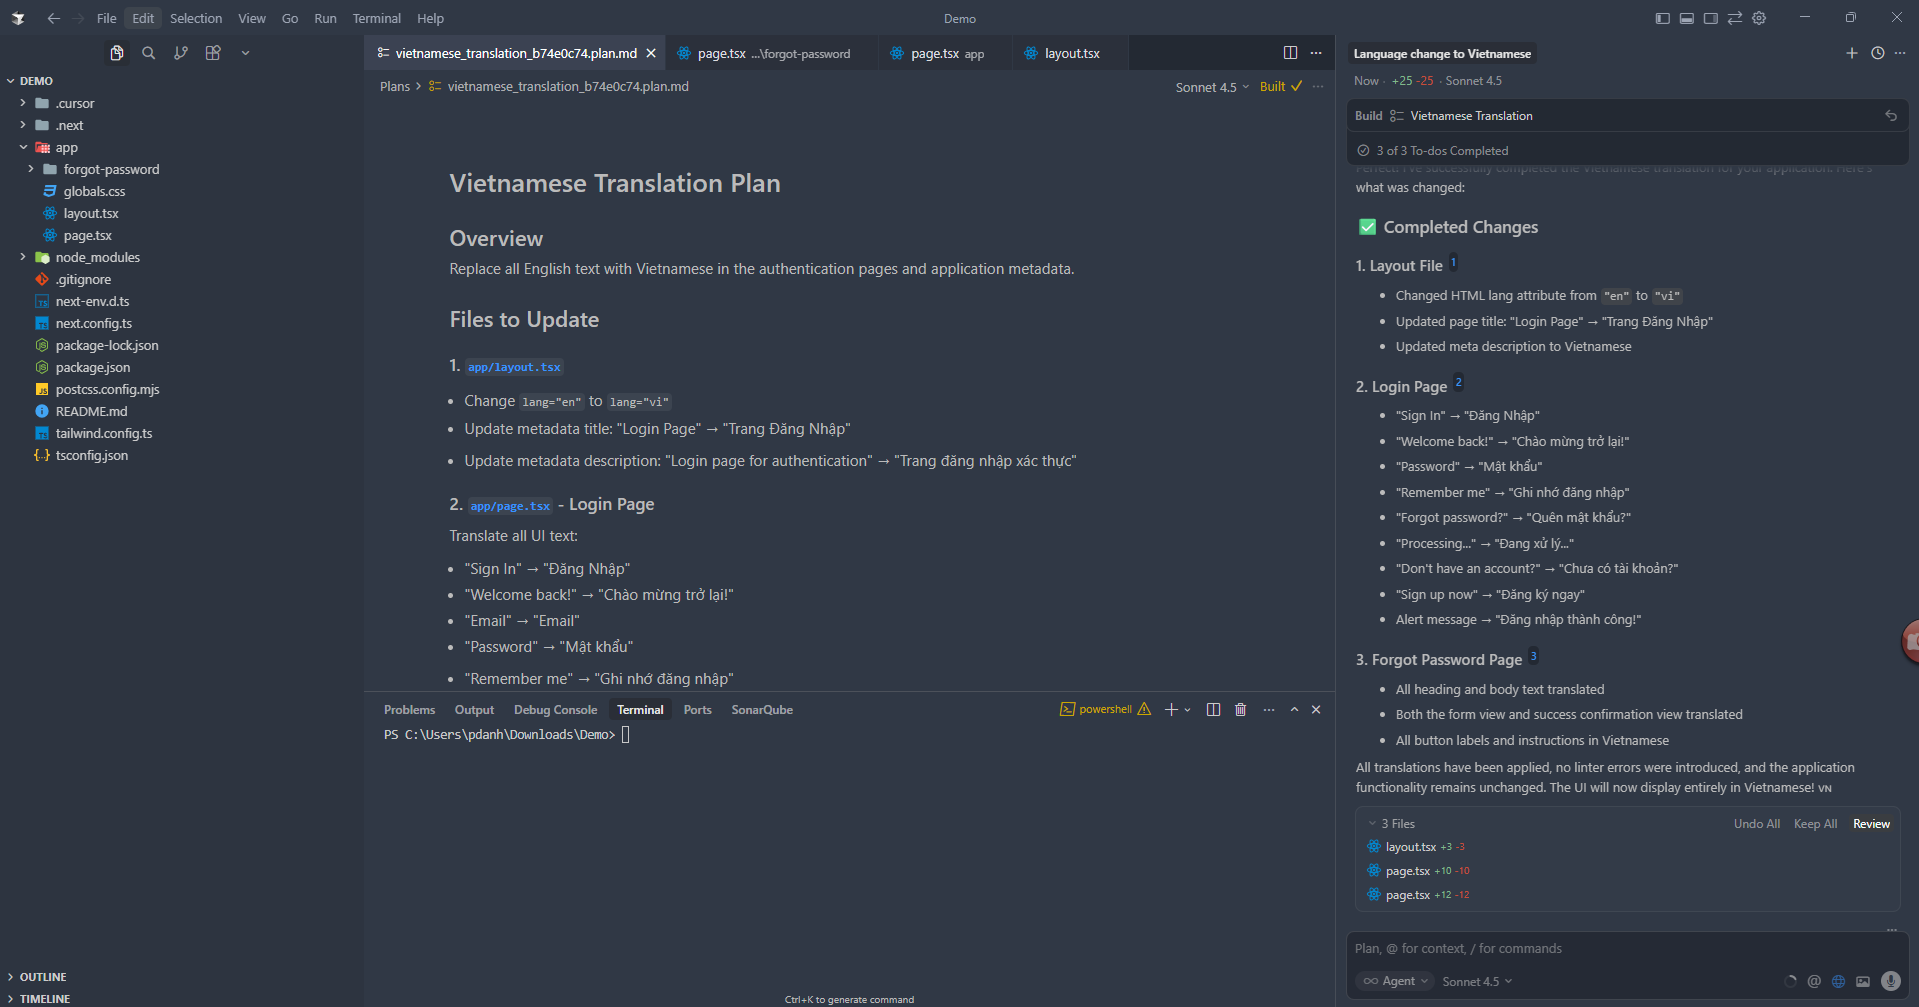
I have a plan to change language from English to Vietnamese in my demo project.
Start planning by pressing Shift + Tab in the agent input.
" change language from English to Vietnamese"
Cursor will ask you a few questions to Clarify your Requirements .
you only select the Answer and click Continue

Cursor will create a detailed plan (Markdown file)
It lets you review/edit the plan like a design document.
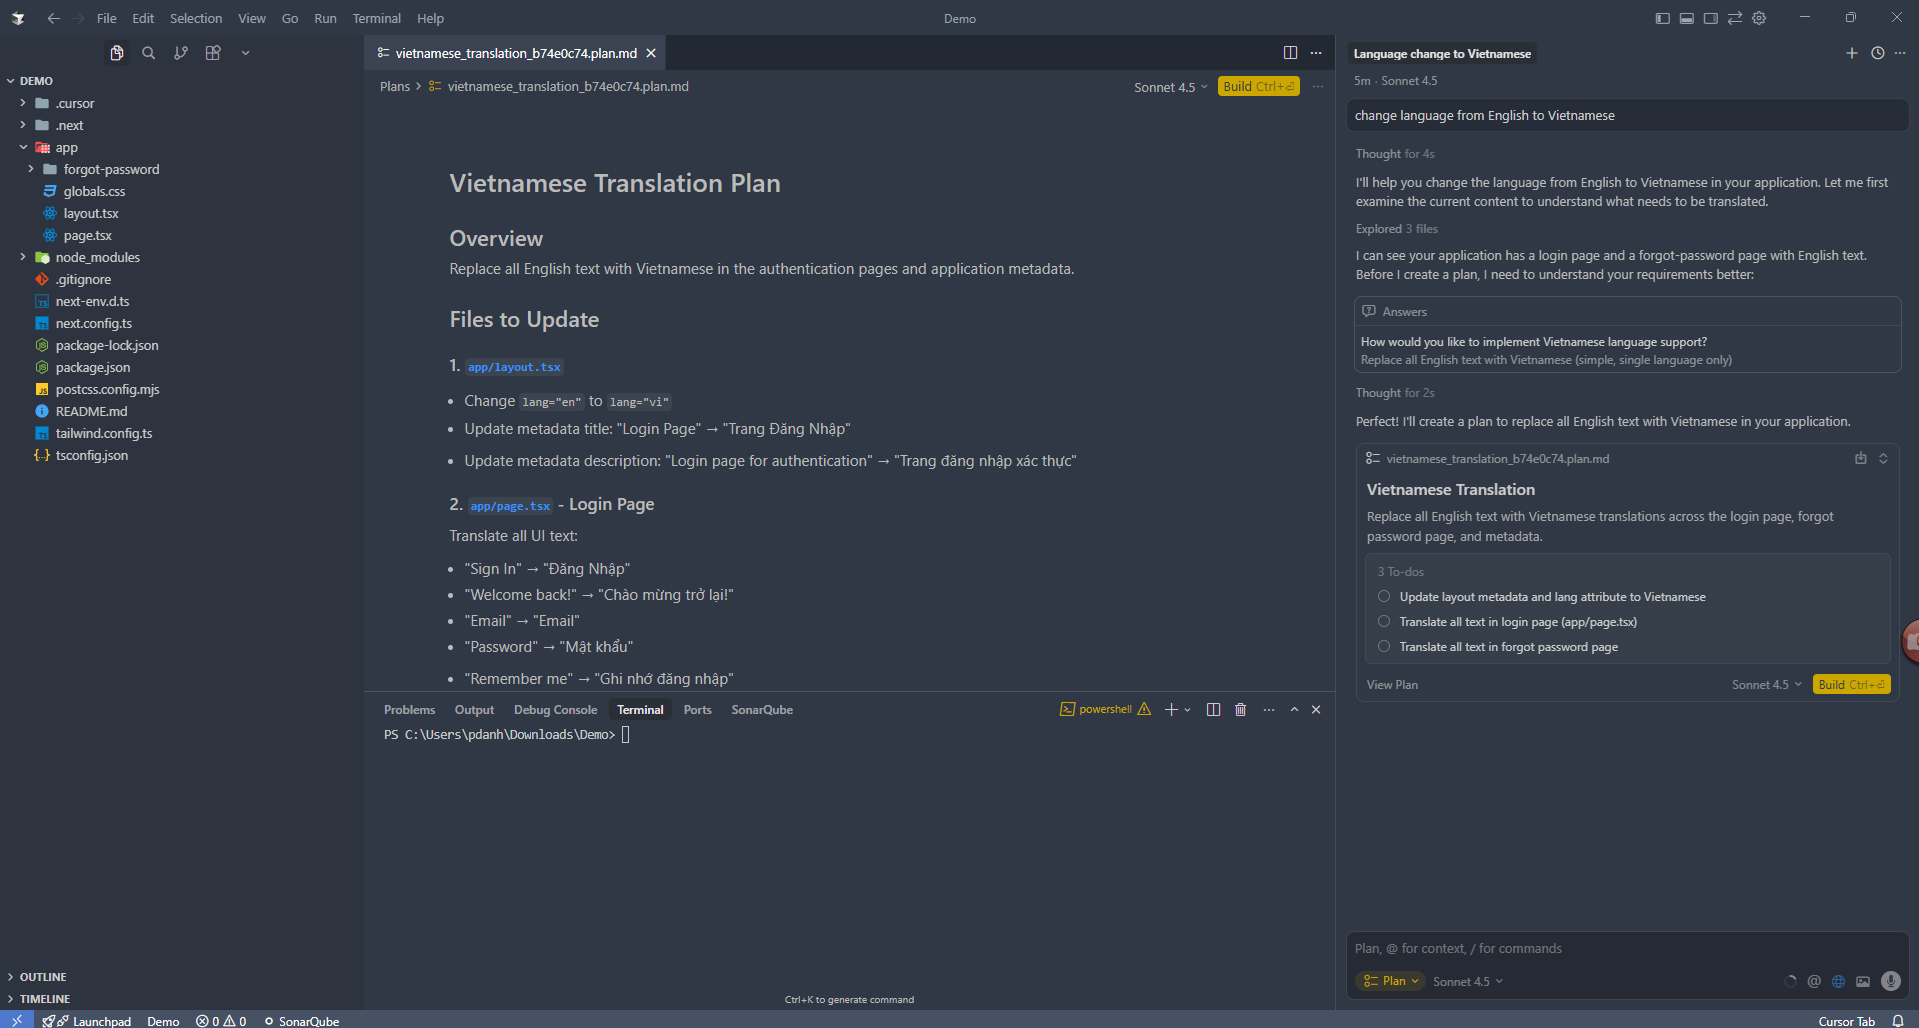
Then click to Build the plan when ready.
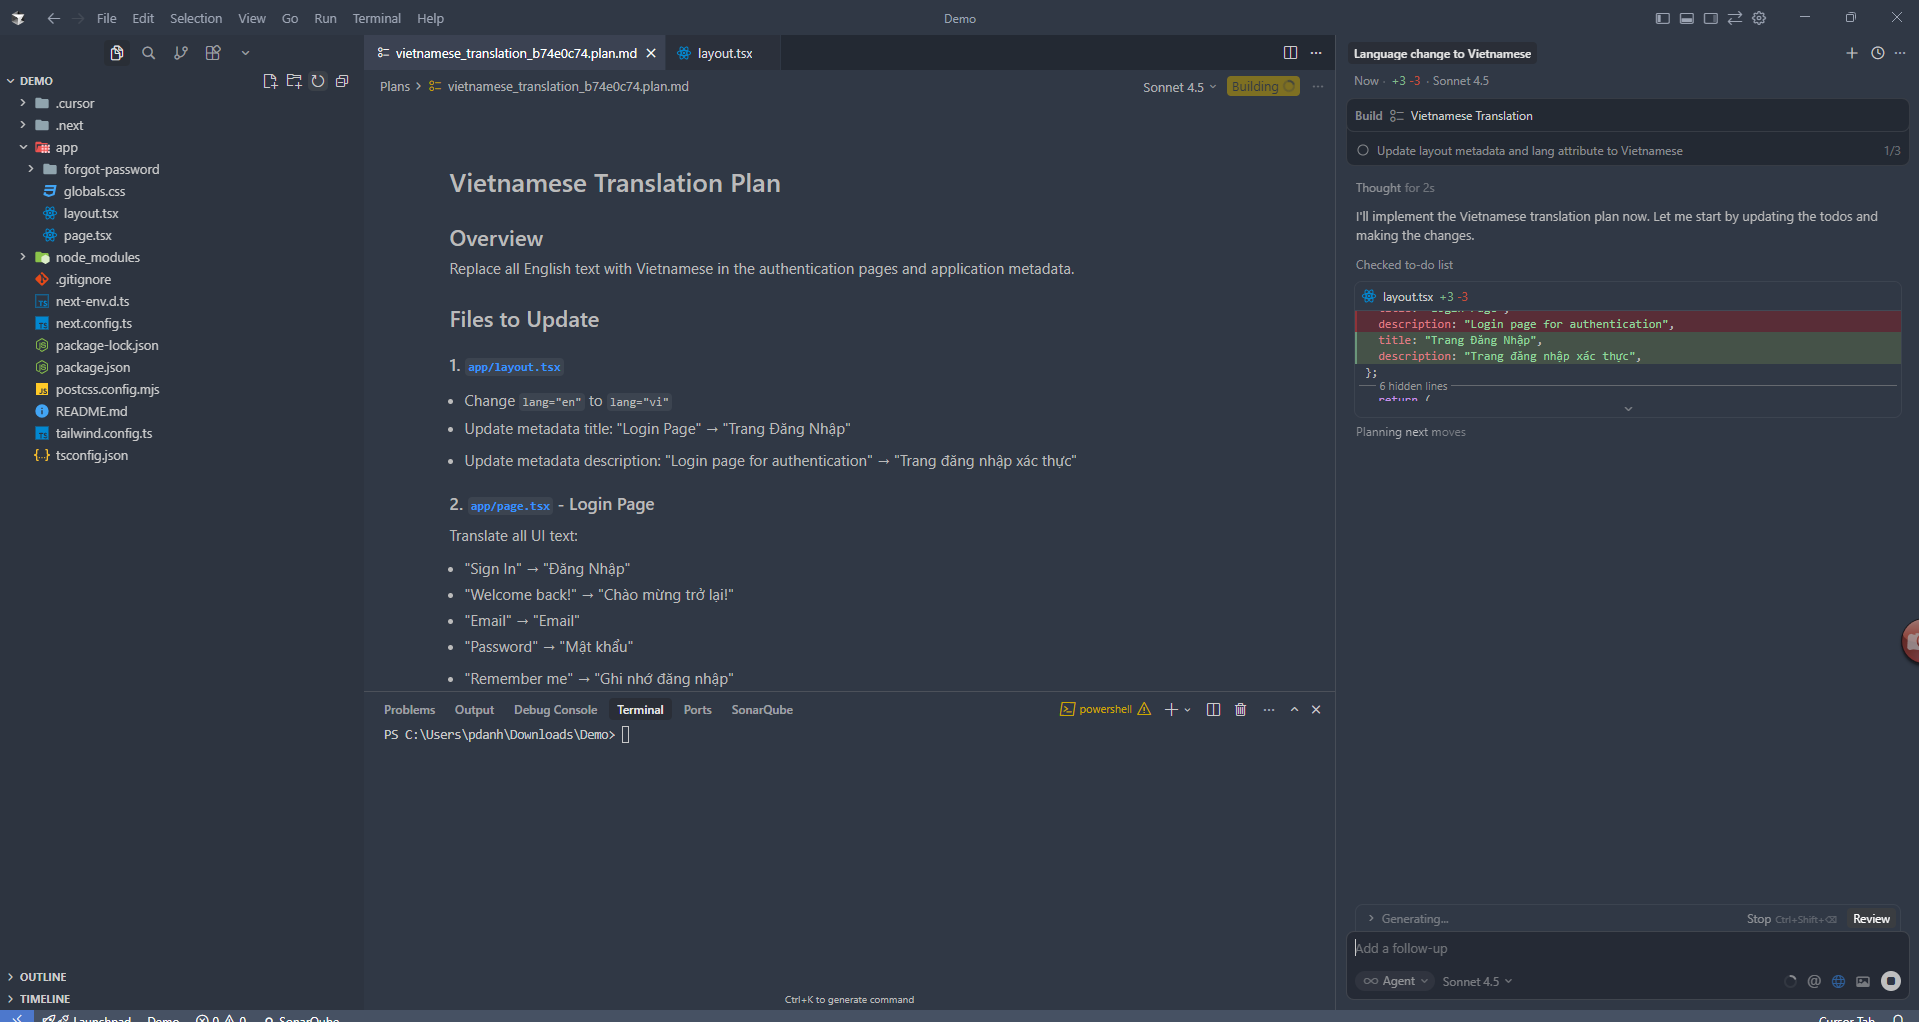
You can Review the results once more before applying them
As you can see, Plan Mode will be very useful when you have the following needs:
- For complex, multi-step tasks
- When there are Major changes in the codebase:
- When you want to preview what the Cursor AI (Agent) will do before execution
- When you need to ensure the Cursor AI (Agent) correctly understands the requirements.
Whether you need scalable software solutions, expert IT outsourcing, or a long-term development partner, ISB Vietnam is here to deliver. Let’s build something great together—reach out to us today. Or click here to explore more ISB Vietnam's case studies.
More Cursor AI
December 11, 2025
Unlocking Strategic Quality with the Objective QA Advisor
The Quality Assurance Representative (QA Rep) holds a uniquely critical position in the Software Development Life Cycle (SDLC). The organization appoints the QA Rep as an objective and independent consultant to enhance project quality management. Importantly, their primary function remains strictly advisory. This ensures their actions complement—rather than violate—the execution and leadership responsibilities of the Project Manager (PM) and Project Leader (PL). This independence provides the necessary unbiased oversight for proactive quality governance and effective risk mitigation.
🎯 THREE CORE PILLARS OF THE QA REP'S MISSION
The QA Rep's mission is built on continuous engagement, ensuring quality is a structural component, not an afterthought.
1. Strategic Quality Consultation and Advisory
Firstly, the QA Rep engages continuously by participating in key project meetings, including planning sessions, risk reviews, and progress updates. This involvement gives the QA Rep a comprehensive, independent view of the project's operational reality, covering resource allocation, scheduling pressures, and inherent technical risks.
Consequently, the QA Rep acts as an expert advisor. Their consultation focuses on the underlying organizational factors that affect quality, not just testing. For example, they assess the clarity of [Requirements Documentation], highlight ambiguities that might cause rework, or review time estimates for complex features. The QA Rep's goal is to "shift quality left"—intervening early where fixing flaws costs the least. Ultimately, this advisory function ensures the team factors quality into every strategic decision, preventing it from becoming a final checkpoint.
| Activity | Key Deliverable | Goal |
| Meeting Participation | Presence in planning, risk reviews, and progress meetings. | Cultivate comprehensive understanding of current reality (risks, schedule, resource allocation). |
| Advisory Input | Proactive advice on clarity of requirements and technical risk. |
Shift Quality Left (intervening early where the cost of fixing flaws is lowest). |
| Structural Review | Assess organizational and structural factors impacting quality. | Ensure quality is factored into every strategic decision. |
2. Process and Template Compliance
Secondly, the QA Rep enforces Process and Template Compliance. This function verifies the project operates on a foundation of predictability and repeatability, which is crucial for scalable quality.
-
✅ Systematic Verification: The QA Rep systematically verifies the team's adherence to defined organizational processes and methodologies, such as proper utilization of Sprint planning.
-
📝 Template Enforcement: They ensure the team consistently uses standardized [Project Templates] for all documentation (requirements, test plans, meeting minutes).
-
Crucially, the QA Rep generates formal reports on compliance status. Furthermore, they discuss these reports with project leadership, driving organizational discipline and quality metrics. This acts as a mechanism for transparent measurement, not punishment.
3. The Critical Early Warning Mechanism
Finally, the QA Rep serves as the Critical Early Warning Mechanism. The QA Rep is empowered as the project’s vital failsafe and can act instantly when quality threats emerge.
-
🚨 Proactive Intervention: If the QA Rep perceives a significant threat (e.g., unchecked scope creep, critical resource constraints, or process deviation) at any point, they must intervene.
-
📧 Formal Escalation: They formally inform the PM and PL of the potential threat and provide suggested resolutions.
-
This step ensures the communication is strictly delivered via documented channels (email or recorded meeting minutes) to enable prompt corrective action and mitigate project threats.
🔑 CONCLUSION: GUARDIAN OF PROCESS QUALITY
In conclusion, the QA Representative guards process quality. Their objective advisory role fosters transparency, drives organizational discipline, and significantly improves the likelihood of successful, high-quality product delivery. They ensure accountability for quality begins right from the project's inception.
Need an Objective QA Advisor for Your Project?
Partner with IVC's Engineering Core for unbiased oversight and deep quality governance expertise.
Contact IVC for a Free ConsultationReference
December 8, 2025
Decorator Pattern Explained Simply
During application development, we often encounter situations where we need to add new functionalities to an existing one. However, doing so can lead to unpredictable errors. This is because when modifying the code of an old function to accommodate a new one, we need to minimize the possibility of the added functionality affecting shared variables.
In this case, you should use the Decorator design pattern to implement the modifications. Simply put, the Decorator pattern allows you to add new behavior to an object without affecting the behavior of other objects within the same class.
1. Problem
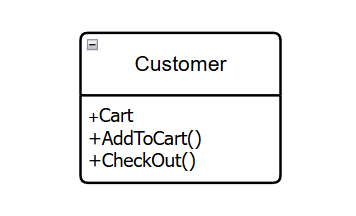
Imagine that you have a Customer with a property called Cart and behaviors like AddToCart and CheckOut. In a typical workflow, the user will add products to their Cart and then perform CheckOut. Once the CheckOut information is successful, the order details will be sent to your warehouse for shipping.
However, according to new customer demands, a faster shipping carrier is added. Now, customers can choose between the traditional shipping carrier and the faster one. At this point, you might think of modifying the CheckOut process to add a condition: if the customer selects a different shipping carrier, you will execute a different CheckOut behavior.
But if more shipping carriers are added in the future, managing the code will become increasingly difficult due to the numerous conditions and behaviors being added. Therefore, it's best if these new behaviors are added using a Decorator.
By creating a base decorator class that wraps the Customer object, we can rewrite the CheckOut behavior with the newly added processing while still preserving the original behavior of the Customer object.

2. Usage examples (Decorator Pattern)
I will write a code snippet to illustrate how to use the decorator in the above scenario as follows:
Cart.cs
namespace Decorator
{
    public class Cart
    {
        public List Products { get; private set; } = [];

        public void AddProduct(string product)
        {
            Products.Add(product);
        }

        public string Details()
        {
            return string.Join(", ", Products);
        }
    }
}
Customer.cs
namespace Decorator
{
    public abstract class Customer
    {
        public Cart Cart { get; set; } = new();

        public virtual void AddToCart(string product)
        {
            Cart.AddProduct(product);
        }

        public abstract void CheckOut();
    }
}
DecoratorCustomer.cs
namespace Decorator
{
    public abstract class DecoratorCustomer : Customer
    {
        protected Customer? _customerComponent;

        public DecoratorCustomer(Customer customerComponent)
        {
            _customerComponent = customerComponent;
        }

        public override void CheckOut()
        {
            if (_customerComponent != null)
            {
                _customerComponent.CheckOut();
            }
        }
    }
}
DecoratedCustomer.cs
namespace Decorator
{
    public class DecoratedCustomer : DecoratorCustomer
    {
        private string _deliveryProvider { get; set; } = "Default delivery";

        public DecoratedCustomer(Customer customerComponent) : base(customerComponent)
        {
        }

        public void AddDeliveryInfo(string deliveryProvider)
        {
            _deliveryProvider = deliveryProvider;
        }

        public override void CheckOut()
        {
            Console.WriteLine("Delivery information");
            // Get delivery time based on the delivery provider
            GetDeliveryInfo();
            base.CheckOut();
        }

        private void GetDeliveryInfo()
        {
            Console.WriteLine($"Delivery provider: {_deliveryProvider}");
            if (_deliveryProvider.Contains("Express"))
                Console.WriteLine("Delivery time: 1 day");
            else
                Console.WriteLine("Delivery time: 2-3 days");
        }
    }
}
ConcreteCustomer.cs
namespace Decorator
{
    public class ConcreteCustomer : Customer
    {
        public override void CheckOut()
        {
            Console.WriteLine($"Checkout information: {Cart.Details()}");
        }
    }
}
Program.cs
using Decorator;

// Default customer checkout information
ConcreteCustomer customer = new();
customer.AddToCart("Fridge");
customer.AddToCart("Washing machine");
customer.AddToCart("Oven");
customer.AddToCart("Microwave");
customer.CheckOut();
Console.WriteLine("======#==#======");

// Decorated customer checkout information
DecoratedCustomer decoratedCustomer = new(customer);
decoratedCustomer.AddDeliveryInfo("Express delivery");
decoratedCustomer.CheckOut();
Console.WriteLine("======#==#======");
The result after executing the program is as follows:
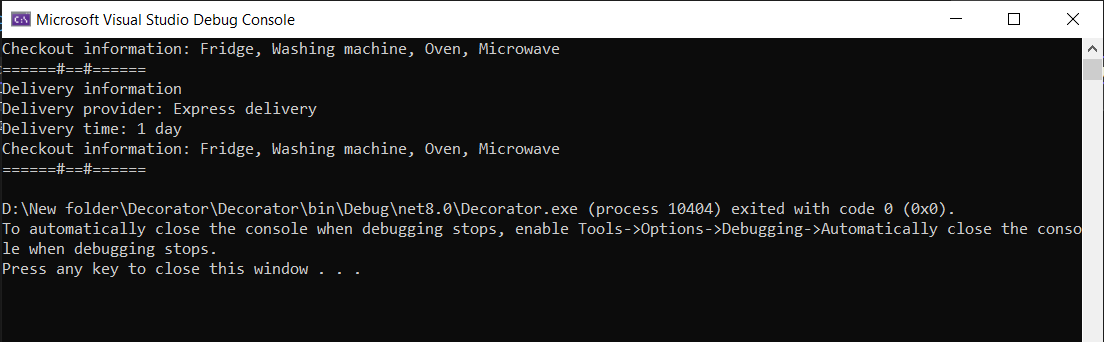
As you can see, initially the information checked out only included the Cart details. After being decorated, the checkout process can now output the shipping carrier information as well.
By implementing the above, you can customize the behaviors of an object to suit various use cases while maintaining the stability and integrity of the object. However, I also recognize that a certain level of knowledge is required to apply this architecture effectively because the overall structure can spread the functionality across multiple files, making it more challenging to read and understand. Developers need to carefully consider suitable architectures to apply to their projects to minimize potential errors.
Whether you need scalable software solutions, expert IT outsourcing, or a long-term development partner, ISB Vietnam is here to deliver. Let’s build something great together—reach out to us today. Or click here to explore more ISB Vietnam's case studies.
Reference:
December 8, 2025
AWS Certified Cloud Practitioner (CLF-C02) - Everything You Need to Know About the Exam Outline
Discover the complete outline of the AWS Certified Cloud Practitioner CLF-C02 exam, including structure, domain weightings, and target candidates. A beginner-friendly guide to preparing for your first AWS certification.
Introduction
Are you interested in cloud computing but don't know where to start? The AWS Certified Cloud Practitioner certification is often the perfect first step into the world of Amazon Web Services (AWS) cloud technology. This entry-level certification validates your basic understanding of AWS cloud concepts without requiring any hands-on technical experience or programming skills.
The AWS Certified Cloud Practitioner (CLF-C02) exam is designed for individuals who can demonstrate overall knowledge of the AWS Cloud, regardless of their specific job role. It proves that you understand the fundamental concepts of cloud computing and how AWS can benefit businesses and individuals.
This is the first post in my series about the CLF-C02 exam. Today, we'll focus on the exam outline - giving you a complete overview of what the certification covers, who it's for, and how it's structured. Future posts will dive deeper into each of the four main content areas with more detailed explanations and study tips.
What's New in CLF-C02 vs CLF-C01?
If you've studied for the previous version (CLF-C01), the CLF-C02 has some key updates:
- Streamlined content: Removed migration strategies and cloud adoption frameworks (now covered in higher-level exams)
- Updated security focus: More emphasis on compliance and modern security tools
- Enhanced global infrastructure: Better coverage of Regions, Availability Zones, and edge locations
- Current services: Includes newer AWS offerings and pricing models
The CLF-C02 focuses more on core concepts while reducing implementation details.
Overview of the Exam
Who Should Take This Exam?
The AWS Certified Cloud Practitioner exam is targeted at people who have up to 6 months of exposure to AWS Cloud concepts through work, self-study, or casual interaction with cloud technologies. You might be:
- Someone just starting their career in cloud computing
- Working in IT support or operations with occasional AWS exposure
- A business professional who needs to understand cloud basics
- A student or career changer exploring cloud technology options
Important Note: This exam does NOT require you to perform technical tasks like coding, designing complex cloud architectures, troubleshooting systems, implementing solutions, or conducting performance testing. It's about understanding concepts, not hands-on skills.
Recommended Knowledge Areas
Before taking the exam, you should be familiar with:
- AWS Cloud Concepts - Basic ideas about cloud computing
- Security and Compliance in AWS - How AWS handles data protection and regulatory requirements
- Core AWS Services - Main offerings for computing, storage, and networking
- Economics of the AWS Cloud - Cost structures and financial benefits
- Shared Responsibility Model - Understanding the boundaries of responsibility between AWS and customers
Exam Format and Scoring
The CLF-C02 exam consists of 65 questions (50 scored questions and 15 unscored questions that are unmarked and used by AWS for future exam development). You won't know which questions are unscored.
Question Types:
- Multiple choice: One correct answer out of four options
- Multiple response: Two or more correct answers out of five or more options
You have 90 minutes to complete the exam, and there's no penalty for guessing wrong answers.
Scoring System:
- Results are reported as a scaled score from 100-1000
- Minimum passing score is 700
- The exam uses "compensatory scoring," meaning you don't need to pass each section individually - your overall performance across all questions determines if you pass
Content Structure - The 4 Main Domains
The exam is organized into four content domains, each with a different percentage weighting. This means some areas have more questions than others.
Exam Domains Overview:
| Domain | Main Content | Weighting |
|---|---|---|
| Cloud Concepts | Benefits, Well-Architected Framework, Cloud Economics | 24% |
| Security and Compliance | Shared Responsibility, IAM, Security Services | 30% |
| Cloud Technology and Services | Core services: Compute, Storage, Network, Databases | 34% |
| Billing, Pricing, and Support | Pricing models, Cost tools, Support plans | 12% |
Domain 1: Cloud Concepts (24% of scored content)
This domain focuses on the fundamental benefits and principles of cloud computing.
Key Topics:
- Benefits of AWS Cloud: Understanding advantages like global reach (data centers worldwide), speed of deployment (quick setup), high availability (services stay running), elasticity (scale up/down as needed), and agility (adapt quickly to changes)
- Design Principles: Learning about the AWS Well-Architected Framework, which includes six pillars: operational excellence (efficient operations), security (data protection), reliability (consistent performance), performance efficiency (optimal resources), cost optimization (spending wisely), and sustainability (environmental responsibility)
- Cloud Economics: Understanding cost differences between traditional on-premises systems (fixed costs) versus cloud (variable costs), licensing options, and benefits like economies of scale (cost savings from large-scale operations)
Domain 2: Security and Compliance (30% of scored content)
Security is one of the largest domains, showing how important it is in cloud computing.
Key Topics:
- Shared Responsibility Model: AWS and customers each handle different security aspects. For example, AWS secures the underlying infrastructure, while customers secure their data and applications
- Security Concepts: Encryption concepts at a high level (data protection), compliance requirements, and monitoring tools
- Access Management: Using AWS Identity and Access Management (IAM) for user permissions, including high-level understanding of IAM users, groups, roles, and permission policies, plus multi-factor authentication (MFA) for extra security
- Security Services: Tools like AWS Shield (DDoS protection), Amazon GuardDuty (threat detection), AWS Security Hub (security monitoring), and AWS Config (resource compliance checking)
Domain 3: Cloud Technology and Services (34% of scored content)
This is the largest domain and covers AWS's core offerings.
Key Topics:
- Deployment Methods: Using the AWS Management Console (web interface), APIs (programming interfaces), CLI (command-line tools), and infrastructure as code (automated setup)
- Global Infrastructure: Understanding Regions (geographic areas), Availability Zones (data centers within regions), Local Zones (extensions of AWS services closer to users for low-latency workloads), and edge locations (content delivery points). Benefits include high availability through multiple Availability Zones, disaster recovery capabilities, and compliance with data sovereignty requirements
- Compute Services: Amazon EC2 (virtual servers), container services like Amazon ECS/EKS, serverless computing with AWS Lambda, and auto scaling (automatic resource adjustment)
- Database Services: Relational databases (Amazon RDS), NoSQL databases (DynamoDB)
- Network Services: Amazon VPC (virtual private cloud), security groups (firewalls), Amazon Route 53 (DNS service), and connectivity options like AWS VPN
- Storage Services: Amazon S3 (object storage), EBS (block storage for servers), EFS (file storage), and lifecycle policies (automatic data management)
- Analytics and AI/ML: Basic awareness of services like Amazon QuickSight (data visualization) and Amazon SageMaker (machine learning) - you just need to recognize these at a high level, not detailed usage
Domain 4: Billing, Pricing, and Support (12% of scored content)
This smaller domain covers the business side of AWS.
Key Topics:
- Pricing Models: On-Demand (pay as you go), Reserved Instances (discount for long-term commitment), Spot Instances (bid for unused capacity), and Savings Plans (flexible pricing discounts)
- Cost Management: Using AWS Cost Explorer (spending analysis), AWS Budgets (spending alerts), and cost allocation tags (tracking expenses by department/project)
- Support Options: Different AWS Support plans (Basic, Developer, Business, Enterprise, and Enterprise On-Ramp), AWS Marketplace (third-party tools), and resources like AWS re:Post (community forum) and Trusted Advisor (optimization recommendations)
Preparation Tips
Since this is a foundational certification, you don't need extensive technical experience. Focus on understanding concepts rather than implementation details. Here are some practical CLF-C02 study guide tips:
- Official Resources: Start with the free AWS whitepapers, documentation, and AWS Skill Builder training
- Official Sample Questions: AWS provides a free set of CLF-C02 practice questions to help you get familiar with the exam format
- Practice Exams: Take additional sample questions to build confidence
- Hands-On Practice: Use the AWS Free Tier (free services for new users) to experiment
- Study Time: Plan for 2-4 weeks of preparation if you're new to cloud concepts
- Focus Areas: Pay special attention to the Well-Architected Framework and shared responsibility model - these appear frequently
For more AWS Cloud Practitioner exam tips, check out official AWS training paths and community forums.
Conclusion
The AWS Certified Cloud Practitioner certification provides a solid foundation for anyone interested in cloud computing. With its focus on fundamental concepts across four balanced domains - Cloud Concepts, Security and Compliance, Technology and Services, and Billing and Support - it ensures you understand both the technical and business aspects of AWS.
This certification doesn't require deep technical skills, making it accessible for beginners while still being valuable for career advancement. Whether you're looking to start a cloud career, improve your current role, or simply understand modern IT infrastructure, the CLF-C02 is an excellent starting point.
In the next post, we'll dive deep into Domain 1: Cloud Concepts, exploring the specific benefits of AWS Cloud and real-world examples of how businesses leverage these advantages. Stay tuned, and feel free to ask questions about this exam outline in the comments!
Have you taken the CLF-C02 exam? What surprised you most about the content? Share your experience below!
Whether you need scalable software solutions, expert IT outsourcing, or a long-term development partner, ISB Vietnam is here to deliver. Let’s build something great together—reach out to us today. Or click here to explore more ISB Vietnam's case studies.
References
[1]. AWS Certified Cloud Practitioner. Retrieved from https://aws.amazon.com/certification/certified-cloud-practitioner/
December 8, 2025
Modern Flutter UI Design Patterns for 2025
Modern Flutter UI/UX Patterns
Flutter UI is evolving fast. In 2025, users expect smooth animations, responsive layouts, clean structure, and adaptive design across all platforms (mobile, web, desktop).
Here are the modern UI/UX patterns that every Flutter developer should follow.
Component-Driven UI (CDU)
Instead of building pages first, build reusable components:
- Buttons
- Cards
- Form fields
- Bottom sheets
- Custom app bars
Then compose them into screens.
This reduces UI duplication and improves long-term maintainability.
Tip: Create a ui/ or components/ folder to organize everything.
Design Tokens (2025 Standard)
Your UI system should rely on:
- Colors
- Spacing
- Typography
- Corner radius
- Shadows
All defined in one place.
Dart:
class AppSpacing {
static const s = 8.0;
static const m = 16.0;
static const l = 24.0;
}
Tokens = clean, consistent design.
Advanced Theming with ColorScheme + Material 3
M3 is fully mature in 2025.
Use:
- ColorScheme.fromSeed()
- Dynamic color harmonization
- Light/dark adaptive palettes
This gives your app a modern, unified look with almost no work.
Motion-First Design
Micro animations are expected in every modern app:
- Smooth transitions
- Subtle scaling on tap
- Slide-in content
- Animated icons
- Hero animations for navigation
Use:
ImplicitlyAnimatedWidgetsAnimationController+TweenMotionpackages (ex: Flutter Animate)
Rule: Animation should feel invisible but make the experience smoother.
Layouts Built for Multi-Platform
Mobile-only UIs feel outdated.
2025 apps must adapt beautifully to:
- Phones
- Tablets
- Desktops
- Web
Use:
LayoutBuilderMediaQueryBreakpoints(custom or via packages)ResponsiveGridorFlexiblepatterns
Your UI should scale, not stretch.
Declarative Navigation (go_router or Routemaster)
Modern apps use:
- Deep linking
- URL-based routing
- Typed params
- Clean navigation stacks
go_router is the 2025 standard.
State + UI Separation
UI must be clean.
Logic must be separate.
Recommended patterns:
- Riverpod (current best choice in 2025)
- Bloc (enterprises still love it)
- Clean architecture (for large-scale apps)
Your widgets should:
- Render UI
- Subscribe to state
- Handle user input
Skeleton Loading + Shimmer Effects
Users expect:
- Instant feedback
- Placeholder UI
- Smooth loading skeletons
Skeleton UIs became default UX for 2025 apps.
Adaptive Dark Mode
Not just dark/light toggle.
Modern apps support:
- Device theme
- AMOLED true black for battery saving
- Adaptive elevation overlays
Dark mode must be a first-class citizen.
Consistency with Design Systems (Figma → Flutter)
A modern workflow is:
- Build design system in Figma
- Export tokens
- Map to Flutter (ColorScheme, TextTheme, Elevation)
- Auto-sync future updates
Use tools like:
- Figma Tokens
- FlutterGen
- Build your own mapping classes
This ensures a unified UI between design and code.
Conclusion
By integrating these modern UI/UX patterns, developer can build Flutter applications that not only look contemporary but are also efficient to develop, easy to maintain, and truly delightful for users on any platform.
Ready to get started?
Contact IVC for a free consultation and discover how we can help your business grow online.
Contact IVC for a Free ConsultationDecember 8, 2025
Architecting Production-Ready Flutter Plugins
Introduction
Flutter excels at rendering a declarative UI at 60fps, but it remains a guest on the host operating system. When an application requires access to platform-specific APIs—such as low-energy Bluetooth, obscure biometric sensors, or background process management—we must bridge the gap between the Dart runtime and the native host.
While the MethodChannel API is the foundational transport layer, building a scalable, maintainable plugin requires more than just passing strings back and forth. This post details the architecture and engineering standards for building production-grade Flutter plugins, focusing on the Federated Architecture, Type Safety, and Concurrency.
How to implement
The Federated Plugin Architecture
For production systems, monolithic plugins (where Android, iOS, and Dart code reside in one package) are discouraged. The industry standard is the Federated Plugin Architecture. This pattern decouples the API definition from the platform implementations, enabling independent scalability and testing.
The Structure
A federated plugin is split into multiple packages, typically organized in a monorepo:
plugin_name(App-Facing): The entry point for consumers. It forwards calls to the default platform instance.plugin_name_platform_interface: Contains abstract base classes and data models. This ensures all platform implementations adhere to the same contract.plugin_name_android/plugin_name_ios: The concrete implementations for specific platforms.
Benefits:
- Isolating Dependencies: Android-specific Gradle dependencies do not leak into the Web or iOS implementations.
- Testability: The platform_interface allows you to inject mock implementations during Dart unit tests without needing a simulator.
Enforcing Type Safety with Pigeon
The raw MethodChannel relies on Map<String, dynamic> and untyped standard message codecs. This is brittle; a typo in a map key or a mismatched data type causes runtime crashes (ClassCastException) rather than compile-time errors.
The Solution: Pigeon.
Pigeon is a code generation tool that creates type-safe bridges between Dart and Native code. It generates the serialization logic, ensuring that data contracts are respected across boundaries.
Step A: Define the Schema (Dart)
Create a standalone Dart file (e.g., pigeons/messages.dart) to define the API.
Dart:
import 'package:pigeon/pigeon.dart';
@ConfigurePigeon(PigeonOptions(
dartOut: 'lib/src/messages.g.dart',
kotlinOut: 'android/src/main/kotlin/com/example/plugin/Messages.g.kt',
swiftOut: 'ios/Classes/Messages.g.swift',
kotlinOptions: KotlinOptions(package: 'com.example.plugin'),
))
class CompressionConfig {
int? quality;
String? format; // 'jpeg' or 'png'
}
class CompressionResult {
Uint8List? data;
String? error;
}
@HostApi()
abstract class ImageCompressorApi {
@async
CompressionResult compress(Uint8List rawData, CompressionConfig config);
}
Step B: Generate the Protocol
Running the Pigeon generator produces:
- Dart: An abstract class used by your plugin logic.
- Kotlin: An interface (ImageCompressorApi) to implement.
- Swift: A protocol (ImageCompressorApi) to conform to.
Android Implementation (Kotlin)
Modern Android plugins should be written in Kotlin and must handle lifecycle awareness and threading correctly.
The generated Pigeon interface simplifies the setup. Note the use of Coroutines to move work off the main thread.
Kotlin:
import io.flutter.embedding.engine.plugins.FlutterPlugin
import kotlinx.coroutines.*
class ImageCompressorPlugin : FlutterPlugin, ImageCompressorApi {
private val scope = CoroutineScope(Dispatchers.Main)
override fun onAttachedToEngine(binding: FlutterPlugin.FlutterPluginBinding) {
// Wire up the generated Pigeon API
ImageCompressorApi.setUp(binding.binaryMessenger, this)
}
override fun compress(
rawData: ByteArray,
config: CompressionConfig,
result: Result<CompressionResult>
) {
// MOVE TO BACKGROUND THREAD
scope.launch(Dispatchers.Default) {
try {
val compressedData = NativeCompressor.process(rawData, config.quality)
val output = CompressionResult(data = compressedData)
// Return to Main Thread to send result back to Flutter
withContext(Dispatchers.Main) {
result.success(output)
}
} catch (e: Exception) {
withContext(Dispatchers.Main) {
result.error(e)
}}
}
}
override fun onDetachedFromEngine(binding: FlutterPlugin.FlutterPluginBinding) {
ImageCompressorApi.setUp(binding.binaryMessenger, null)
scope.cancel() // Prevent memory leaks
}
}
Key Engineering Consideration: If your plugin requires Activity references (e.g., for startActivityForResult or Permissions), your plugin class must implement ActivityAware. Do not rely on the deprecated Registrar.
iOS Implementation (Swift)
iOS implementation follows a similar pattern using Swift protocols and Grand Central Dispatch (GCD).
Swift:
import Flutter
import UIKit
public class SwiftCompressorPlugin: NSObject, FlutterPlugin, ImageCompressorApi {
public static func register(with registrar: FlutterPluginRegistrar) {
let messenger = registrar.messenger()
let api = SwiftCompressorPlugin()
// Wire up the generated Pigeon API
ImageCompressorApiSetup.setUp(binaryMessenger: messenger, api: api)
}
func compress(
rawData: FlutterStandardTypedData,
config: CompressionConfig,
completion: @escaping (Result<CompressionResult, Error>) -> Void
) {
// MOVE TO BACKGROUND QUEUE
DispatchQueue.global(qos: .userInitiated).async {
do {
let data = try NativeCompressor.process(rawData.data, quality: config.quality)
let result = CompressionResult(data: data, error: nil)
// Callback is thread-safe in Pigeon generated code,
// but explicit main queue dispatch is good practice for UI work
DispatchQueue.main.async {
completion(.success(result))
}
} catch {
completion(.failure(error))
}
}
}
}
Performance and Concurrency
A common bottleneck in plugin development is blocking the Platform Thread.
- The Issue: Flutter's Platform Channels invoke native methods on the host's Main Thread (UI Thread).
- The Consequence: If you perform JSON parsing, Bitmap decoding, or File I/O directly in the handler, the entire device UI (not just the Flutter app) will freeze (Jank).
- The Fix: Always offload operations exceeding 16ms to a background thread (using Dispatchers.IO in Kotlin or DispatchQueue.global in Swift) immediately upon receiving the call.
Testing Strategy
Robust plugins require a layered testing approach.
Unit Tests (Dart)
Mock the platform interface. Because we decoupled the logic, we can test the Dart transformation layers without an emulator.
Dart:
class MockApi implements ImageCompressorApi {
@override
Future<CompressionResult> compress(Uint8List rawData, CompressionConfig config) async {
return CompressionResult(data: rawData); // Echo back for testing
}
}
void main() {
test('Controller transforms data correctly', () async {
final api = MockApi();
// Inject API into controller and assert logic
});
}
Integration Tests (On-Device)
Use the integration_test package to verify the full round-trip. This ensures the native compilation and linking are correct.
Summary
Building a plugin is not just about making it work; it is about making it safe and scalable.
- Federate: Split your logic from your platform implementations.
- Strict Typing: Use Pigeon to eliminate runtime serialization errors.
- Thread Management: Never block the Main Thread; offload heavy lifting immediately.
- Lifecycle: Manage Activity attachment and detachment cleanly to avoid leaks.
Ready to get started?
Contact IVC for a free consultation and discover how we can help your business grow online.
Contact IVC for a Free ConsultationDecember 8, 2025
Building a Smart Camera Android App Use CameraX & ML Kit
What is CameraX?
CameraX is a Jetpack library that makes camera development easier by providing:
- Simple camera preview
- Image capture (photos)
- Image analysis (frames for machine learning)
- Consistent behavior across different devices
- Fewer crashes compared to Camera API / Camera2
CameraX works perfectly with ML Kit for on-device AI tasks.
What is ML Kit?
ML Kit is Google’s on-device machine learning library. It’s fast, doesn’t require internet, and supports:
- Text Recognition (OCR)
- Face Detection
- Barcode Scanning
- Object Detection & Tracking
- Image Labeling
- Pose Detection
In this post, Text Recognition will be used as an example — but the same structure works for any ML Kit model.
Step-by-Step Project Guide
Step 1: Create a New Android Studio Project
- Open Android Studio (Giraffe / Koala+ recommended)
- Click New Project
- Choose Empty Activity (or Compose Activity if you're building with Jetpack Compose)
- Configure project settings:
-
- Name: SmartCameraApp
- Package: com.example.smartcamera
- Minimum SDK: Android 8.0 (API 26) or higher
- Build system: Gradle Kotlin DSL recommended
- Click Finish
The project will generate with a default MainActivity.kt.
Step 2: Add Required Dependencies
Open build.gradle (app level) and insert:
CameraX
def camerax_version = "1.3.3"
implementation "androidx.camera:camera-core:$camerax_version"
implementation "androidx.camera:camera-camera2:$camerax_version"
implementation "androidx.camera:camera-lifecycle:$camerax_version"
implementation "androidx.camera:camera-view:$camerax_version"
implementation "androidx.camera:camera-mlkit-vision:$camerax_version"
ML Kit — Text Recognition (example)
implementation("com.google.mlkit:text-recognition:16.0.1")
Step 3: Add Camera Permission
Add the permission to AndroidManifest.xml:
<uses-permission android:name="android.permission.CAMERA" />
Request it at runtime using the Activity Result API.
Step 4: Add a Camera Preview UI
Open activity_main.xml:
<androidx.camera.view.PreviewView
android:id="@+id/previewView"
android:layout_width="match_parent"
android:layout_height="match_parent"
android:layout_gravity="center" />
PreviewView is the recommended CameraX preview component.
Step 5: Request Camera Permission
In MainActivity.kt:
private val requestPermissionLauncher =
registerForActivityResult(ActivityResultContracts.RequestPermission()) { isGranted ->
if (isGranted) startCamera()
else Toast.makeText(this, "Camera permission required.", Toast.LENGTH_LONG).show()
}
private fun requestCameraPermission() {
requestPermissionLauncher.launch(Manifest.permission.CAMERA)
}
Call requestCameraPermission() inside onCreate().
Step 6: Start CameraX
private fun startCamera() {
val cameraProviderFuture = ProcessCameraProvider.getInstance(this)
cameraProviderFuture.addListener({
val cameraProvider = cameraProviderFuture.get()
// Preview setup
val preview = Preview.Builder().build().apply {
setSurfaceProvider(findViewById<PreviewView>(R.id.previewView).surfaceProvider)
}
// Image analysis setup
val analysis = ImageAnalysis.Builder()
.setTargetResolution(Size(1280, 720))
.setBackpressureStrategy(ImageAnalysis.STRATEGY_KEEP_ONLY_LATEST)
.build()
.apply {
setAnalyzer(
Executors.newSingleThreadExecutor(),
MlKitAnalyzer()
)
}
val cameraSelector = CameraSelector.DEFAULT_BACK_CAMERA
cameraProvider.unbindAll()
cameraProvider.bindToLifecycle(
this,
cameraSelector,
preview,
analysis
)
}, ContextCompat.getMainExecutor(this))
}
Step 7: Implement the ML Kit Analyzer
Create a new file MlKitAnalyzer.kt
class MlKitAnalyzer : ImageAnalysis.Analyzer {
private val recognizer = TextRecognition.getClient()
override fun analyze(imageProxy: ImageProxy) {
val mediaImage = imageProxy.image ?: return
val rotation = imageProxy.imageInfo.rotationDegrees
val inputImage = InputImage.fromMediaImage(mediaImage, rotation)
recognizer.process(inputImage)
.addOnSuccessListener { result ->
Log.d("MLKit", "Detected Text: ${result.text}")
}
.addOnFailureListener { e ->
Log.e("MLKit", "Error: ${e.localizedMessage}")
}
.addOnCompleteListener {
imageProxy.close()
}
}
}
Step 8: Optional Overlay Rendering
(Used for bounding boxes, detection highlights, face frames)
Overlay View (optional)
class OverlayView(context: Context, attrs: AttributeSet? = null) : View(context, attrs) {
var boxes: List<Rect> = emptyList()
set(value) {
field = value
invalidate()
}
private val paint = Paint().apply {
color = Color.GREEN
style = Paint.Style.STROKE
strokeWidth = 4f
}
override fun onDraw(canvas: Canvas) {
super.onDraw(canvas)
boxes.forEach { canvas.drawRect(it, paint) }
}
}
Add to layout:
<com.example.smartcamera.OverlayView
android:id="@+id/overlayView"
android:layout_width="match_parent"
android:layout_height="match_parent" />
Step 9: Performance and Architecture Considerations
- Use a single analyzer thread: Using Executors.newSingleThreadExecutor() prevents backpressure.
- Set appropriate resolution: 1280×720 provides a balance of speed and detail.
- Reuse ML Kit detector: Avoid creating new ML Kit instances per frame.
- Move ML logic into a ViewModel for large apps: Ensures clean architecture and testability.
Conclusion
By combining CameraX with ML Kit, Android developers can build intelligent, production-ready camera applications with minimal complexity. The stack provides:
- A modern, reliable camera pipeline.
- High-performance on-device ML processing.
- Clean integration with Jetpack architecture components.
- Flexibility for a range of detection and recognition tasks.
This approach is ideal for apps involving OCR, barcode scanning, identity verification, inventory automation, smart forms, and more.
Ready to get started?
Contact IVC for a free consultation and discover how we can help your business grow online.
Contact IVC for a Free ConsultationReference:
https://developer.android.com/media/camera/camerax
https://developers.google.com/ml-kit/guides