In recent years, Vietnam has been attracting attention as a destination for offshore development and software development outsourcing due to the growing global need for IT, rising labor costs and shortages of software developers.
This study will refer to the Vietnam IT Market Report 2024 - 2025 published by TopDev, a major IT human resources platform in Vietnam, and also examine characteristics and trends of software developers in Vietnam through ISB Vietnam’s perspective, as the company has been providing offshore software development outsourcing services from Vietnam for more than 20 years.
We hope this article will be helpful to people gathering information about Vietnamese software developers, software development outsourcing, and offshore development destinations.
Number and Quality of Software Developers in Vietnam
Vietnam has become well-known across the world for its abundant IT talents, particularly in software development. The Vietnam IT Market Report 2024–2025 published by TopDev stated that about 560,000 professionals work in computer science and IT-related fields. This number is increasing, with an addition of 55,000 to 60,000 students on average each year, enrolling in computer science majors and it-related fields. Consequently, Vietnam continues to see a boom in professionals with high-level specialized knowledge and practical experience in software development and IT.
Factors that account for this phenomenal growth:
- Government Policies: The Vietnamese government recognizes IT talent development as a national strategy by actively supporting the IT sector within national development plans.
- Competitive Remuneration: The IT and Tech industry in Vietnam has been recognized for paying above-average salaries compared to other industries. This financial advantage serves as a magnet for talents to pursue careers as software developers or work within IT companies.
These factors set the base for the high-quality and skilled talent within the industry and is a major contributor to the rapid growth of the technology industry in Vietnam.
Vietnam software developers are acknowledge for their work ethic and being highly skilled. Vietnam has consistently ranked among the top 10 countries for best offshore software development and outsourcing services due to the vast talent pool and competitive rates.
A few examples stand out:
- In the Global Services Location Index of Kearney, Vietnam came in sixth among the biggest countries for software outsourcing services in 2021.
- As per Accelerance's 2022 Global Software Outsourcing Trends and Rates Guide, Vietnam ranks at the second spot among its Southeast Asian peers when it comes to being a software outsourcing destination.
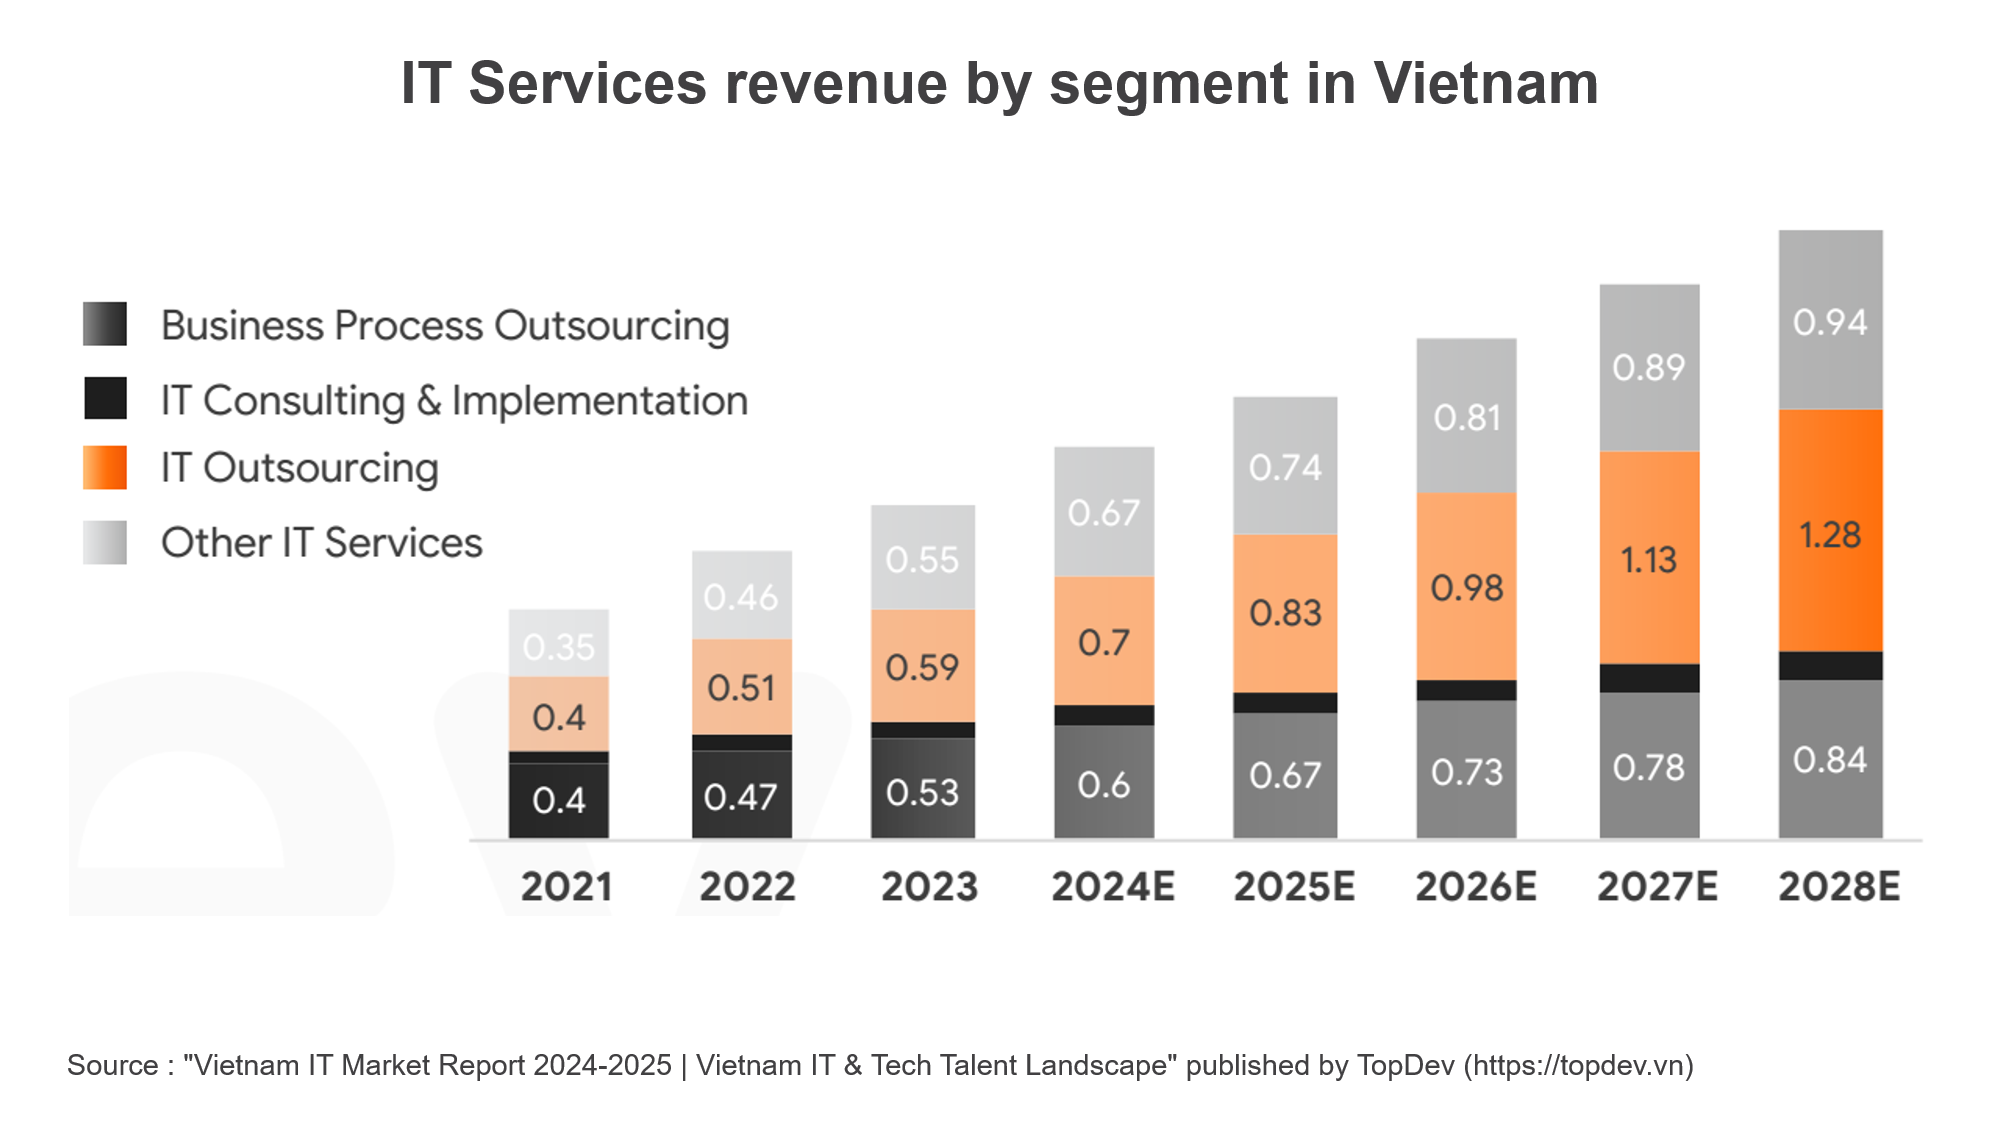
In fact, Vietnam's IT sourcing revenue has been experiencing significant growth and is projected to increase substantially from $700 million in 2024 to $1.28 billion in 2028, nearly doubling within just four years.
Such praise is a testament to the continuous rise in both the quality and quantity of software developers based in Vietnam, furthering its standing as a favored destination in global offshore software development and software development outsourcing.
Next, we will dive into the features that distinguish Vietnamese software developers and the most common Tech Stacks according to the report above.
Age Distribution, Years of Experience, and Level Distribution of Software Developers in Vietnam
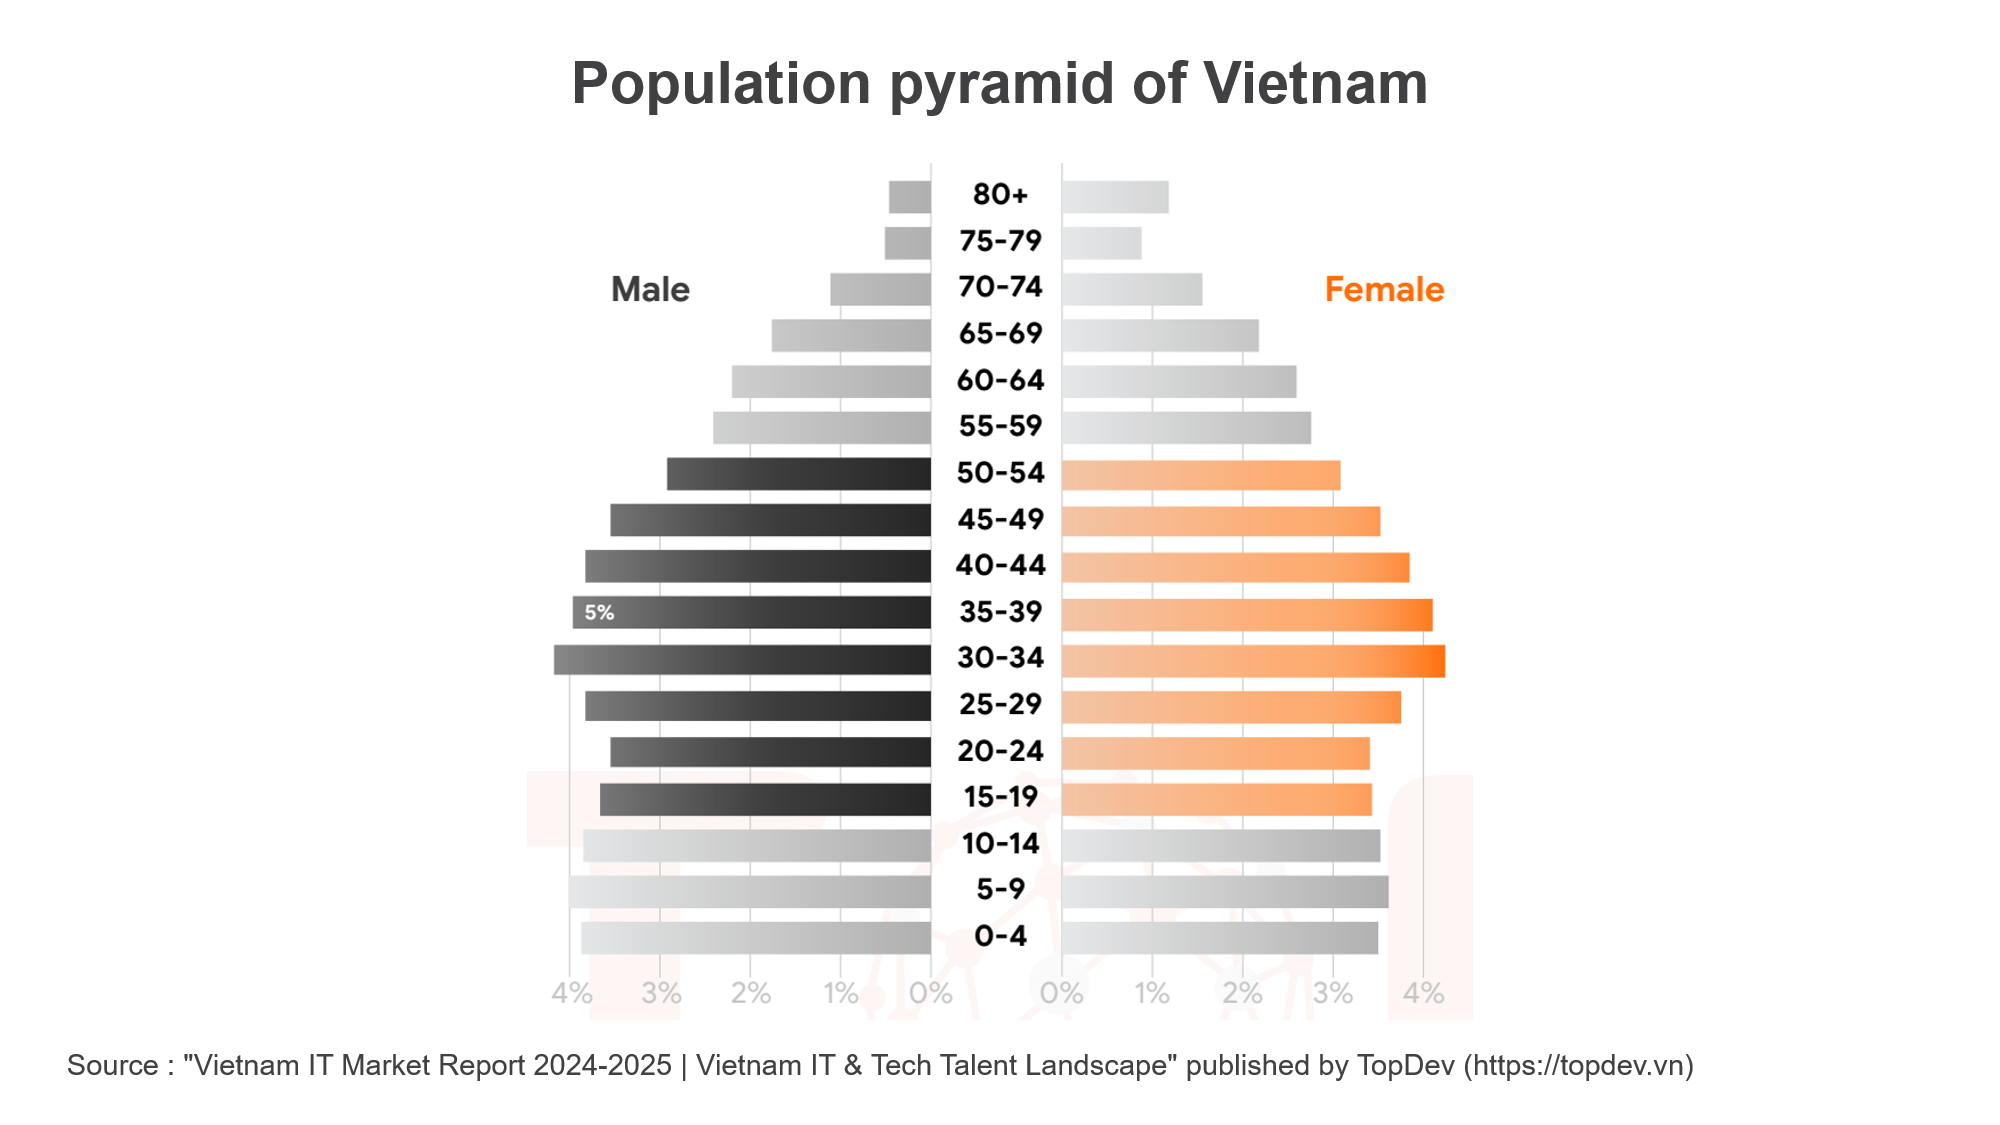
Vietnam is a fast growing economy characterized by a youthful population, with an average age of 33 years. Such demographic trends are reflected in Vietnam's software developer workforce, largely shaped by the younger generation.
Age Distribution
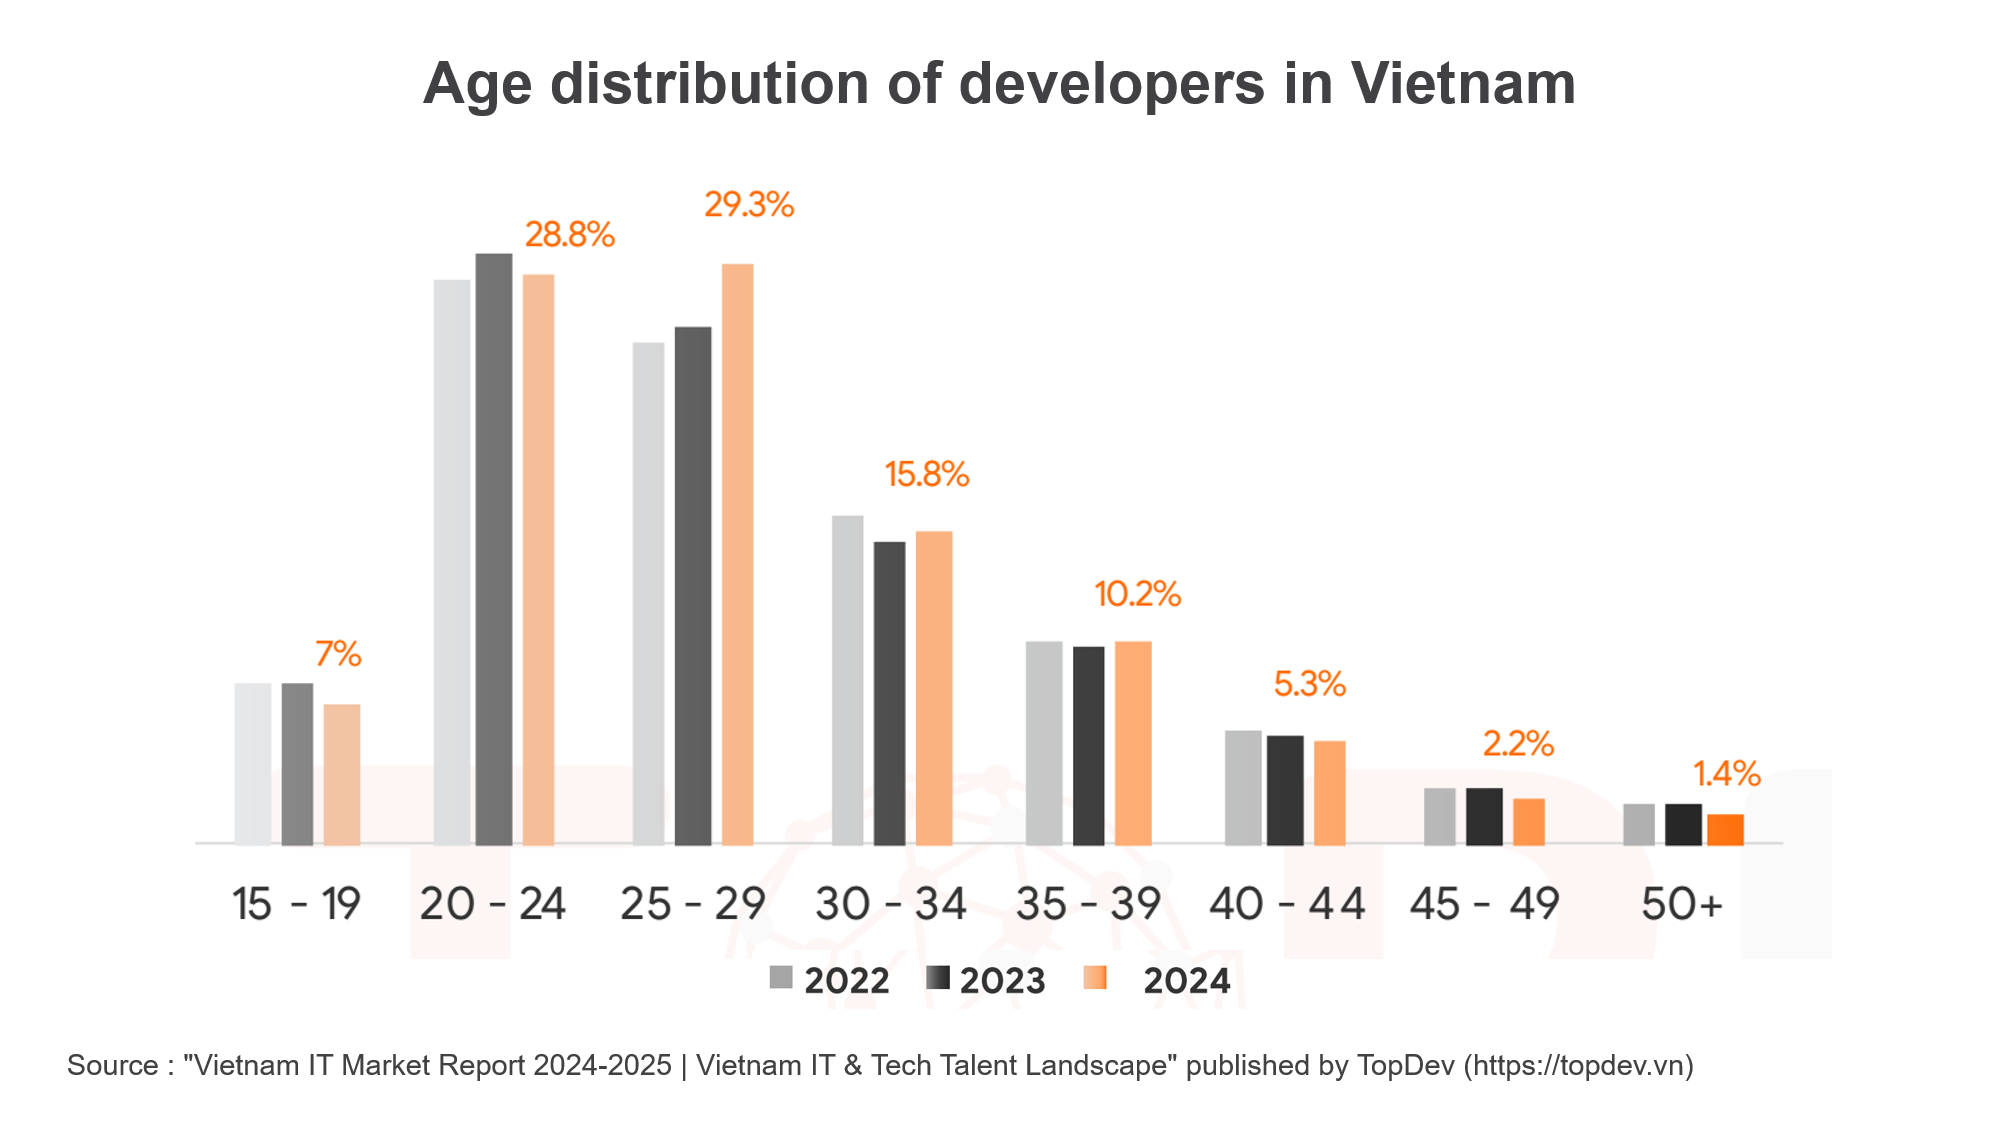
As per estimates, in 2024, the age profile for the majority of Vietnamese software developers is 25-29 years of age, accounting for 29.3% of the total. Right after them comes the age group 20-24, which with 28.8% includes young adults. This means that over half or 58.1% of all developers in Vietnam fall into the 20s age group. The remaining proportions include 30-34 years (15.8%) and 35-39 years (10.2%).
While younger developers still dominate, the overall age distribution has moved upward gradually from 2022 to 2024. The proportion of developers who are 15-19 and 20-24 has decreased, while the groups of 25-29 years and 30-39 years have seen increases. This constitutes a maturing software development workforce with a growing number of experienced professionals.
Years of Experience
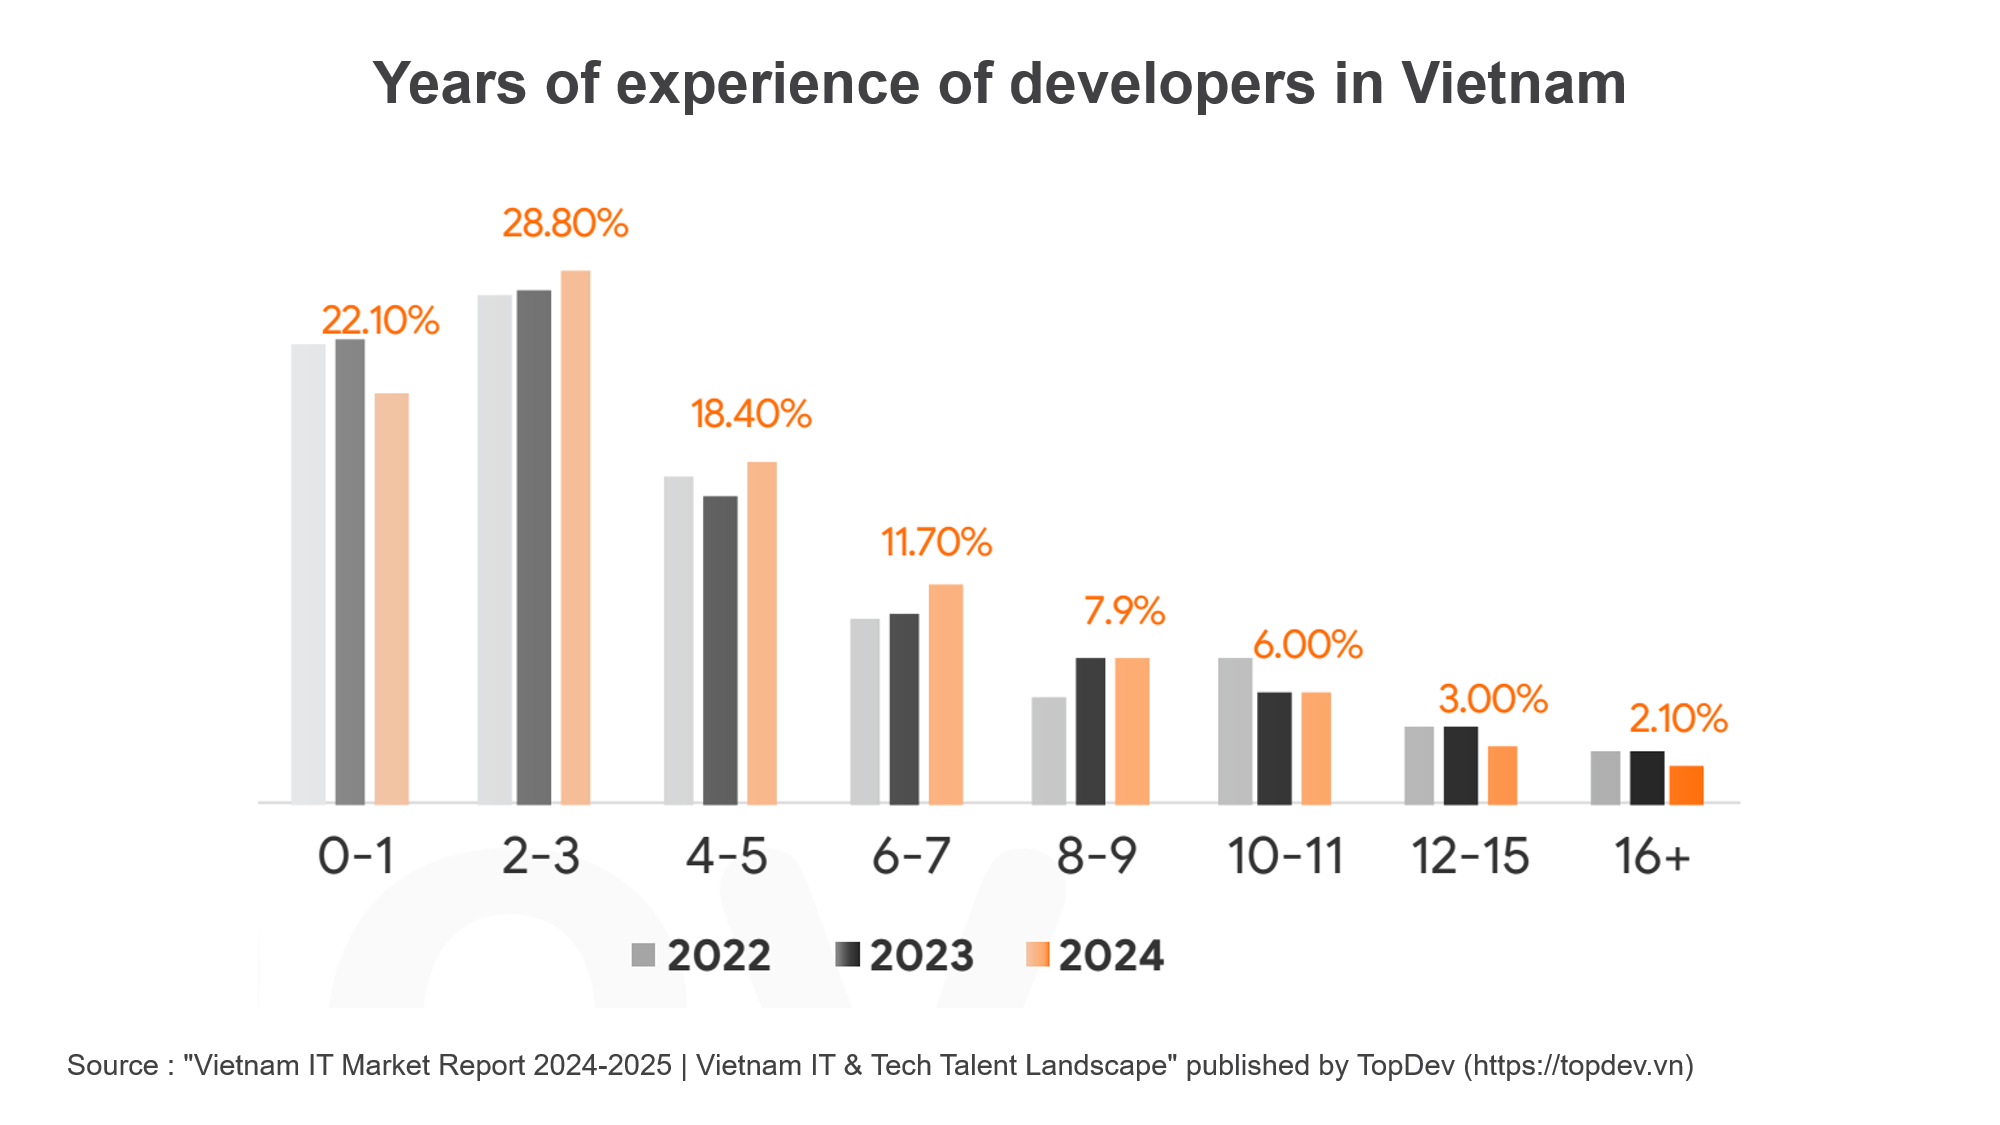
The same pattern is displayed in the skill levels of the developers. In 2024, most developers had 2 to 3 years of experience, at 28.8%, followed by those with 0 to 1 years of experience, at 22.1%. Together, developers with 0 to 3 years of experience account for 50.9% or around half of the total work force. After this, there is a consistent upswing of developers from midlevel to senior level: 4 to 5 years (18.4%), 6 to 7 years (11.7%), 8 to 9 years (7.9%), and 10 to 11 years (6.0%).
Although the first-year workers dominate the field of software development today, the steady mainstream growth of skilled personnel also indicates a transition of the developer workforce to a more competent level-suitably equipped to handle streaming, large-scale, complex projects.
Level Distribution
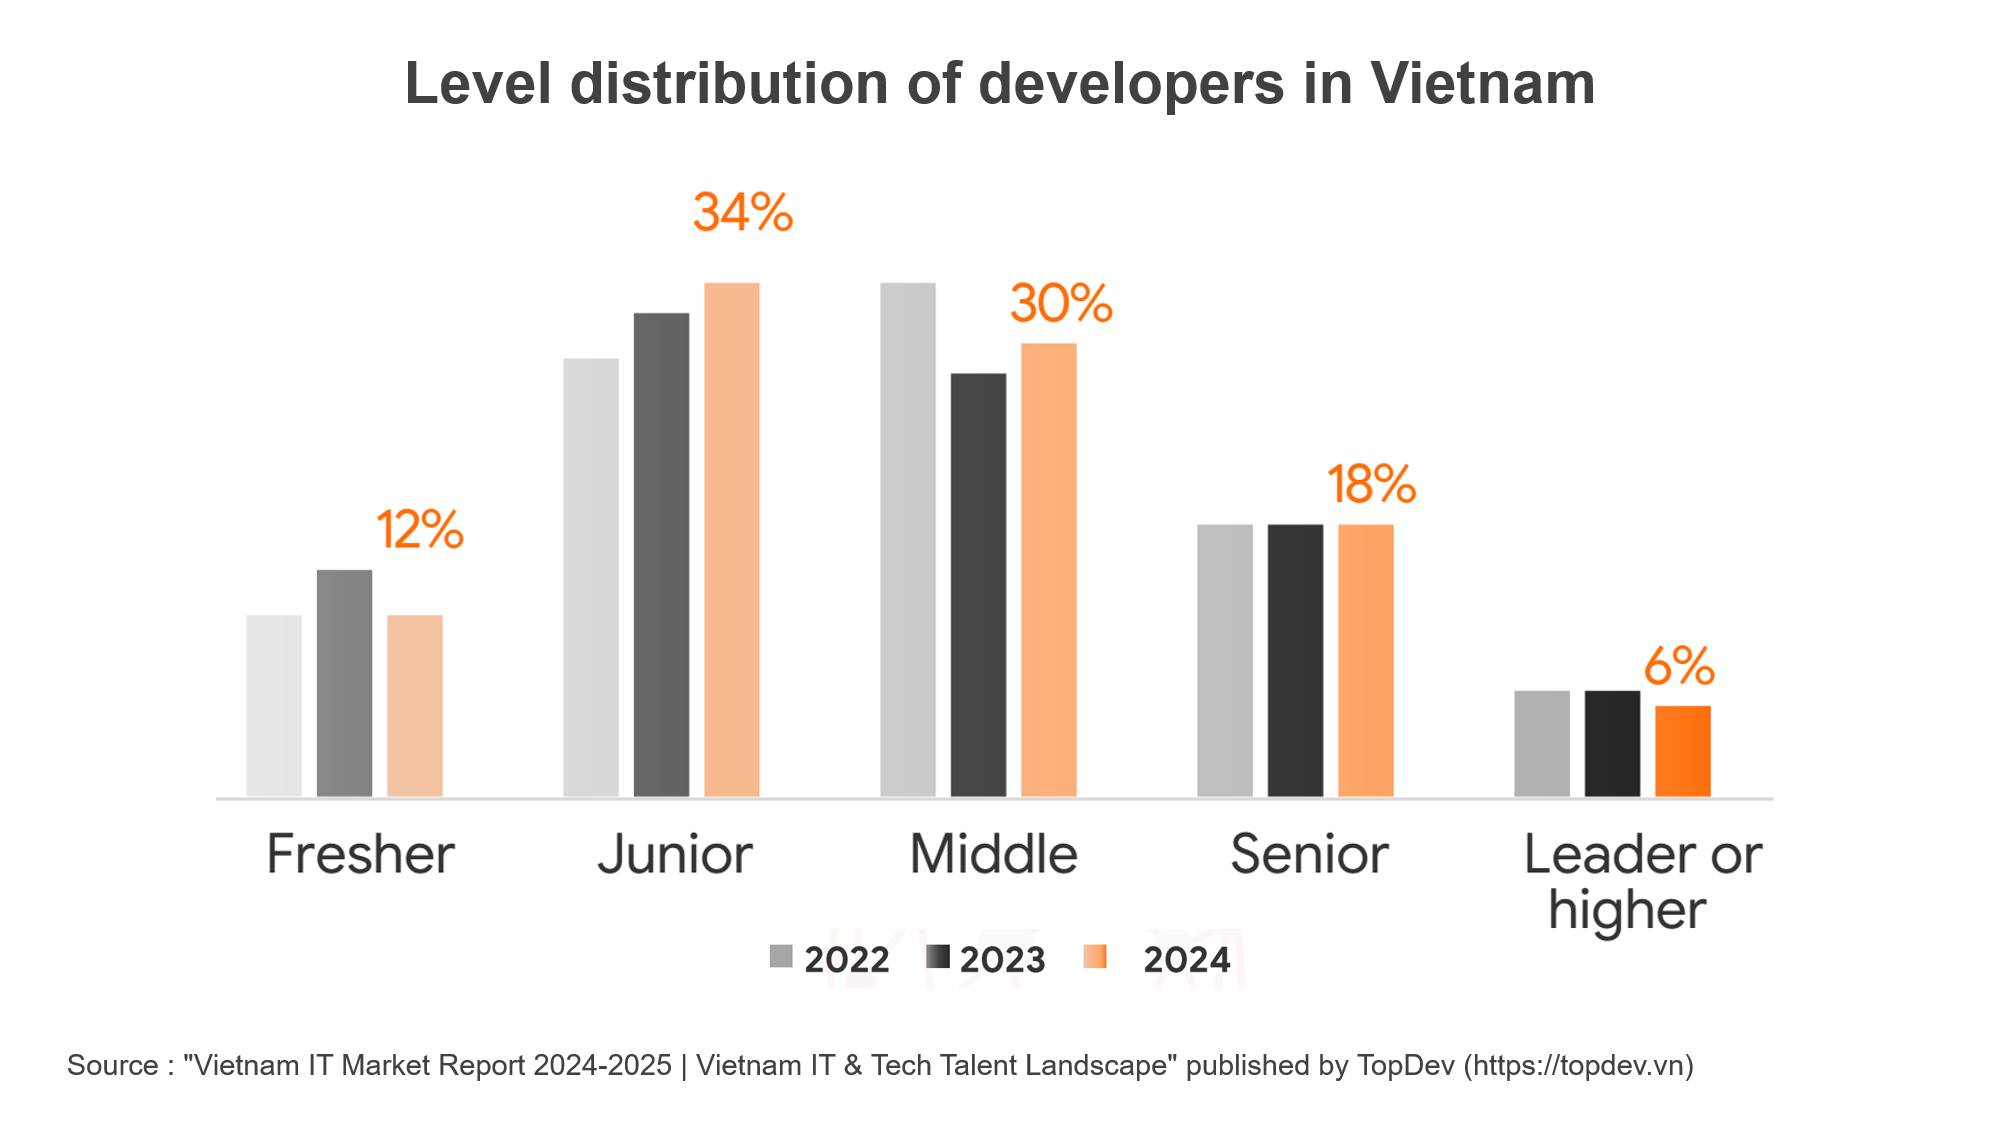
This maturity, however, is reflected in the current level distribution. In 2024, the junior tier made up 34% of developers and is the largest group. Next comes the middle-tier, with 30%, while the two groups put together account for 64% of the total developers. The number of fresher is reducing while the number of junior and middle is increasing, indicating that the overall skill level within the Vietnamese software development community is rising.
A Key Strength in Vietnam’s Software Development Industry
A steady rise in the average experience and skill level of developers, in addition to an annually increasing influx of tens of thousands of new IT professionals each year, is a major advantage for Vietnam. This development, thus, reinforces Vietnam's position as a top choice for software development outsourcing and offshore software development services.
Vietnam is soaring above expectations with a clash of youthful yet highly skilled developers ready to provide reliable yet cost-effective solutions for the clients, and the evolution of this young workforce should be considered testimony to the country's strength in the market for offshore software development.
Trends and Characteristics of Tech Stacks among Software Developers in Vietnam
Vietnamese software developers utilize a diverse range of tech stacks, each with distinct trends and preferences across different fields. Below, we delve into the most popular programming languages, frameworks, and technology categories based on their popularity among developers in Vietnam.
*The numbers in () indicate the popularity
JavaScript
JavaScript continues to be a leading programming language among developers in Vietnam. A significant development in 2023 was the introduction of "Bun (64.3%)," which quickly rose to prominence, overtaking established frameworks such as Node.js (48.2%), Angular (45.1%), and ReactJS (36.0%). Furthermore, TypeScript (32.9%) and Vue (31.4%) are also popular choices, highlighting JavaScript's adaptability within modern web development.
Java
In the realm of Java, Spring Boot (45.2%) leads as the top choice, followed by Hibernate (7.0%) and Struts (1.2%). These frameworks are preferred for their reliability and efficiency in building enterprise-grade applications, making Java a cornerstone for backend development in Vietnam.
Python
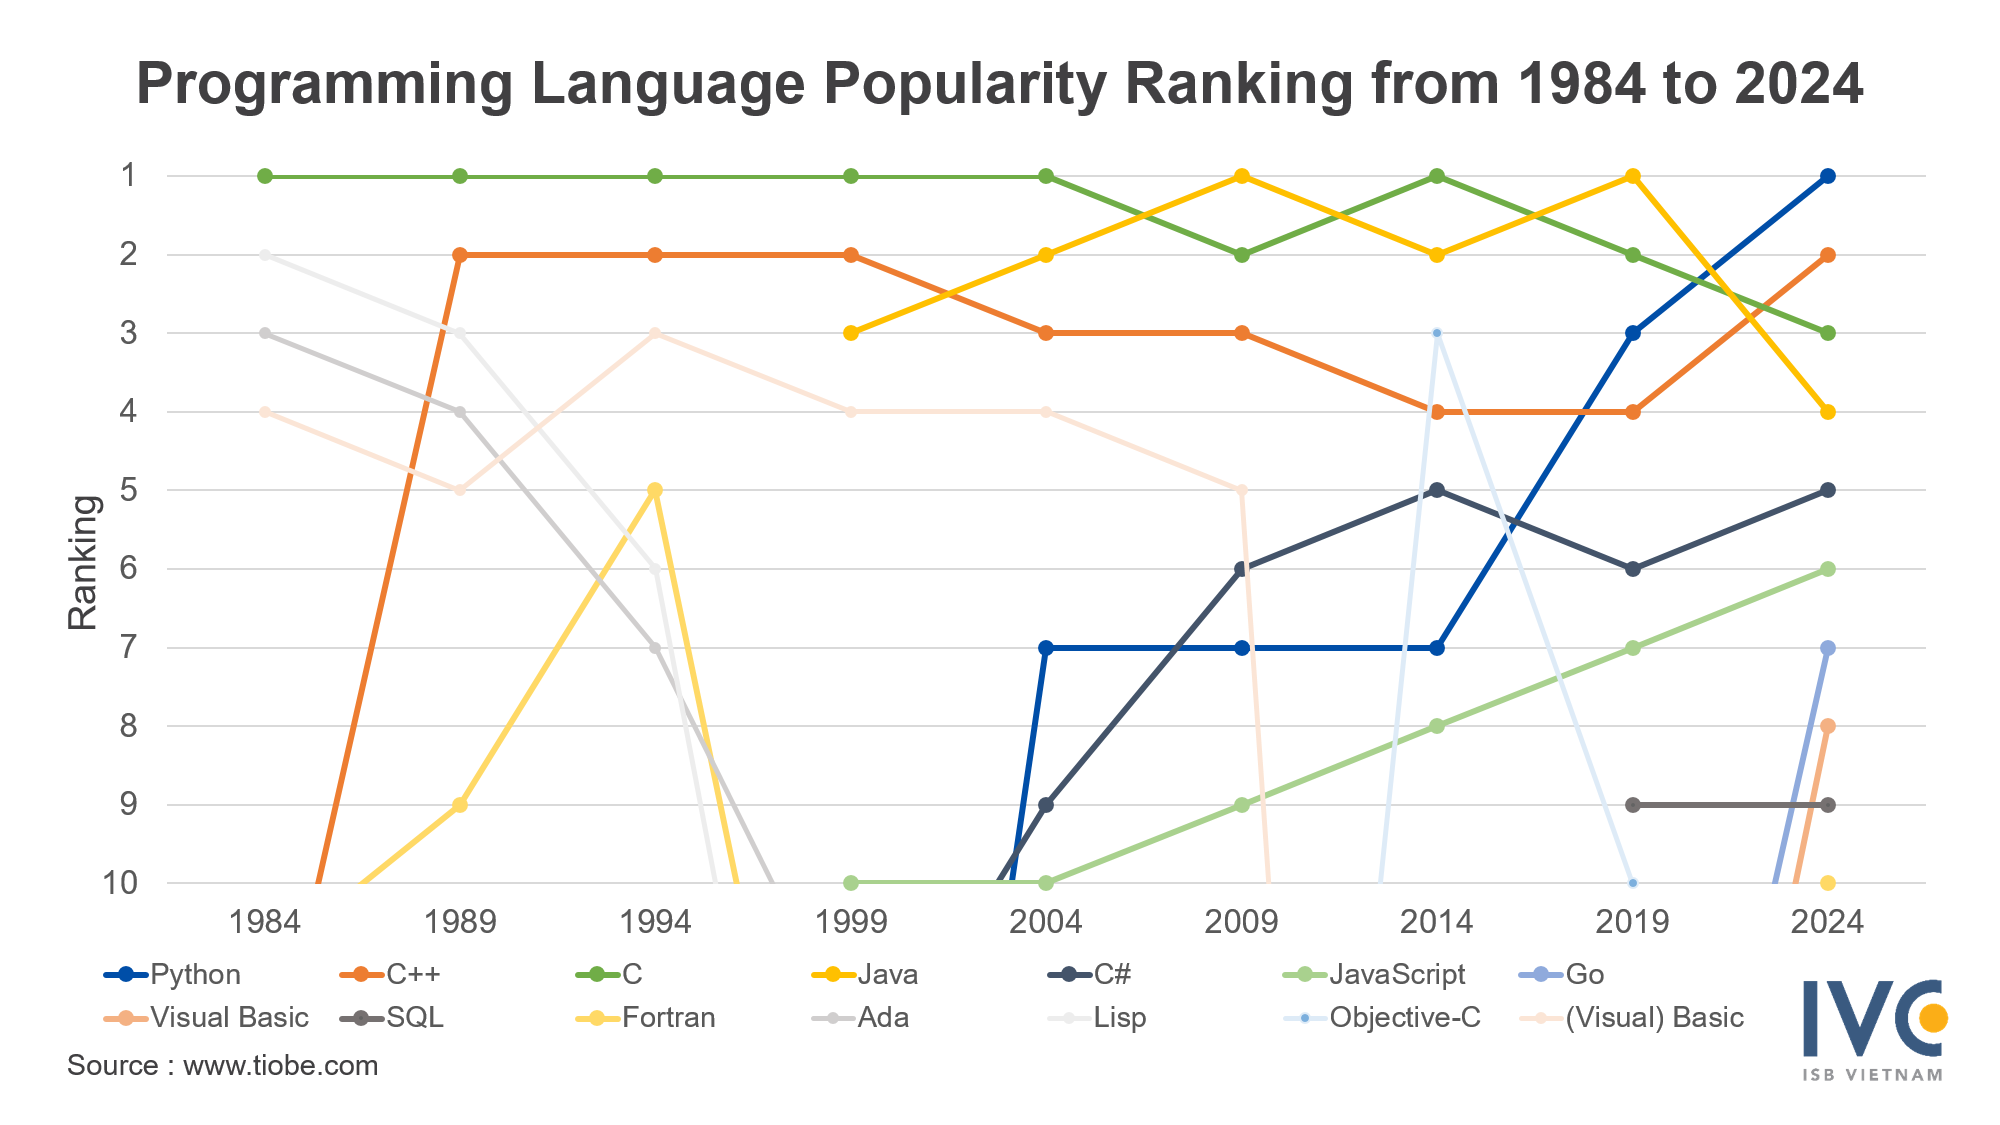
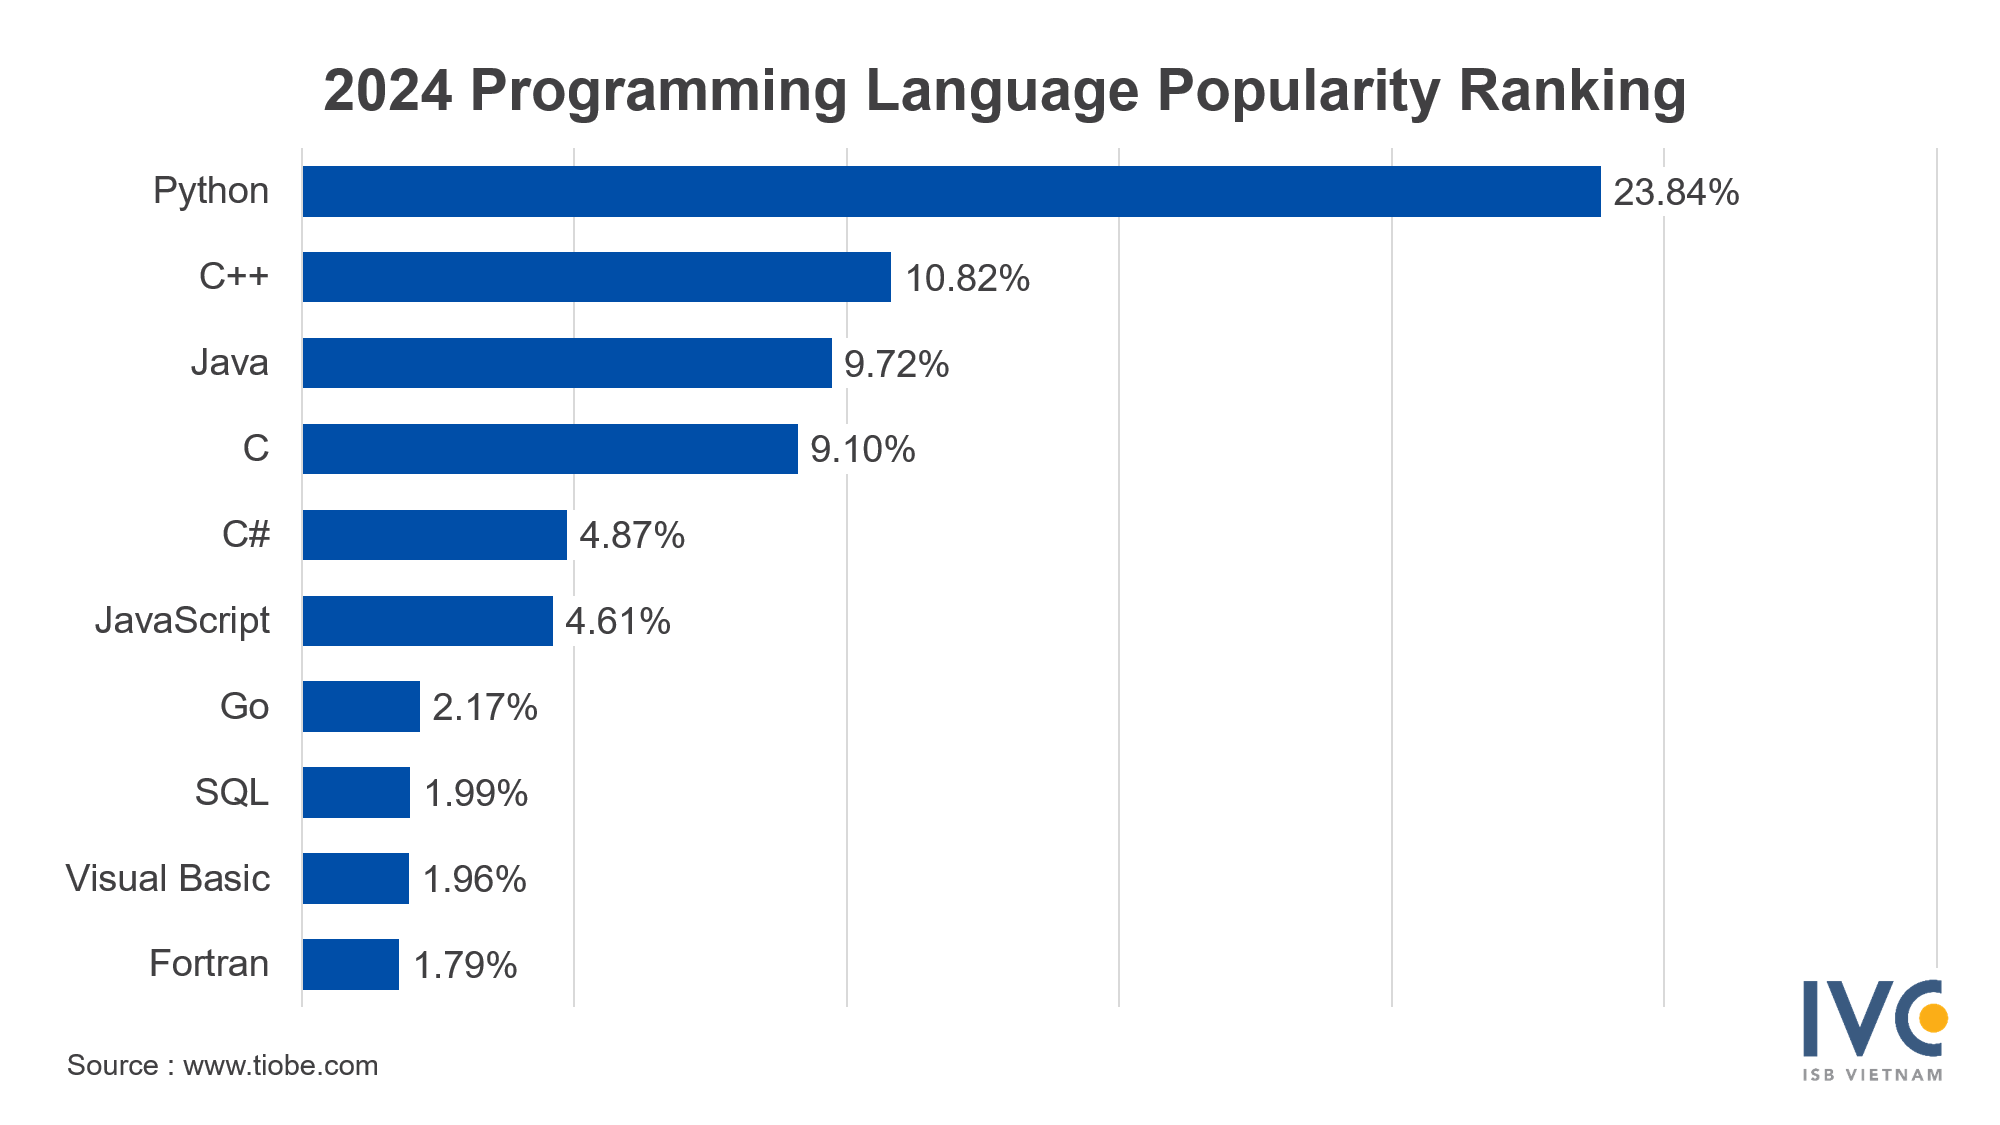
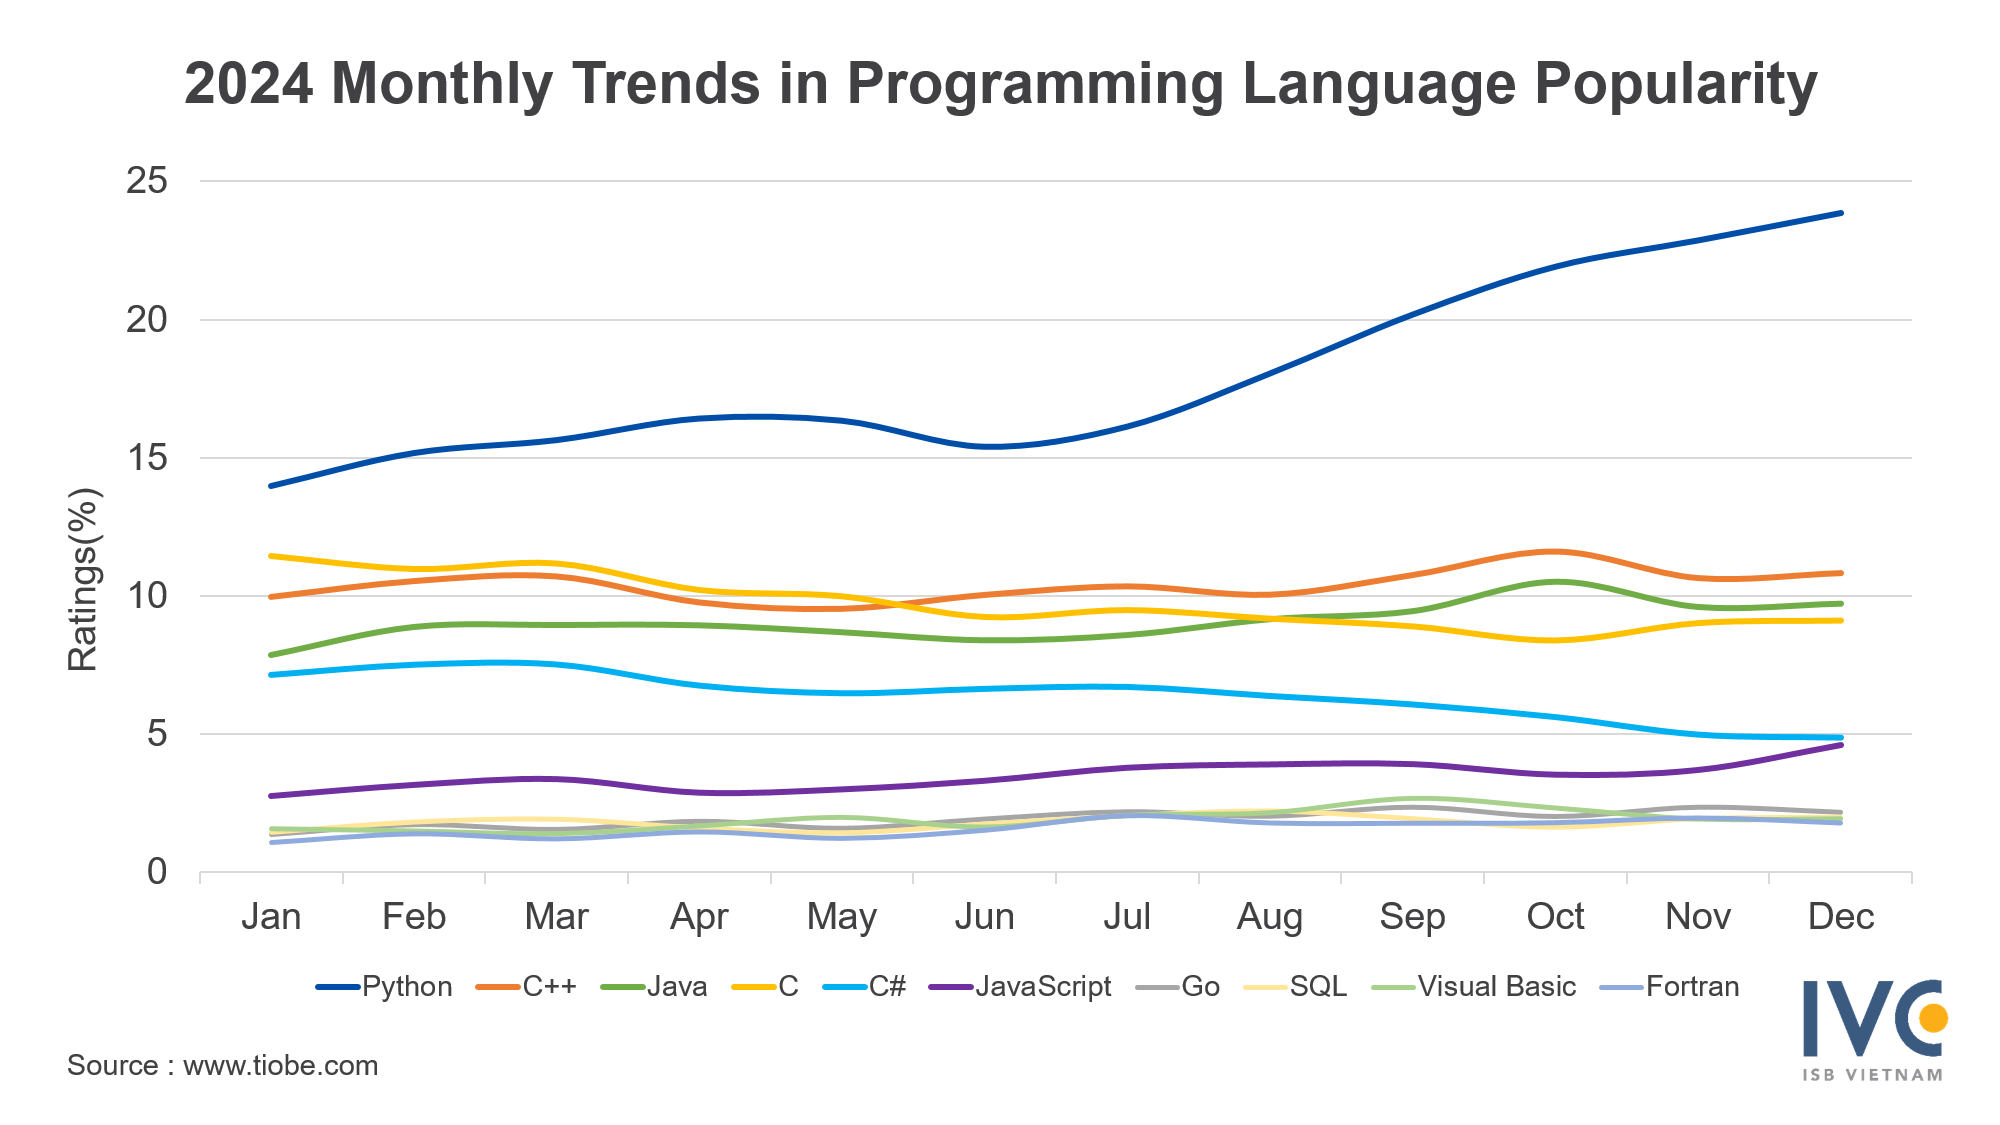
Python is widely used due to its varied frameworks like Django (35.1%), Pandas (31.0%), and Flask (19.1%). In areas like data processing and machine learning, libraries such as PyTorch (16.9%) and TensorFlow (11.4%) are among the top selections, reinforcing Python’s significance in AI development efforts. On an international scale, Python has earned recognition as the most favored programming language for 2024, resulting in increased demand.
Most popular programming languages in 2024
.NET/C#
In the .NET & C# space, .NET Core (46.2%), ASP.NET Core (37.0%), and .NET Framework (29.0%) dominate. While this category has seen little change in recent years, these frameworks remain central to enterprise and desktop application development in Vietnam.
PHP
In the landscape of PHP frameworks, Laravel stands out with considerable support from 60.5% of developers opting for it. It is followed by Symfony at 24.7% and CodeIgniter at 17.1%, illustrating that PHP remains relevant in crafting web applications.
Mobile Development
In mobile development, Java (50.2%) and Swift (30.5%) are the leading choices, enabling robust native application development for Android and iOS, respectively. Flutter (19.1%) and React Native (10.2%) also see significant adoption.
Database Technologies
MySQL (78.0%) remains the most widely used database technology, praised for its open-source reliability. Other popular options include SQL Server (59.9%) and MongoDB (36.1%), reflecting the diverse data management needs of Vietnamese developers.
DevOps and Cloud Platforms
Within DevOps practices, Linux reigns supreme with a substantial share of 76.5%, closely trailed by Docker at 52.7%. In terms of cloud platforms, AWS leads with a commanding presence of 38.3%, while Azure accounts for 25.2% and VMWare captures 17.1%. These tools play an essential role in enhancing modern development environments and ensuring they can scale effectively.
Detailed Tech Stack Data of Vietnamese Software Developers
All this data consists of breakdowns of some of the most popular technology stacks among Vietnamese software developers, namely, the browser, tools, frameworks, and platform that dominate in each category. According to the presented report, these statistics provide insight into the preferences and expertise of Vietnamese developers.
*The numbers in () indicate the popularity
- Javascript: Bun (64.30%), NodeJS (48.20%), Angular (45.10%), ReactJS (36.0%), Typescript (32.9%), Vue (31.4%)
- Java: Spring Boot (45.20%), Hibernate (7.00%), Struts (1.20%), Vaadin (1.20%)
- Python: Django (35.10%), Pandas (31.00%), Flask (19.10%), PyTorch (16.90%), TensorFlows (11.40%)
- .NET/ C#: .Net core (46.20%), ASP.Net core (37.00%), .Net framework (29.00%), ASP.Net MVC (16.50%), Xaramin (0.70%)
- PHP: Laravel (60.50%), Symfony (24.70%), CodeIgniter (17.10%), Yii (4.50%), CakePHP (4.00%)
- Mobile Development: Java (50.20%), Swift (30.50%), Flutter (19.10%), React Native (10.20%), Kotlin (3.80%)
- Database technologies: MySQL (78.00%), SQL Server (59.90%), MongoDB (36.10%), PostgreSQL (31.40%), Redis (21.90%)
- DevOps: Linux (76.50%), Docker (52.70%), Bash (11.90%), Kubernetes (10.30%)
- Cloud Platform: AWS (38.30%), Microsoft Azure (25.20%), VMWare (17.10%), Firebase (14.60%), Google Cloud Platform (8.60%)
Conclusion
This article has explored the various dimensions of Vietnam’s software developers, providing insights into its workforce, technical expertise, and evolving trends. Drawing from the Vietnam IT Market Report 2024–2025 and industry data, the following key points summarize Vietnam’s position in the global IT landscape.
Dynamically Growing and Evolving Workforce
Vietnam has a youthful and growing pool of software developers with many in the 20-29 age range. Because of a developing industry, the workforce is mostly composed of junior-level developers, with a gradual increase shown of mid-level and experienced developers. Government initiatives and much attention paid to IT education are driving this development.
Wide range of tech stacks
The effectiveness of Vietnamese developers with a range of programming languages and frameworks makes them distinguished not only on the commonly used technologies such as JavaScript and Python, but also for specialized tools for mobile development, cloud platforms, and DevOps. Developers are flexible enough to handle a variety of industry needs, the report emphasized, and have been able to embrace modern technologies and keep pace with recent trends.
An Excellent Outsourcing Destination
International rankings such as Kearney's Global Services Location Index and Accelerance's outsourcing reports highlight Vietnam's prestige for offshore software outsourcing. These rankings reaffirm that Vietnam is on the path to an eye-catching career in the global IT ecosystem.
About ISB VIETNAM
As a leading provider of software development and offshore services, we have specialized in delivering high-quality, cost-effective solutions to our partners for the past 20 years.
ISB Vietnam is proud to have a team of highly skilled software developers based in Vietnam, known for their technical expertise and commitment to excellence. Leveraging a vast network of developers both within Vietnam and across the globe, we are uniquely positioned to deliver tailored software development solutions that meet the diverse needs of our clients.
For any inquiries related to IT Outsourcing Solutions, we are the right partner.
Don’t hesitate to contact us to discuss how we can work together to make your project a success.