In software development, writing unit tests is an effective technique for developers to ensure the quality of their source code. There are many popular testing frameworks, such as Cypress, Vitest, Jest, Mocha, etc. In this article, I will guide you through writing unit tests using Vitest, a modern framework that leverages the speed of Vite.
This guide will walk you through, step-by-step, how to write robust unit tests for quite common scenarios in a modern Vue 3 + TypeScript application: get data from API and fetching data to populate a table. Finally, we'll learn how to measure the effectiveness of our tests using Code Coverage.
Assume that we have a page that displays a list of users when opened. The data is fetched from an API.
During the data fetching process, a loading icon is displayed and is hidden once the data retrieval is complete.
The example source code is as follows:
The content of the component that displays the user list. To keep this article from being too long, you are free to define the CSS yourself.
src/components/UserTable.vue
<template>
<div class="user-table-container">
<h2>User List</h2>
<divv-if="loading"class="loading-message">
<div class="spinner"></div>
<span>Loading users...</span> </div>
<div v-if="error" class="error-message">
<p>Error: {{ error }}</p>
<p>Please try again later.</p>
</div>
<table v-if="users.length > 0" class="user-table">
<thead>
<tr>
<th>ID</th>
<th>Name</th>
<th>Email</th>
</tr>
</thead>
<tbody>
<tr v-for="user in users" :key="user.id">
<td>{{ user.id }}</td>
<td>{{ user.name }}</td>
<td>{{ user.email }}</td>
</tr>
</tbody>
</table>
<p v-else-if="!loading && !error" class="no-users-message">No users found.</p>
</div>
</template>
<script setup lang="ts">
import { fetchUsers, type User } from '@/services/userService';
import { ref, onMounted } from 'vue';
const users = ref<User[]>([]);
const loading = ref(true);
const error = ref<string | null>(null);
onMounted(async () => {
error.value = null;
try {
users.value = await fetchUsers();
} catch (e: any) {
error.value = e.message;
} finally {
loading.value = false;
}
});
</script>
Here is the content for our data service. For this example, we will be using the public API from JSONPlaceholder.
src/services/userService.ts
export interface User {
id: number;
name: string;
email: string;
}
export async function fetchUsers(): Promise<User[]> {
if (!response.ok) {
throw new Error('Failed to fetch users from JSONPlaceholder');
}
return response.json();
}
Let's now begin writing the unit tests for our two source files, UserTable.vue and userService.ts.
Setting up the environment for unit testing
First, open your terminal and run the following command:
Bash
npm install -D vitest @vue/test-utils jsdom
Next, open your vite.config.ts file and add the configuration for Vitest:
vite.config.ts
import { defineConfig } from 'vitest/config'
import { fileURLToPath, URL } from 'node:url'
import vue from "@vitejs/plugin-vue";
export default defineConfig({
plugins: [vue()],
resolve: {
alias: {
'@': fileURLToPath(new URL('./src', import.meta.url))
},
},
test: {
coverage: {
reporter: ['text', 'json', 'html'],
},
globals: true,
environment: 'jsdom',
},
})
Next, add below test script to your package.json:
package.json
{
"scripts": {
...................
...................
...................
"test:unit": "vitest",
"test:unit:coverage": "vitest run --coverage",
"test:unit:ui": "vitest --ui --coverage"
}
}
Finally, install vitest ui to view Code Coverage result.
Bash
npm install -D @vitest/ui
Our environment is now ready for testing.
Create and implement tests for UserTable.vue and userService.ts.
Create a tests folder alongside the src directory that mirrors its structure.
tests/components/UserTable.spec.ts
import { mount, flushPromises } from '@vue/test-utils';
import UserTable from '../../src/components/UserTable.vue';
import * as userService from '../../src/services/UserService';
import type { User } from '../../src/services/UserService';
import { beforeEach, afterEach, describe, expect, it, vi } from 'vitest';
describe('UserTable.vue', () => {
// Declare global variables to control the Promise
let resolveFetchUsers: (value: User[]) => void;
let rejectFetchUsers: (reason?: any) => void;
// Configure mock before each test
beforeEach(() => {
vi.restoreAllMocks(); // Ensure a clean state before each test
// Create a pending promise and store its resolve/reject functions.
// `fetchUsers` will be mocked to return this promise.
const pendingPromise = new Promise<User[]>((resolve, reject) => {
resolveFetchUsers = resolve; // Store the resolve function
rejectFetchUsers = reject; // Store the reject function
});
vi.spyOn(userService, 'fetchUsers').mockImplementation(() => pendingPromise);
});
// Test Case 1: Initial loading state
it('should display a loading state initially', () => {
// Since loading.value is true from the start in the component,
// the loading state will appear immediately after mount.
const wrapper = mount(UserTable);
// Now, the loading state should be present for us to assert
expect(wrapper.find('.loading-message').exists()).toBe(true);
expect(wrapper.text()).toContain('Loading users...');
// Ensure other sections are not displayed
expect(wrapper.find('table').exists()).toBe(false);
expect(wrapper.find('.error-message').exists()).toBe(false);
});
// Test Case 2: Successful API call and rendering of user data
it('should render a table of users on a successful API call', async () => {
const mockUsers: User[] = [
{ id: 1, name: 'Alice Smith', email: 'alice@example.com' },
{ id: 2, name: 'Bob Johnson', email: 'bob@example.com' },
{ id: 3, name: 'Charlie Brown', email: 'charlie@example.com' },
];
const wrapper = mount(UserTable); // Component mounts and fetchUsers starts (pending)
// Trigger the Promise to resolve successfully with mock data
resolveFetchUsers(mockUsers);
// Wait for all Promises to resolve and the component to update the DOM
await flushPromises();
// Assert successful outcome
expect(wrapper.find('.loading-message').exists()).toBe(false);
expect(wrapper.find('.error-message').exists()).toBe(false);
const table = wrapper.find('table.user-table');
expect(table.exists()).toBe(true);
const rows = wrapper.findAll('tbody tr');
expect(rows).toHaveLength(mockUsers.length);
expect(rows[0].text()).toContain('Alice Smith');
expect(rows[0].text()).toContain('alice@example.com');
});
// Test Case 3: Handling API call failure
it('should display an error message on a failed API call', async () => {
const errorMessage = 'Failed to connect to server';
const wrapper = mount(UserTable); // Component mounts and fetchUsers starts (pending)
// Trigger the Promise to be rejected
rejectFetchUsers(new Error(errorMessage));
// Wait for the Promise to be rejected and the component to update the DOM
await flushPromises();
// Assert error outcome
expect(wrapper.find('.loading-message').exists()).toBe(false);
expect(wrapper.find('table').exists()).toBe(false);
const errorDiv = wrapper.find('.error-message');
expect(errorDiv.exists()).toBe(true);
expect(errorDiv.text()).toContain('Error: ' + errorMessage);
});
// Test Case 4: Handling an empty array from API
it('should display "No users found" if API returns an empty array', async () => {
const wrapper = mount(UserTable); // Component mounts and fetchUsers starts (pending)
// Trigger the Promise to resolve with an empty array
resolveFetchUsers([]);
// Wait for the Promise to resolve and the component to update the DOM
await flushPromises();
// Assert no user found outcome
expect(wrapper.find('.loading-message').exists()).toBe(false);
expect(wrapper.find('.error-message').exists()).toBe(false);
expect(wrapper.find('table').exists()).toBe(false);
expect(wrapper.text()).toContain('No users found.');
expect(wrapper.find('.no-users-message').exists()).toBe(true);
});
});
tests/services/UserService.spec.ts
import { fetchUsers, type User } from '../../src/services/UserService'; // Adjust path if needed
import { beforeEach, afterEach, describe, expect, it, vi } from 'vitest';
describe('userService', () => {
// Variable to store the Spy object for the global fetch function
let fetchSpy: vi.SpyInstance;
// Runs before each test case
beforeEach(() => {
// Reset all mocks and spies to ensure each test case is independent
vi.restoreAllMocks();
// Create a spy on the global `fetch` function. This allows us to control its behavior.
fetchSpy = vi.spyOn(global, 'fetch');
});
// Runs after each test case (vi.restoreAllMocks is already in beforeEach, but can be kept for robustness)
afterEach(() => {
// Restore the original `fetch` function after the test is done
vi.restoreAllMocks();
});
// Test Case 1: Check fetch users successfully
it('should fetch users successfully', async () => {
// 1. Prepare mock data that `fetchUsers` should return
const mockUsers: User[] = [
{ id: 1, name: 'Alice Smith', email: 'alice@example.com' },
{ id: 2, name: 'Bob Johnson', email: 'bob@example.com' },
];
// 2. Mock the `fetch` response
// `mockResolvedValueOnce` will make this `fetch` call return a successful Promise
// with a simulated Response object.
fetchSpy.mockResolvedValueOnce({
ok: true, // `response.ok` will be true
json: () => Promise.resolve(mockUsers), // The json() function will return the mockUsers data
status: 200,
statusText: 'OK',
} as Response); // Type assertion for Response properties
// 3. Call the `fetchUsers` function to be tested
const users = await fetchUsers();
// 4. Assertions
// Check if `fetch` was called exactly once
expect(fetchSpy).toHaveBeenCalledTimes(1);
// Check if `fetch` was called with the correct URL
expect(fetchSpy).toHaveBeenCalledWith('https://jsonplaceholder.typicode.com/users');
// Check if `fetchUsers`'s return value matches the mock data
expect(users).toEqual(mockUsers);
});
// Test Case 2: Check throw an error if fetching users fails
it('should throw an error if fetching users fails (e.g., HTTP 404/500)', async () => {
const errorMessage = 'Failed to fetch users from JSONPlaceholder';
// 1. Mock the `fetch` response to indicate an error (response.ok is false)
fetchSpy.mockResolvedValueOnce({
ok: false, // `response.ok` will be false
status: 404,
statusText: 'Not Found',
json: () => Promise.resolve({ message: 'Resource not found' }), // Return JSON for the error
} as Response);
// 2. Assert that the function throws the expected error
await expect(fetchUsers()).rejects.toThrow(errorMessage);
// Still check if `fetch` was called
expect(fetchSpy).toHaveBeenCalledTimes(1);
});
// Test Case 3: Check throw an error if there is a network issue
it('should throw an error if there is a network issue (fetch itself fails)', async () => {
const networkError = new Error('Network request failed');
// 1. Mock `fetch` to throw an error directly (simulating a network error)
fetchSpy.mockRejectedValueOnce(networkError);
// 2. Assert that the function throws that network error
await expect(fetchUsers()).rejects.toThrow(networkError);
// Still check if `fetch` was called
expect(fetchSpy).toHaveBeenCalledTimes(1);
});
});
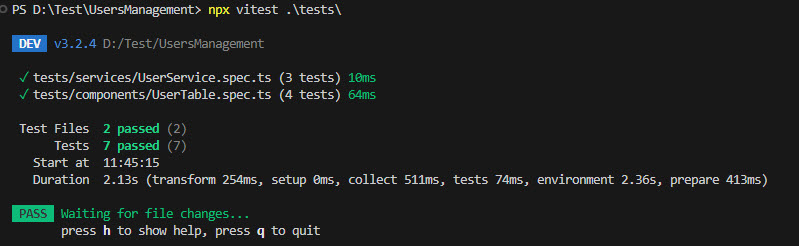
Now, we will execute all of our test cases. If any errors occur, we will fix them. The goal is to ensure that all test cases pass.
Bash
npx vitest .\tests\
The test results for the two files are shown in the image below:
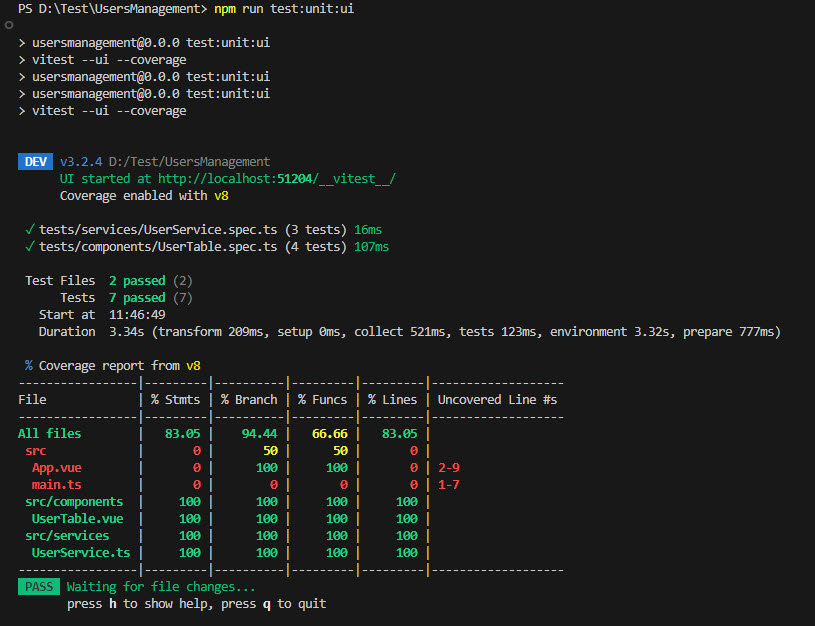
Measuring Your Test Coverage
Let's review the code coverage results. The closer the percentage is to 100%, the more comprehensive the unit tests are.
Bash
npm run test:unit:uinpx vitest .\tests\
The coverage results for the two source files are shown in the image below:
Conclusion
In summary, this article has guided you through writing unit tests for two Vue.js source files for a single feature using Vitest.
For official documentation, please refer
hereI hope this guide will help you better understand this testing framework.
References